Can’t Connect to 5GHz WiFi on Windows 11: How to Force It
Apply these quick tips if you fail to connect to a 5Ghz WiFi
Key notes
- Some Windows 11 users may not be able to find the 5 GHz WiFi SSID due to incompatible drivers, problems with the router or adapter, or any internal bugs.
- You can try forcing your PC to connect to a 5Ghz band; however, that may not work if something is wrong.
- Running the network adapter troubleshooter could help, though you should check out the other methods from this article to solve 5 GHz WiFi connection issues.

If you can’t connect to 5GHz WiFi on Windows 11, you are not alone. To avoid network overlapping and to gain a more stable and speedy wireless connection, 5 GHz has been a new standard for WiFi.
However, due to some limitations, many users can’t connect or find the 5GHz WiFi SSID on Windows. Keep in mind that this problem is not like the WiFi option disappearing problem.
Why can’t I connect to the 5GHz WiFi from Windows 11?
- Incompatible adapter: If the latest Windows do not support the WiFi adapter or it is incompatible, your 5G WiFi will keep dropping, fail to connect altogether, or it may be why you can’t connect or find a specific SSID.
- Incompatible router: If there is a problem with your router, the problem may happen, so you might have to power cycle it.
- Incorrect settings: Note that improper settings on both the PC and router may trigger this problem.
- Driver problem: Keep in mind that a proper driver is a must to make your 5GHz wireless adapter work properly.
- Windows 11 bug: If there is a bug on Windows, you can encounter various connectivity issues. Some of the below procedures will help you in this regard.
- The adapter has an internal problem: The root of the problem can also be the wireless adapter you are using.
How can I check if my computer supports the 5 GHz wireless band?
- Press Win + X on the keyboard and click on Terminal.
- Type the following command and hit Enter:
netsh wlan show drivers
If you see that it is 5 GHz mentioned in the supported band section, it means your PC has the capability. However, for some adapters, you may see different information. In this case, you should look at the Radio type section.
If you see 802.11a and 802.11g, 802.11n, and 802.11ac, the network adapter supports both 2.4 and 5 GHz bands.
How to switch to 5GHz WiFi in Windows 11?
You can forcibly switch to 5Ghz WiFi on Windows 11 to solve this problem. However, before that, we recommend you check out these things:
- Make sure Windows is up to date.
- Ensure that your wireless adapter driver is up to date. If necessary, use Outbyte Driver Updater to update the drivers.
- Restart your PC and also power cycle your router.
- Make sure your WiFi router supports the 5Ghz band, and doesn’t have any other issues. If needed, check out these 5GHz WiFi routers.
- Ensure that the adapter supports the specific 5Ghz band your router is using.
- At last, you must make sure that all wireless and networking settings are correct on your PC and router.
After that, you can go through the following methods to fix can’t connect to 5Ghz WiFi in Windows 11.
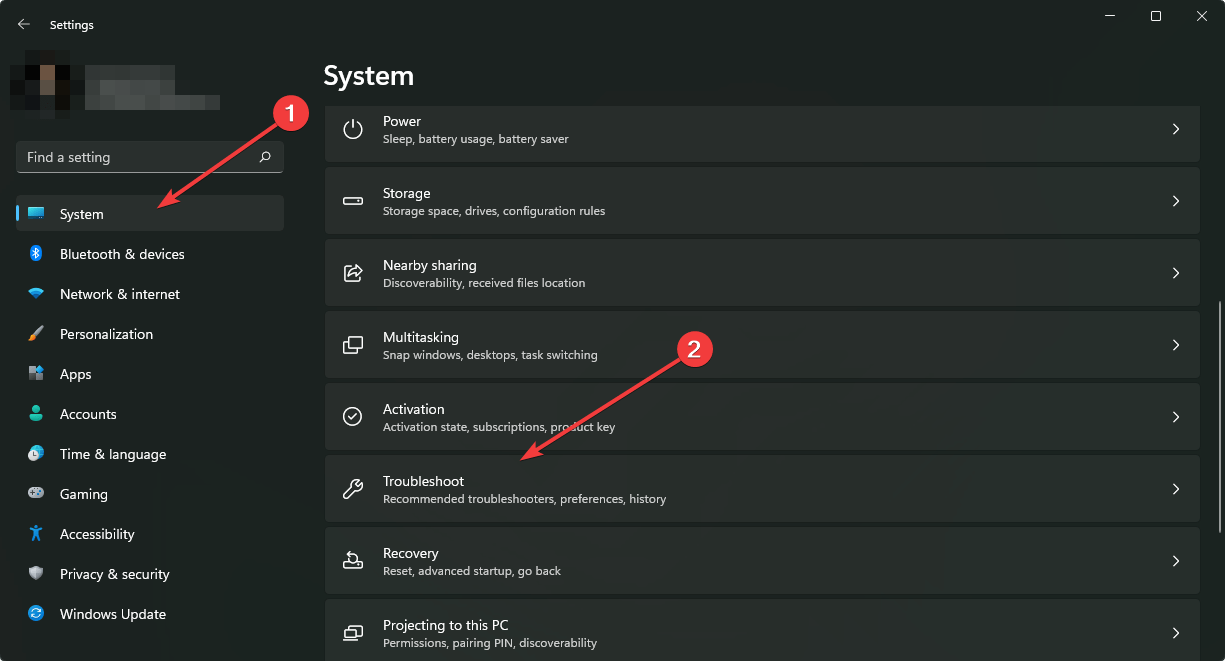
1. Run the Network Adapter troubleshooter
- Press Win + I on the keyboard to open Windows 11 Settings.
- Go to System and then click on Troubleshoot.
- Navigate to the Other troubleshooters.
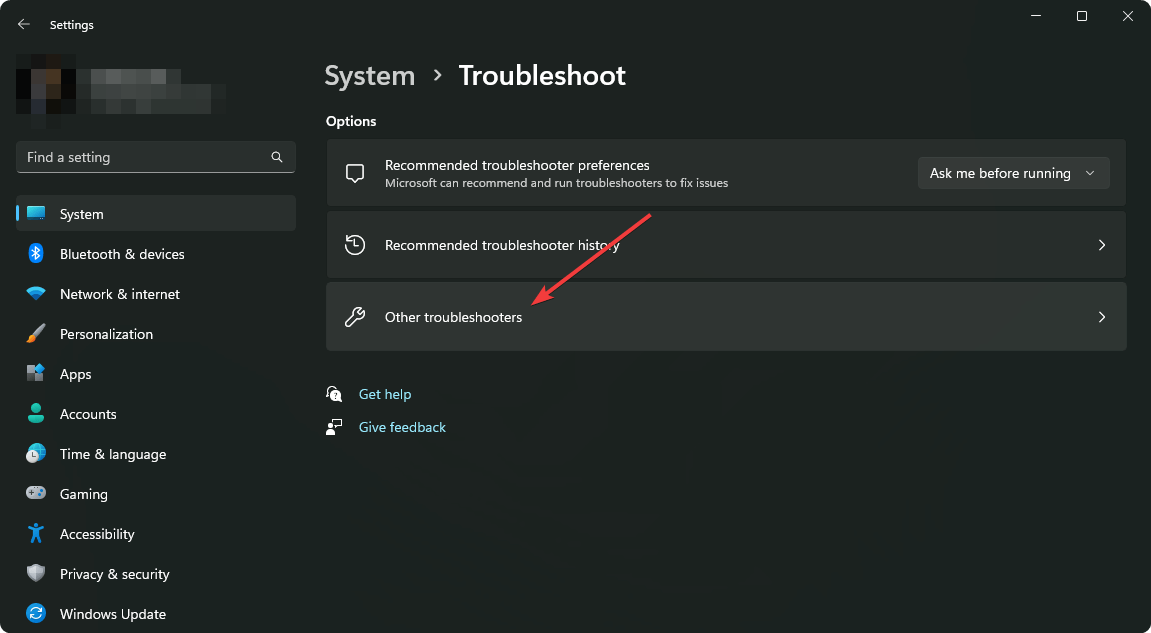
- Find the Network Adapter and click on Run next to it.

- Select your WiFi adapter and click on Next.

- Follow the on-screen steps to complete the troubleshooting process.
2. Set 5Ghz preference
- Press Win + X on the keyboard and click on Device Manager.
- Expand Network adapters.
- Right-click on your wireless adapter and go to its Properties.

- Go to the Advanced tab.
- Find an option like Wireless Mode and select the 5Ghz band.

- Click on OK.
You may directly see the 5 GHz option. However, for some adapters, there may be different IEEE standard names, like IEEE 802.11ac. Select these options and see which one works. It should solve can’t connect to the 5GHz WiFi on Windows 11 issue.
We have another article that explains this method in more detail, so learn how to change the network band on Windows 11.
3. Disable and re-enable the wireless adapter
- Open the Device Manager like before.
- Right-click on your wireless adapter and click on Disable.

- Next, right-click on the adapter again and choose Enable.
4. Reset TCP/IP
- Open the Terminal like before.
- Type the following command and press Enter:
netsh winsock reset
- Then, run the following commands one by one:
netsh int ip reset
ipconfig /release
ipconfig /flushdns
ipconfig /renew
After that, try to connect to the 5Ghz wireless network and see if it works.
5. Re-install the wireless adapter
5.1 Uninstall the WiFi adapter
- Like methods 2 and 3, open the Device Manager and expand Network Adapters.
- Right-click on the wireless adapter and choose Uninstall.

- Tick Attempt to remove the driver for this device and click on Uninstall.
5.2 Install the adapter
- Go to your wireless adapter or computer manufacturer’s website.
- Download the appropriate driver.

- Install it on your PC.
Alternatively, you can use an automated driver updater to install any missing drivers on your PC.
After re-installation, it should solve the problems with 5GHz WiFi connectivity on your PC. However, in some cases, you may need to consider resetting Windows 11. If necessary, you also can do a clean installation.
If interested, learn if you can clean install Windows after upgrading.
This article has explained how you can fix can’t connect to a 5GHz wireless network on Windows 11. If you have any suggestions, feel free to let us know in the comment box.
Read our disclosure page to find out how can you help Windows Report sustain the editorial team. Read more


Improve this guide


User forum
0 messages