[Fixed] CPU Fan Error on Boot: Asus, Megatrends
Follow our quick fixes for CPU fan error on boot
4 min. read
Updated on
Read our disclosure page to find out how can you help Windows Report sustain the editorial team. Read more
Key notes
- You can add a variety of cooling fans to your PC casing but the CPU fan is essential and irreplaceable. That’s why it’s hard to ignore the CPU fan error on boot.
- This error usually points to either a malfunction of the CPU fan or underperforming in regards to RPM.
![how to fix CPU fan speed error on boot [Asus, Megatrends]](https://windowsreport.com/wp-content/uploads/2020/04/Fix-CPU-fan-speed-error-on-boot-886x590.jpg)
You can add a variety of cooling fans to your PC casing, but the CPU fan is essential and irreplaceable.
That’s why it’s hard to ignore the CPU fan error on the boot that some users keep getting. That error usually points to a malfunction of the CPU fan or underperforming RPM.
We have a few tips on resolving the error without too much hustle. Check them out below.
Why does my BIOS say CPU fan error?
An error that occurs at startup caused by the central processing unit (CPU) fan is frequently the result of physical damage to the fan itself, faulty settings, or external circumstances that cause the computer to overheat and force the fan to spin at speeds that are exceptionally high.
Alternatively, errors with the computer’s central processing unit (CPU) fan might be brought on by dirt or other debris that obstructs the device’s air vents.
How do I fix CPU fan speed error?
Before moving on to more complex solutions, make sure to do the following:
- Remove the fan and clean the dust. You can use pressurized air to clean it.
- If you installed an AIO liquid CPU cooler, check to see that the Pump was plugged into the AIO PUMP port and that the AIO Radiator Fans were plugged into the CPU FAN port.
- Check to see that the CPU cooler is correctly attached to the motherboard and that the fan of the CPU cooler is specifically hooked into the CPU FAN header.
- To reduce the CPU temperatures, re-apply the thermal paste.
- Disable overclocking and custom fan curves
- Move your PC to get adequate ventilation
1. Update BIOS
1. Download the newest BIOS version from your motherboard manufacturer’s website and copy it onto an USB flash drive.
2. Open the Start Menu then click the Power button. Hold the Shift key and choose the Restart option.
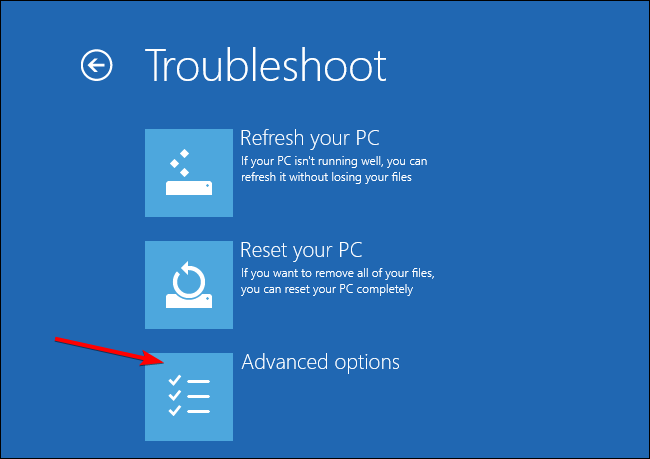
3. You should see several options available. Choose Troubleshoot followed by Advanced options.
4. Select UEFI Firmware Settings.
5. Click the Restart button and your computer should now boot to BIOS.
6. Once you enter BIOS, look for the BIOS update option and select it.
7. Now you need to choose the BIOS update file from your USB flash drive and wait while your BIOS updates.
It’s more likely to work out CPU fan error on boot by accessing your BIOS and update the firmware of your Windows PC.
For more details about your computer’s BIOS, check out our dedicated guide on how to check the BIOS and update it.
2. Lower the default fan RPM in BIOS
- To fix the CPU fan speed error detected boot into BIOS on your PC.
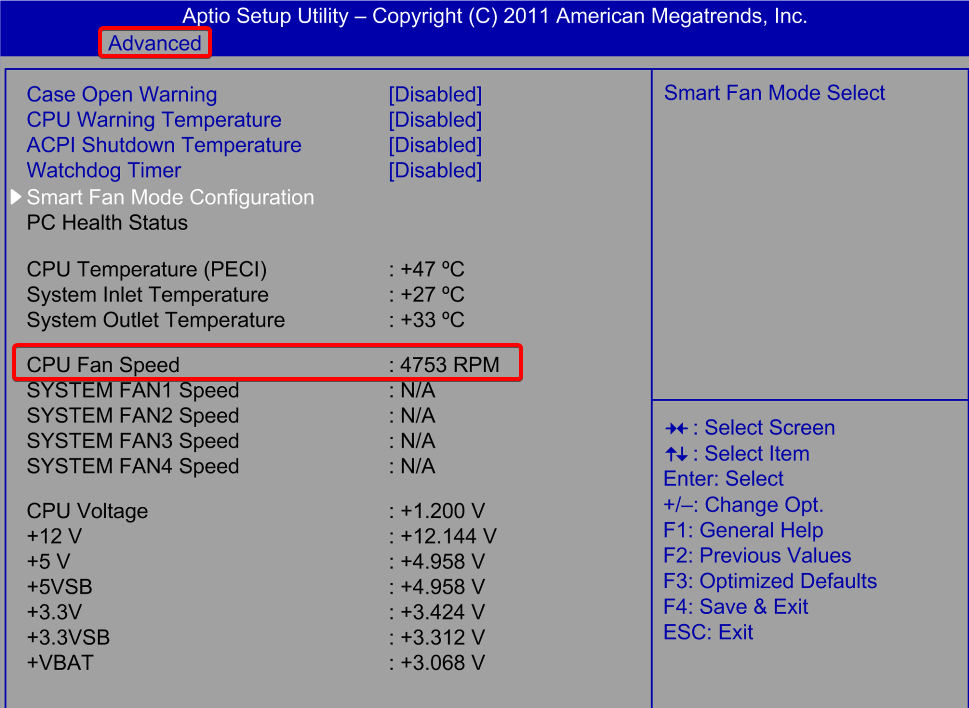
- Navigate to CPU Fan settings. The sections might differ based on your motherboards. The important thing is to look for anything related to the CPU Fan control, usually found in the Advanced settings menu. Now, locate the setting that regulates RPM warnings. The default value should be around 600 RPM (rotations per minute).
- Lower the default value to 300 RPM and save changes.
- Exit BIOS and boot into the system. This is one of the best solutions for the Asus motherboard CPU fan error.
3. Disable CPU Fan speed monitoring in BIOS
- Boot into BIOS. Navigate to the aforementioned Advanced settings.
- Look for the Monitoring (Monitor) section.
- Change the CPU Fan Speed to Ignore and confirm changes.
- Boot into Windows and look for improvements.
After that, the CPU fan press F1 error should be gone. However, if the issue persists, take your PC for diagnostics and repair.
4. Try another CPU fan header
In some cases, your PC might have more than one CPU fan header. If you face the CPU fan error, it might be because the header you are using is faulty.
The best thing to do in this case is to try another header. Also, ensure the fan is connected to the correct location (i.e., the fan header).
5. Check other fans
Sometimes, you need to verify if your CPU fan is working well. To do this, you need to try other fans compatible with your PC.
Just make sure you connect it to the header and that the area is well-ventilated.
6. Replace the CPU fan
If the fixes above fail to solve the CPU fan error, you might need to go for broke and replace the fan. This is especially true if you tested your PC with other fans, and they worked without error.
The only thing you need to take care of is the compatibility of the fan with your PC and that you get the connection right.
What will happen if the CPU fan fails?
Central processing units that have dead fans will overheat. When a computer’s central processing unit (CPU) gets too hot, there are normally built-in safeguards that will either shut it down or slow it down to prevent it from exploding.
However, suppose the computer protections fail or don’t kick in quickly enough. In that case, the central processing unit (CPU) could reach temperatures above its maximum operating temperature and burn out.
To learn more about this issue, our CPU fan is not spinning guide is a great place to start.
Check out how to lower high CPU temperature in Windows 10 & 11 to extend its lifespan.
Alternatively, you can replace the cooler, which isn’t a complex task. Did our article help you with the Asus water-cooling CPU fan error? Let us know by leaving a comment in the section below.


User forum
3 messages