How to delete windows.old straight from Settings in The Fall Creators Update
3 min. read
Updated on
Read our disclosure page to find out how can you help Windows Report sustain the editorial team. Read more

The Windows 10 Fall Creators Update brings a series of useful new features to the table, and many of them directly target the Settings page. Speaking of which, the revamped Settings page now allows users to delete the windows.old folder straight from Settings.
Prior to the Fall Creators Update, Windows users had to follow a series of steps to delete the windows.old folder. Thanks to the new feature, users can now access and delete this folder much easier and faster.
Delete previous versions of Windows from Storage Sense
Here’s how to delete windows.old from Settings in The Fall Creators Update:
1. Go to Start > type ‘settings‘ > select the first result to open the Settings page
2. Go to System > Storage
3. In the newly opened Storage Sense page, enable the option and click ‘Change how we free up space’
4. Under the ‘Free up space now’ section, check the option ‘Delete previous versions of Windows’ to delete the windows.old folder > click Clean now
The Fall Creators Update enhances the Storage Sense features to free up space and the new windows.old clean up is a very useful addition. At the same time, the OS tweaked the design of Storage Sense a bit to make everything fit together neatly.
If you want to try out the new features, you can enroll in the Windows Insider Program. For the time being, the new features are only available for Insiders. The general public will be able to use them starting September when Microsoft officially launches Windows 10 Fall Creators Update.
Meanwhile, here’s how you can delete the windows.old folder on older Windows versions:
How to remove the Windows.old folder
As a quick reminder, the Windows.old folder appears when you upgrade your version of Windows or perform a clean install of Windows 10. The role of this folder is to keep your previous Windows installation files so that you can to restore it. Here’s how to remove the Windows.old folder:
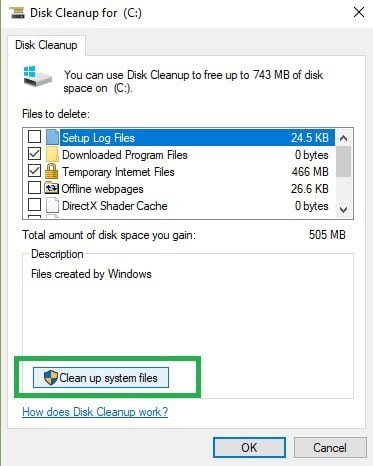
1. Type Disk Cleanup > select the drive where you installed the OS > select Clean up system files
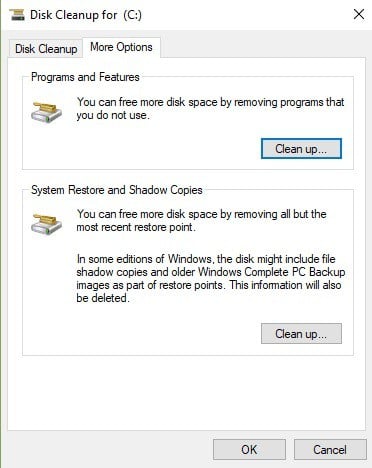
2. Wait for the utility to calculate how much space it can free up > on the new windows, click on the “More options” tab
3. Go to System Restores and Shadow copies > hit Clean up
RELATED STORIES YOU NEED TO CHECK OUT:
- Windows 10 Fall Creators Update adds one-handed touch keyboard support for tablets


User forum
0 messages