4 ways to recover your unknown device in Device Manager
Key notes
- PCI drivers are an important component needed to connect your computer to newly installed hardware.
- However, issues may arise with those drivers where your hardware appears as an 'Unknown device' in the Device Manager.
- This guide will show how to fix the Unknown device problem and download PCI drivers.

Peripheral Component Interconnect or PCI is the local computer bus needed to connect hardware devices to a computer’s motherboard, like an audio card. If the installation goes well, then you will see the PCI device in the Device Manager.
However, problems may arise. The PCI drivers may be corrupted or outdated which will cause those components on your PC to stop working. This is why you should keep your drivers updated.
Where do I find PCI drivers?
PCI drivers can usually be found under Other devices or System devices in the Device Manager app and may appear with a specific name or called Unknown device. The latter is because your computer doesn’t recognize it.

This guide will show how to recover your Unknown device and ensure they work on your Windows 11 computer. These solutions will also solve problems with the PCI Serial Port.
Windows 10 users have also run into the same problem in the past. For the older system, the solutions are similar to this guide as they both may require downloading drivers from the manufacturer.
How to recover my Unknown devices and update PCI drivers?
1. Download and update PCI drivers
- Click on the magnifying glass icon to bring up the search bar.
- Search for the Device Manager and click the entry that appears.

- You will have to search for the PCI drivers. They’re usually found under Other devices or System devices.
- For this guide, the PCI drivers are found under System devices so that will be selected.

- Scroll down and locate the PCI drivers.

- Right-click it to make a context menu appear. Select Update driver.
- A new window will appear with two choices: Search automatically for drivers and Browser my computer for drivers. Click the first one.

- Doing so will automatically update the PCI driver. If everything is up to date, you’ll get a message stating the best drivers are already installed.

- If the problem still persists, go to the Settings menu.
- Click on the Windows Update tab found in the left hand menu.

- If there’s an update available, install it.

- After installation, restart your PC as that should fix the problem.
- It’s recommended that you don’t select Browse my computer for drivers as all the choices there will be older drivers. You need new ones.
2. Update PCI driver from manufacturer’s website
- If the problem still persists or a yellow exclamation mark appears signifying that it isn’t recognized, then you’ll have to download the driver from the manufacturer.
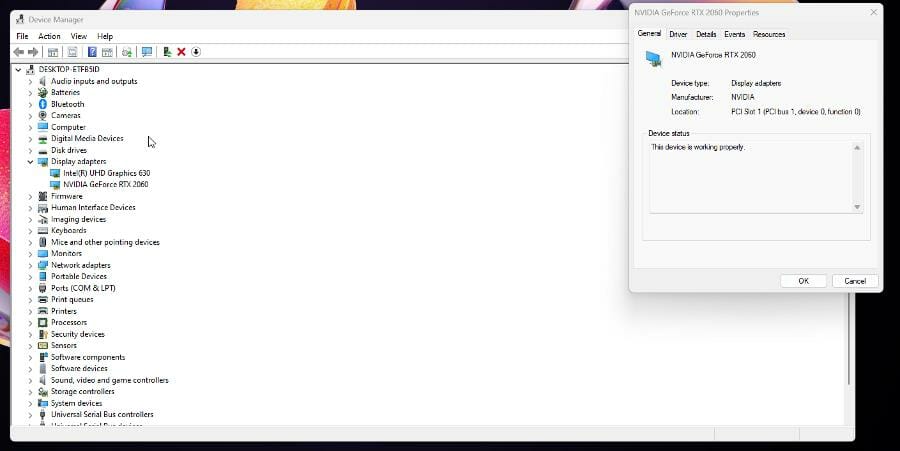
- Return back to the Device Manager and locate the problematic driver, might be called Unknown driver.
- Right click it to make the context menu appear and select Properties.

- In the Properties menu, click the Details tab.

- Click the drop down menu under Property.

- In the menu, select Hardware Ids.

- You will need to get the Hardware ID of the problematic driver which are the numbers after VEN_ and DEV_.
- VEN stands for Vendor ID and DEV stands for Device ID. The numbers will vary depending on your computer, but in this example, the numbers are 8086 and 15DA.

- Once you have those numbers, open a web browser and search for PCI Lookup. It’s a website telling you where you can find the PCI drivers that you need.

- Click the PCI Lookup result and you’ll see two bars where you can enter in the Vendor ID and Device ID numbers.
- Enter the ID numbers and hit Submit.

- Next, you will see the hardware that has the faulty driver. In this case, it’s the JHL6340 Thunderbolt 3 Bridge by Intel.

- Now that you know the specific name of faulty piece of hardware, search for its corresponding drivers in a web browser.
- As an example, “jhl6349 thunderbolt 3 driver” was typed into the search bar and the results show Intel’s page for the drivers.

- Click the corresponding result for your computer’s faulty driver and download it.

3. Update the PCI device driver automatically
There are third-party tools like Outbyte Driver Updater that can automatically update PCI drivers without the need for manual intervention.

Follow these steps to set up Outbyte Driver Updater to do this task for you:
- Install and launch Outbyte Driver Updater.
- Wait for the software to perform an initial analysis of your PC.
- Select the PCI device driver to update or fix.
- Wait for Outbyte Driver Updater to download and install the missing PCI drivers.
- Follow the PCI individual driver’s install instructions.
- Reboot your PC for the changes to take effect.
Otherwise, as seen in prior solutions, doing it manually takes time and needs extensive knowledge of the drivers you are looking for.
4. Other common PCI driver errors
The two solutions above will solve the majority of your problems with faulty PCI drivers. However, there are still a few solutions that you can try out if the previous one don’t work out.
| Run Hardware and Device Troubleshooter | The Troubleshooter has a good chance of solving driver problems by locating and fixing them automatically. |
| Run antivirus software | Malware may be getting in the way of your PCIs. It’s recommended that you run antivirus software to get rid of it. |
| Run SFC Scan | A System File Checker scan will zero in on the faulty driver and repair the problem right after with DISM. |
| Perform a Clean Boot | A Clean Boot will restart your computer with the bare bones set of apps and drivers, and should be a last ditch effort. |
| Contact technical support | When all else fails, contact the manufacturer’s technical support for further support. |
What I do if I run into other installation issues with the PCI drivers?
You may run into the infamous Blue Screen of Death. Errors like these may be caused by the PCI BUS DRIVER INTERNAL error. It’s an annoying problem that can be easily solved by updating drivers, but you may have to check your hardware.
Another failing may be attributed to the device needing further installation. This can be caused by poor driver management. Fortunately, the solutions for this problems are simple.
Feel free to leave a comment below if you have any questions on other Windows 11 apps. Also, leave comments about reviews that you’d like to see or information on other Windows 11 features.
Read our disclosure page to find out how can you help Windows Report sustain the editorial team. Read more


Improve this guide


User forum
0 messages