How to disable auto-login Windows 7 [Temporarily / Bypass]
Key notes
- Auto login is useful, but it's not safe to use, so you might want to disable auto login on Windows 7.
- To disable it, you need to modify user account settings, and enable the password requirement.
- If you're tech-savvy, you can achieve the same results but adjusting your registry.
- To temporarily disable auto login in Windows 7, you can use specialized tools from Sysinternals.
Having to enter a user password on each log in can be tedious, and many users choose to disable this feature. This isn’t advised from a security standpoint, and in this guide, we’ll show you how to disable auto login on Windows 7.
Although this guide focuses on Windows 7, these solutions are universal, and they should work in newer versions of Windows as well.
How do I disable automatic login/logoff in Windows 7?
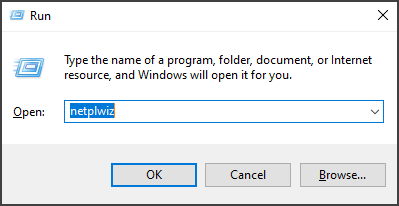
1.Enable or disable manually
- Press Windows Key + R and enter netplwiz. Press Enter or click OK.
- Check the Users must enter username and password to use this computer.
- Click on Apply and OK to save changes.
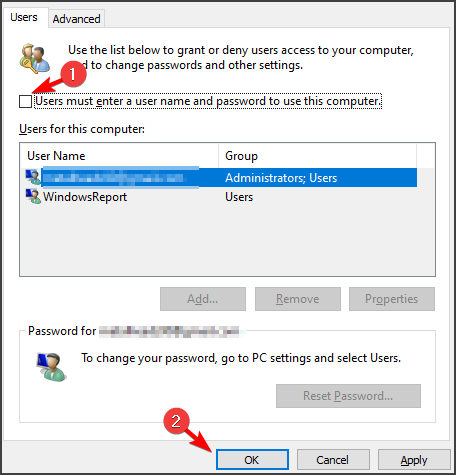
- If asked to enter the user password, be sure to do so.
By doing so, you’ll disable auto login on Windows 7. After changing these settings, users will be required to enter their passwords to log in to Windows.
2. Use Microsoft Autologon

- Download Autologon.
- Click on the file you downloaded, since it doesn’t require installation.
- Fill in the password in the empty box.
- Click on Enable or Disable.
- Hit Enter, then click Ok.
Microsoft Autologon is a software developed by Sysinternals, specially made for those who want to customize their login parameters.
The software allows you to easily configure the built-in login settings and disable auto login on Windows 7.
3. Disable logon from Redgedit
- Press Windows Key + R, enter regedit and press Enter.
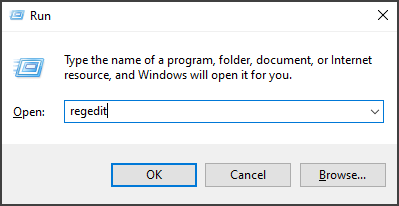
- After the Registry Editor opens, navigate to the code path
HKEY_LOCAL_MACHINE\SOFTWARE\Microsoft\Windows NT\CurrentVersion\winlogon - Find AutoAdminLogon and change its value to 0.

Note: This solution only works for those who already used Regedit to enable automatic Windows logon.
You should find the newly created AutoAdminLogon string, and change the value from 1 to 0 to disable auto login on Windows 7.
Keep in mind that working with Regedit is not recommended since it contains crucial strings and commands that will change the way your system works.
Auto login feature can be useful, and we have an in-depth guide on how to enable auto login on Windows 7, if you want to try it out.
This article showed you different ways in which you can disable auto login on Windows 7. Keep in mind that this solutions work on newer versions of Windows as well.
Feel free to give us any feedback regarding the subject in the comment section below.
Read our disclosure page to find out how can you help Windows Report sustain the editorial team. Read more


Improve this guide


User forum
0 messages