DVD Not Working in Windows 10/11? Here's how to fix it
9 min. read
Updated on
Read our disclosure page to find out how can you help Windows Report sustain the editorial team. Read more

If your DVD is not working, you might experience certain issues, especially if you have multimedia or other applications on DVD discs. This can be a problem for some users, and today we’re going to show you how to tackle this issue.
Many users, including myself, have been reporting problems with their DVDs in Windows 8 or Windows 8.1. If your DVD too is also not working, then follow the below steps needed to fix the problem.
Problems with the DVD drive not working in Windows 8 or Windows 8.1 are one of the most common and experienced by many users. We’re going to talk about this issue and try to offer some working solutions, as there are enough guides to help you get rid of it. The CD and DVD problems have occurred with Windows 8 more often than with Windows 8.1, so it seems that Microsoft has put an update in place.
My DVD drive installed Windows 8 and can also boot from DVD, but Windows 8 does not recognize the drive after the operating system is loaded. How can I get drivers loaded for this version of Windows? If I boot with the Windows 8 DVD in the drive, ignore the option to boot from the CD or DVD, when the OS loads, the drive is recognized and I can use it for that session. If I reboot without the DVD in the drive, it is gone again.
DVD drive not detected in Windows 10? Try these solutions
- Use Command Prompt
- Delete UpperFilters and LowerFilters DWORDs
- Run the troubleshooter
- Check your optical reader
- Change your group policy
- Reinstall your DVD drivers
- Install the necessary drivers manually
- Check for updates
There are many problems that can occur with your DVD drive, and in this article we’ll address the following issues:
- Windows 10 DVD drive not reading discs – Several users reported that their DVD drive isn’t reading discs. This is usually caused by a bad driver or a dirty optical sensor.
- DVD not playing Windows 10 – Several users reported that DVD isn’t playing on their Windows 10. This can be an annoying problem, but you should be able to fix it using one of our solutions.
- DVD drive not showing – Sometimes your DVD drive might not even show up on Windows 10. If that’s the case, be sure to check your drivers. In one of our previous article we showed you how to fix missing DVD drive, so be sure to check that article for detailed explanation.
- DVD writer not working properly – Several users reported that DVD writer isn’t working on their PC. If you have this problem, be sure to check your DVD configuration.
- DVD not, found playing, reading, recognized, detected, ejecting, responding, spinning, displaying files, loading – There are many problems that can occur with your DVD. However, you should be able to fix most of these problems by using one of our solutions.
- DVD not autoplaying Windows 10 – Many users reported that DVD AutoPlay isn’t working for them. In one of our previous articles we explained how to fix AutoPlay problems for DVDs, so be sure to check it out.
- DVD not appearing in my computer – Another problem that many users reported is that DVD isn’t appearing on their PC. This can occur if your DVD drive isn’t connected properly or if your drivers aren’t compatible with Windows 10.
1. Use Command Prompt
This is what one user is saying and many others are having similar problems like this one. Users affected by this problem said that they saw the following message: “Windows cannot start this hardware device because its configuration information (in the registry) is incomplete or damaged. (Code 19).” Now, let’s see what we can do to fix it. First of all, try the following:
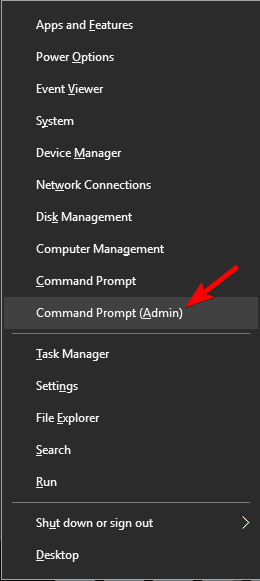
- Run Command Prompt as an administrator. To do that, right click the Start Button and choose Command Prompt (Admin) from the menu. If you don’t have Command Prompt on the list, you can also use PowerShell (Admin).
- Type reg.exe add HKLMSystemCurrentControlSetServicesatapiController0″ /f /v EnumDevice1 /t REG_DWORD /d 0x00000001 and press Enter.
After doing that, restart your PC and check if the problem is fixed.
2. Delete UpperFilters and LowerFilters DWORDs
If the previous solution didn’t fix your problem, then try checking if all the cables are properly put in place, just in case this might be caused by a rather stupid problem that you overlooked.
Also, you can check for the DVD drive in BIOS. After restarting the Windows 8/Windows 8.1 computer, enter the BIOS screen (usually by pressing F10 multiple times). If it is absent, then it is a hardware problem, and not a software one, and you’ll need to contact your vendor. Now, here’s another potential fix:
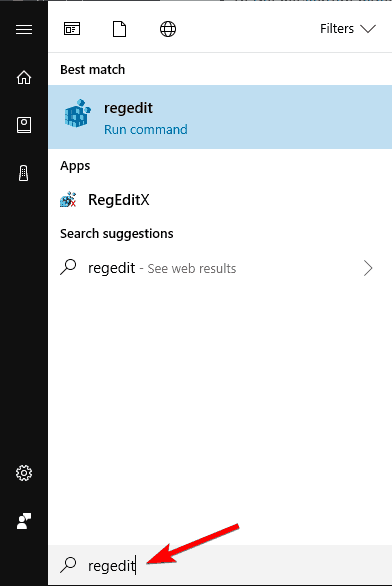
- Type regedit in the Search bar and press Enter.
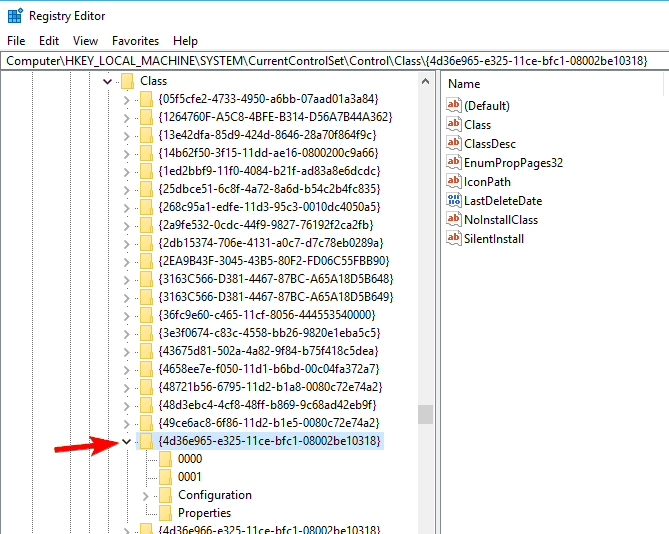
- In the navigation panel, locate and then click the following registry subkey: HKEY_LOCAL_MACHINESYSTEMCurrentControlSetControlClass{4D36E965-E325-11CE-BFC1-08002BE10318}.
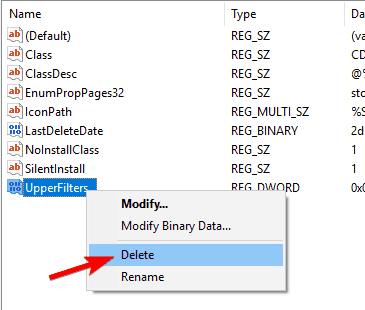
- In the right panel, locate one or both of the keys UpperFilters and LowerFilters. You can have only one, or you can have both. Select these keys, right-click them and choose Delete.
- When you are prompted to confirm the deletion, click Yes.
- Exit Registry Editor.
- Restart the computer.
3. Run the troubleshooter
Sometimes you might be able to fix the problem with the DVD drive simply by running the hardware troubleshooter. To do that, follow these steps:
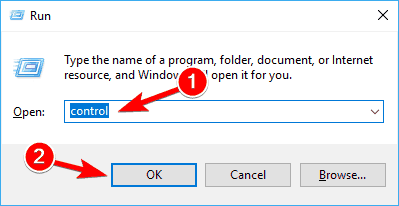
- Press the Windows Key + R to open the Run dialog box. Type control in the Run dialog box, then press Enter or click OK button.
- In the Search box in Control Panel, type troubleshooter, and then click Troubleshooting.
- Under the Hardware and Sound section, click on Configure a device. If you are prompted to enter an administrator password or provide confirmation, type the password or provide confirmation.
After the troubleshooter is finished, check if the problem still remains.
4. Check your optical reader
If your DVD is not working, the problem might be your optical reader. Sometimes the reader can move and remain in a new position causing this problem to appear.
To fix the issue, you need to use a small object and move it to the original position. Keep in mind that this is rather dangerous, and if you don’t know what you’re doing you can easily permanently damage your DVD drive and your PC.
Several users reported that cleaning their optical reader fixed the problem. There are many ways to do that, and the best one might be to open your DVD drive and clean it with a cue tip.
If you’re not comfortable with removing your DVD drive, you can always use a disc that comes with a small brush that automatically cleans your DVD.
If cleaning the DVD drive doesn’t work, your DVD might be faulty, and the only choice is to replace the entire DVD drive.
5. Change your group policy
According to users, if DVD is not working the problem might be related to built-in burning features. However, you can resolve this problem by making few changes in Group Policy Editor. To do that, follow these steps:
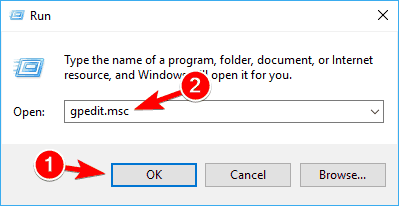
- Press Windows Key + R and enter gpedit.msc. Press Enter or click OK.
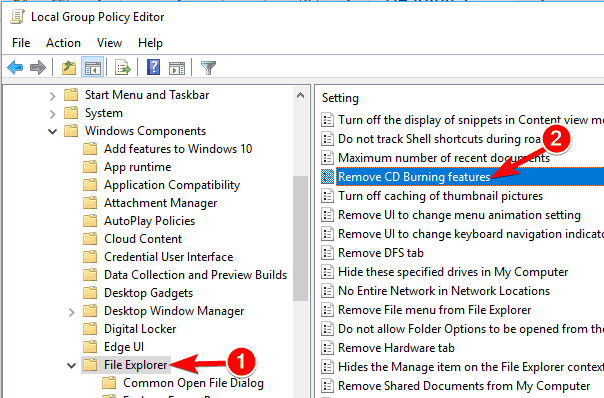
- In the left pane navigate to User ConfigurationAdministrative TemplatesWindows ComponentsFile Explorer. In the right pane, double click on Remove CD Burning features.
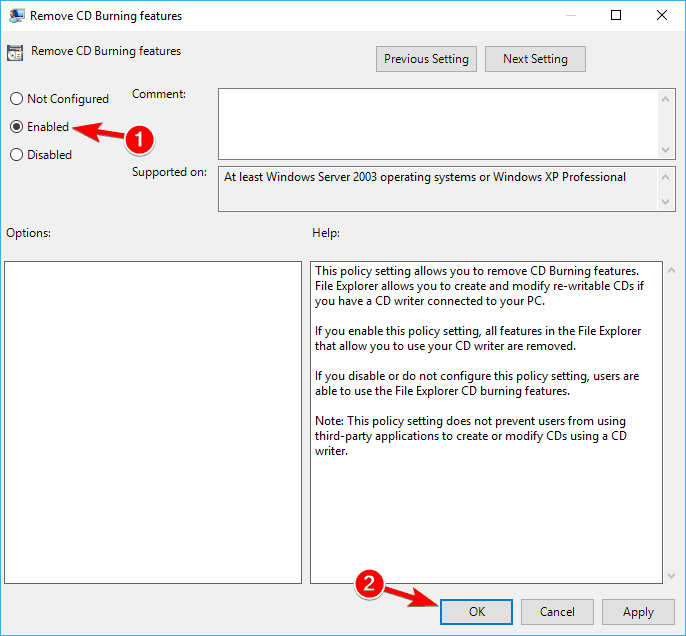
- When the Properties window opens, select Enabled and then click on Apply and OK.
If you can’t access Group Policy Editor, you can disable this feature using Registry Editor. To do that, follow these steps:
- Open Registry Editor.
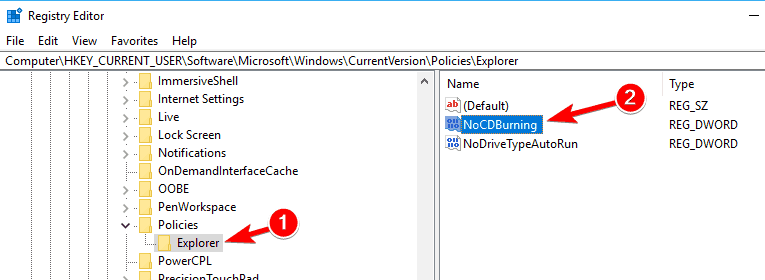
- In the left pane, navigate to HKEY_CURRENT_USERSoftwareMicrosoftWindowsCurrentVersionPoliciesExplorer key. In the right pane, look for NoCDBurning DWORD and double click it. If this DWORD isn’t available, you’ll need to create it manually.
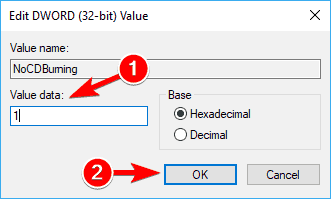
- Set the Value data to 1 and click on OK to save changes.
After making the changes, restart your PC and check if the problem is resolved.
6. Reinstall your DVD drivers
Few users reported that they fixed the problem simply by reinstalling their DVD driver. If DVD is not working, you can fix the problem by doing the following:
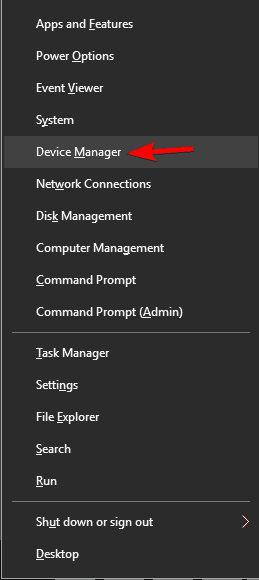
- Open Device Manager. You can do that by pressing Windows Key + X and choosing Device Manager from Win + X menu.
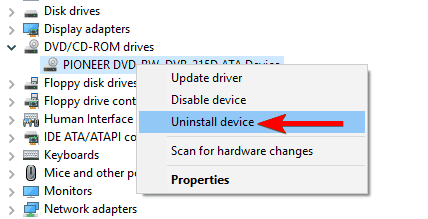
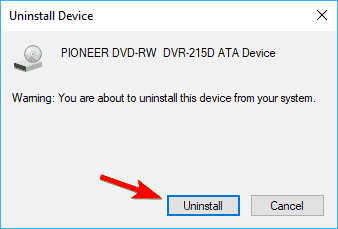
- When Device Manager opens, locate your DVD drive and right-click it. Choose the Uninstall device.
- When the confirmation menu appears click on the Uninstall button.
Once the driver is removed, restart your PC. When the PC restarts, Windows will automatically install the default driver and your DVD drive should start working again.
7. Install the necessary drivers manually
If your DVD isn’t working on Windows 10, the problem is most likely related to your drivers. This is a minor problem that can be fixed by manually installing the missing drivers. To do that, follow these steps:
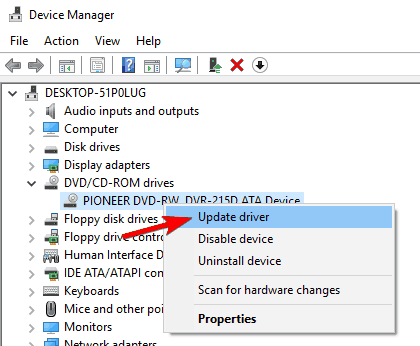
- Open Device Manager. Locate your DVD drive on the list. If there’s a small question mark or an exclamation mark next to it, it means that there’s a problem with your DVD drive.
- Right-click your DVD drive and choose Update driver.
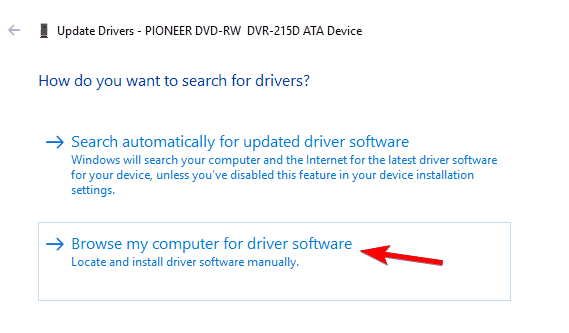
- Click on Browse my computer for driver software.
- Now click on Let me pick from a list of available drivers on my computer.
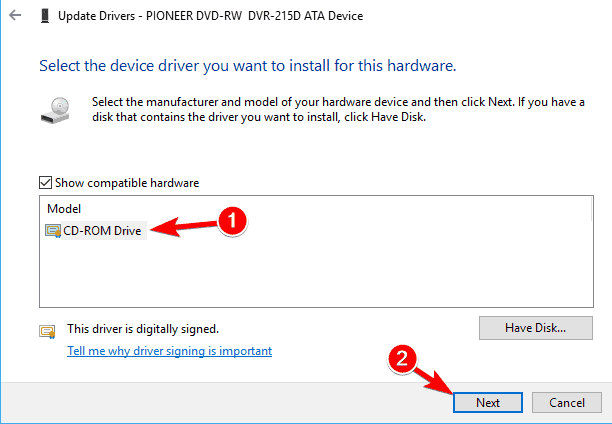
- Select the desired model from the list and click on Next.
After installing the driver manually, the problem with your DVD drive should be resolved.
8. Check for updates
If the DVD is not working, perhaps you can fix the issue simply by updating Windows 10. Windows 10 already updates itself automatically, but you can manually check for updates by doing the following:
- Open the Settings app.
- Head over to the Update & Security
- Now click Check for updates
If any updates are available, they will be downloaded automatically in the background. Once the updates are downloaded, restart your PC and check if the problem is still there.
If all of the above still didn’t solve your problem, then have a look at this guide from HP that is meant for HP and Compaq computers with Windows 8, but there’s a high chance it could work for you, as well.






User forum
1 messages