How to fix the most irritating Dying Light 2 bugs
8 min. read
Updated on
Read our disclosure page to find out how can you help Windows Report sustain the editorial team. Read more
Key notes
- Many users reported that Dying Light 2 can generate serious bugs, like not installing or launching.
- To fix this kind of problem on your PC, you should definitely try updating your graphics drivers.
- If the game can not install, launch, or provides poor performance on your console, make sure to update your device.
- The above solutions would also work if you face Dying Light 2's screen-related bugs.
![Fix known Dying Light 2 bugs [Expert Guide]](https://cdn.windowsreport.com/wp-content/uploads/2022/04/Dying_Light_2_presspack20.0-886x590.jpg)
The gaming world is an extremely unpredictable environment, where any game or extension can get you headaches.
Of course, this also applies to the newly released Dying Light 2 masterpiece, as many worldwide users already reported facing related bugs on both PC and console versions.
Even if Internet forums are generally listing favorable reviews, critics have condemned a slew of bugs and issues present in the final game.
It seems like these are pretty various and common, so if you’re also encountering some of them, do not panic! You’re not the only one.
Fortunately, any issue can be easily solved by following certain steps and we’re going to highlight all of them.
How can I fix the most common Dying Light 2 bugs?
1. Install/launch issues and poor performance on Xbox/PlayStation/PC
1.1 For Windows PC
1.1.1 Update your graphics drivers
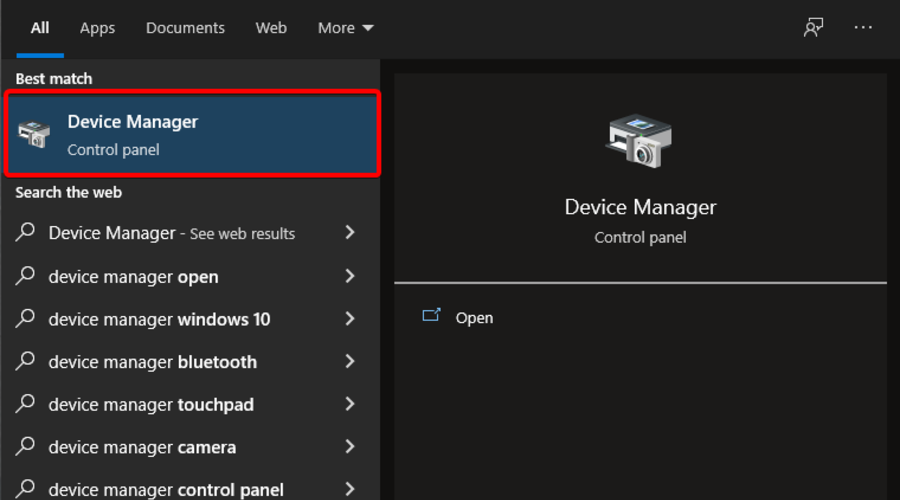
- Hit the Windows keys, type Device Manager, and open the first result.
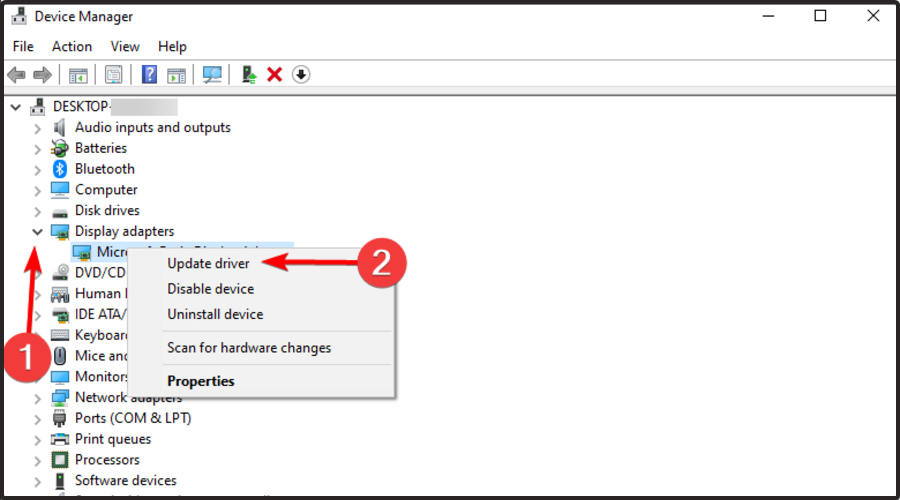
- Expand the Display adapters section, right-click on the desired component, then choose to Update driver.
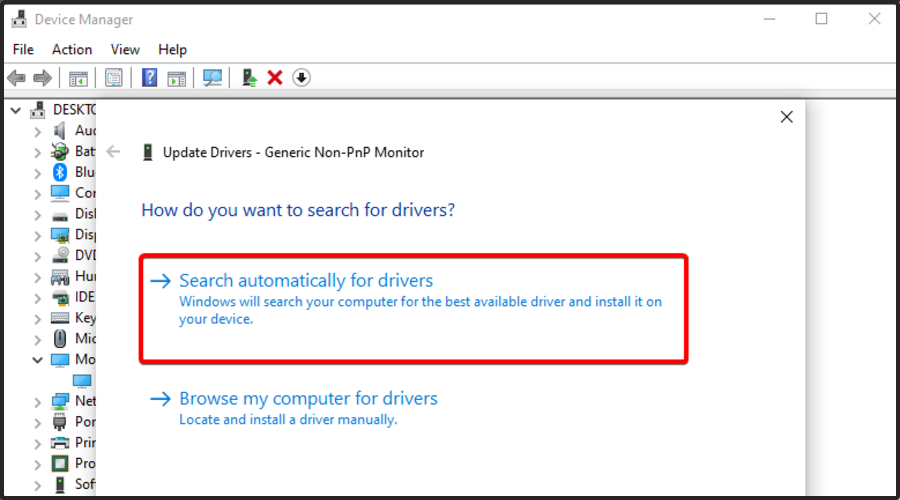
- Now, select to Search automatically for drivers.
- Wait until your system will scan and recommend any available options.
- In case there are no reliable solutions to get, you’ll be notified accordingly.
Keep in mind that up-to-date drivers allow you to work and play your favorite games on a healthy operating system. In this manner, it is important to constantly check for related updates.
Because the above steps can consume time if performed weekly, we decided to come up with a more efficient solution.
Outbyte Driver Updater will automatically take care of all of your outdated, missing, or corrupted drivers, regardless of their type.
1.1.2 Ensure your system meets the minimum/recommended game specifications
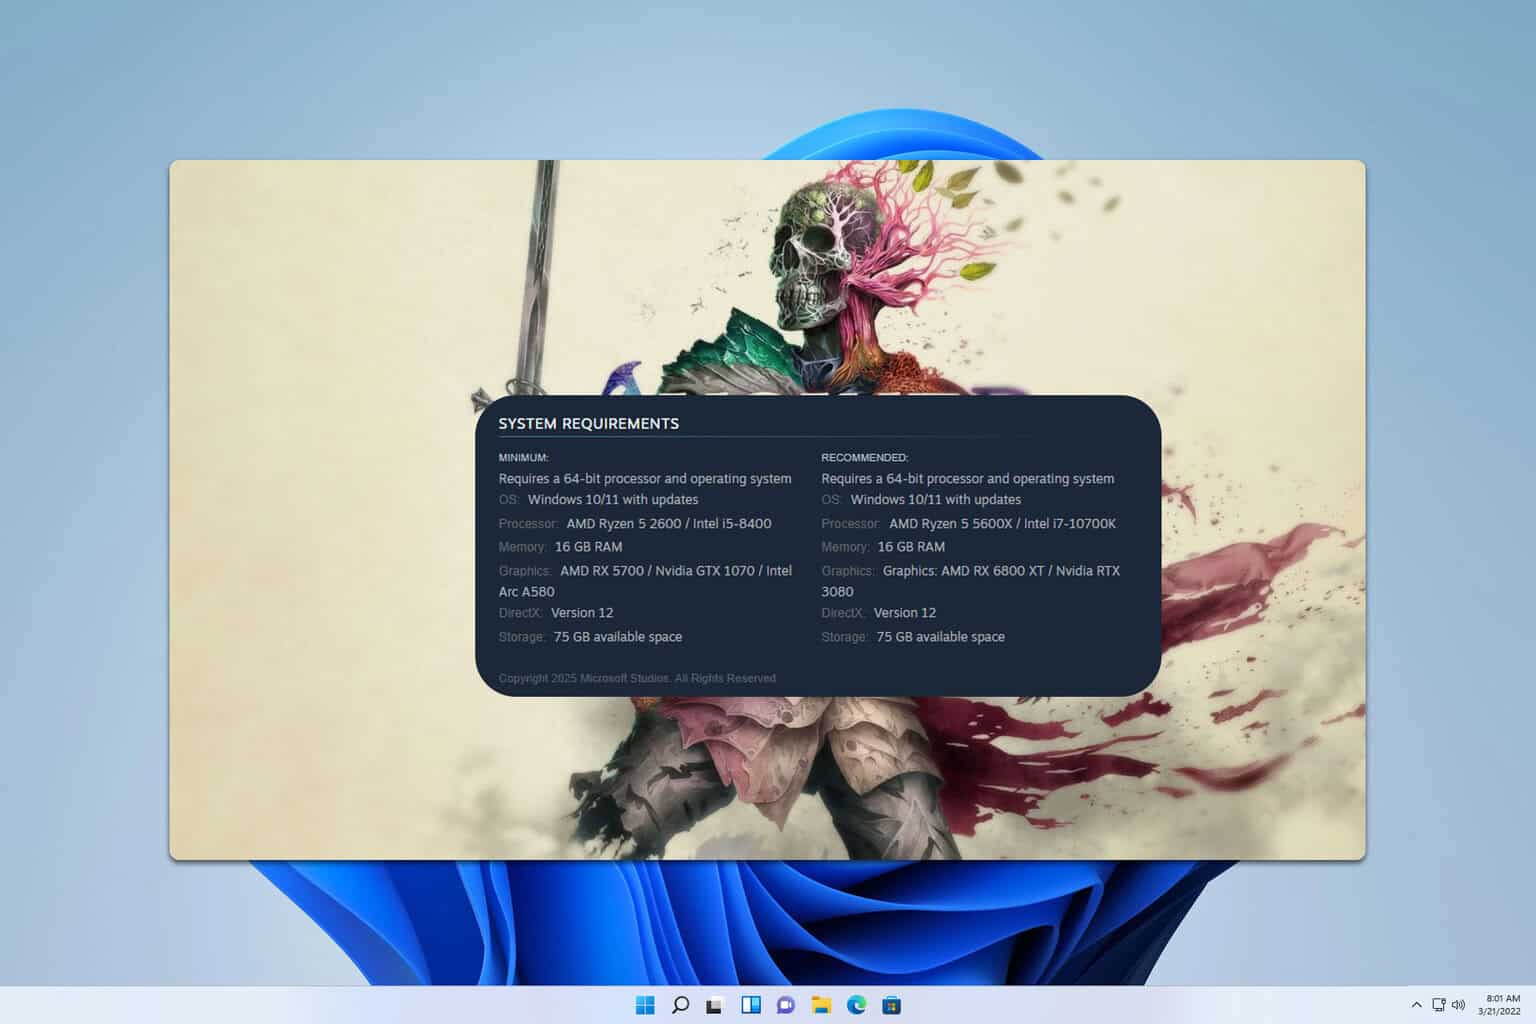
For the PC version, you’ll only have to navigate to the Device specifications, located in Windows Settings (Windows + I keyboard shortcut).
If you’re not sure what requirements your OS and hardware should meet, make sure you take a look at the minimum ones listed below:
- CPU: Intel Core i3-9100 / AMD Ryzen 3 2300X
- RAM: 8 GB
- OS: Windows® 7
- Video Card: NVIDIA® GeForce® GTX 1050 Ti / AMD Radeon™ RX 560 (4GB VRAM)
- Pixel Shader: 5.1
- Vertex Shader: 5.1
- Free Disk Space: 60 GB
- Dedicated video RAM: 4096 MB
Even if your system meets the game’s minim requirements, it is better to have something better. That’s why we’ve also compiled a list of our recommendations:
- CPU: Intel i5-8600K or newer/AMD Ryzen 5 3600X
- RAM: 16 GB
- OS: Windows® 10
- Video Card: NVIDIA® GeForce RTX™ 2060 6GB or AMD RX Vega 56 8GB or newer
- Pixel Shader: 5.1
- Vertex Shader: 5.1
- Free Disk Space: 60 GB
- Dedicated Video RAM: 6 GB (AMD 8GB)
1.1.3 Temporarily disable your antivirus software
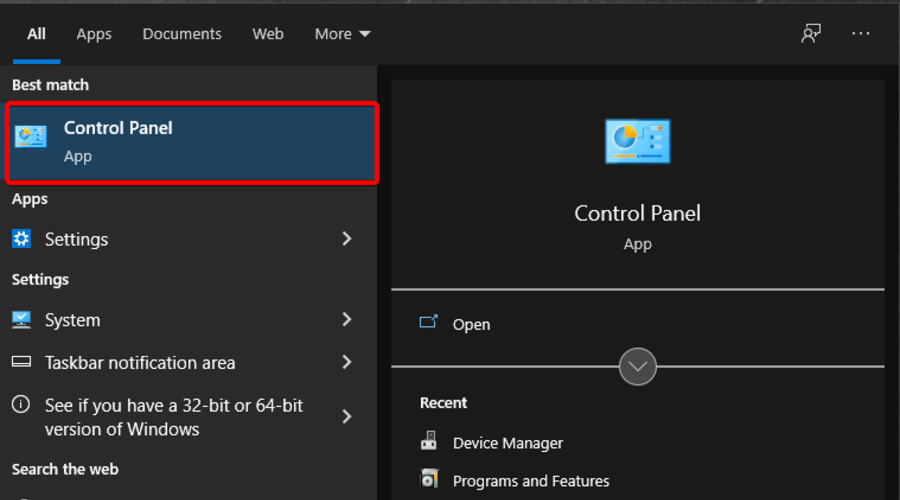
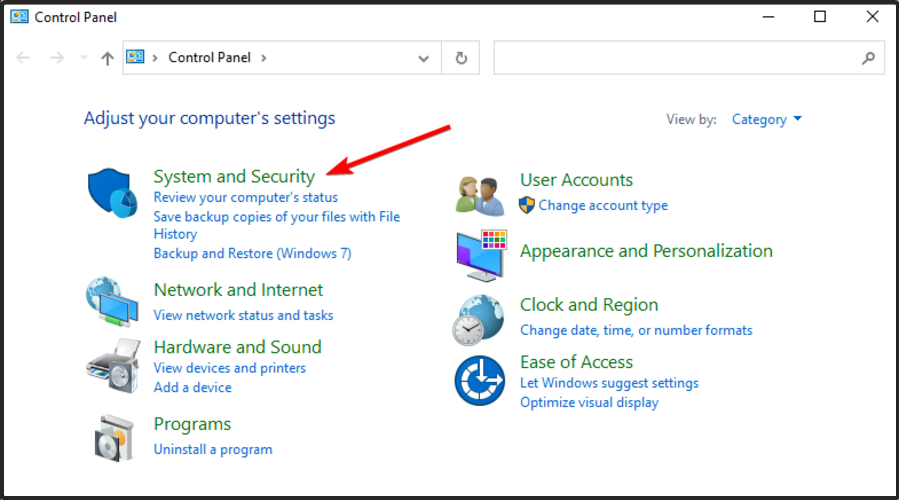
- Press on the Windows key, type Control Panel, then click on the first result.
- Navigate to System and Security.
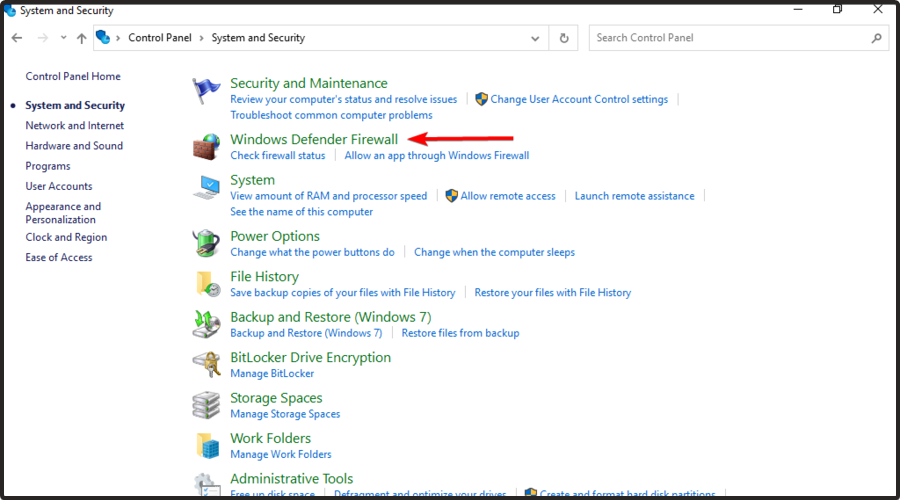
- Click on Windows Defender Firewall.
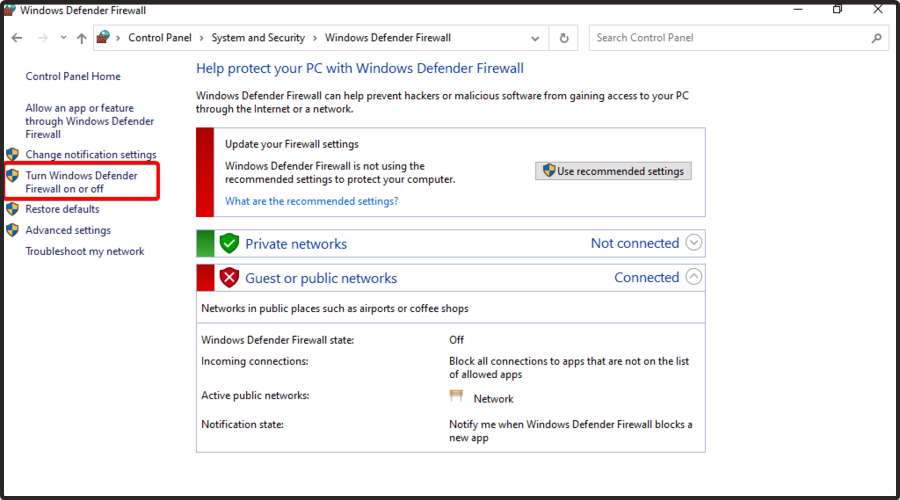
- From the left window pane, choose to Turn Windows Defender Firewall on or off.
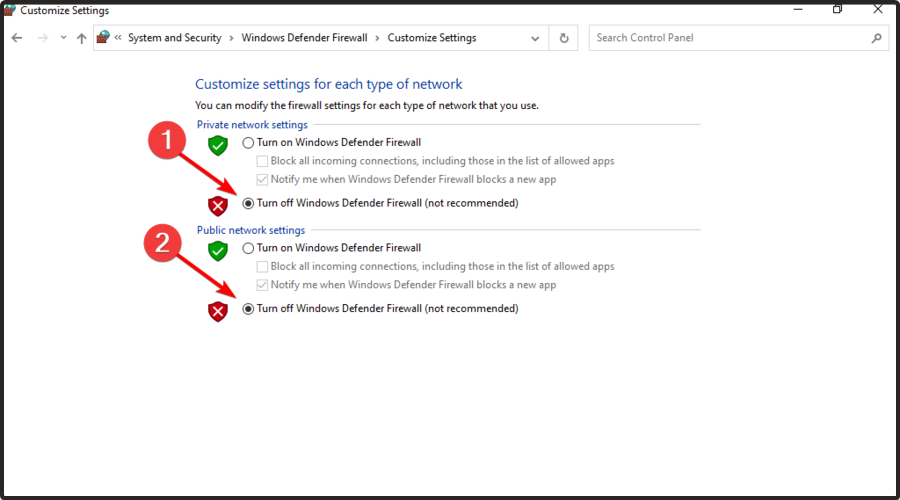
- Now, make sure you checkmark the two sections shown directly below.
1.2 For console
1.1.1 Update your console
For Xbox consoles:
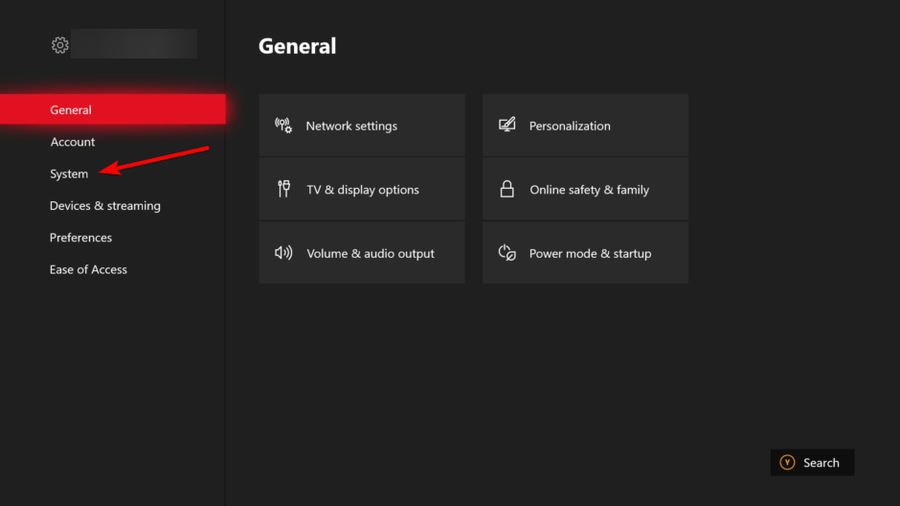
- Press the Home button on the Xbox console to open the Dashboard menu.
- Now, select Settings from the bottom of the menu.
- Choose All Settings.
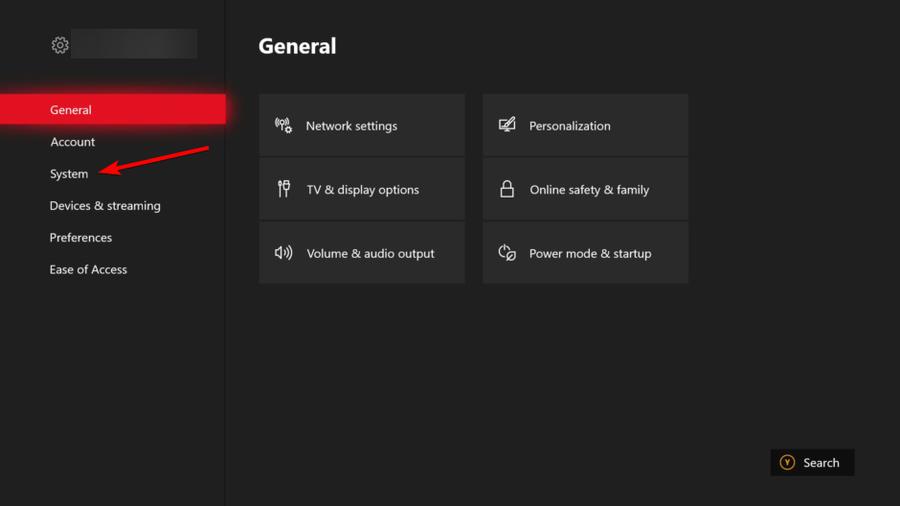
- Go to System.
- Select Updates.
- Choose to Update Console (if available).
- Follow the on-screen prompts to complete the update process.
- Once done, make sure to restart the console to apply changes.
For PS4 consoles:
- Make sure that the connection between your PS4 and the Internet is stable.
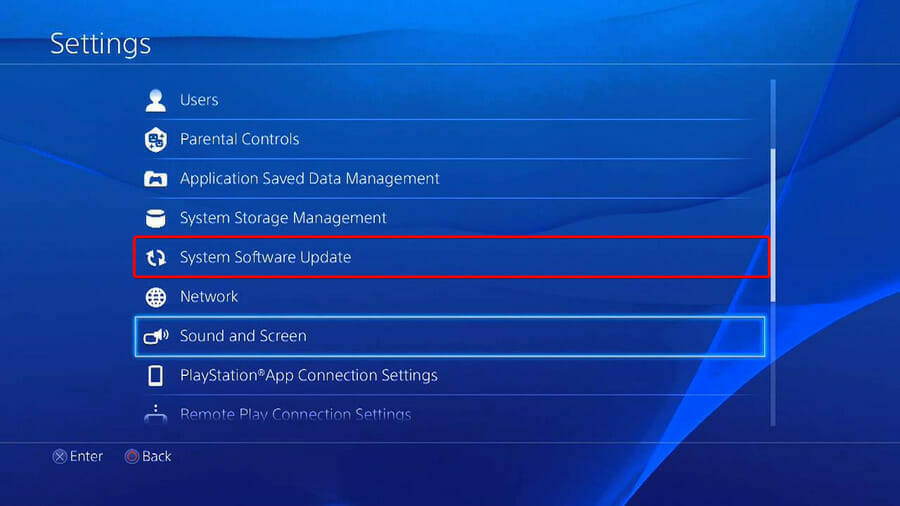
- Now, navigate to PS4 Settings.
- Click on System Software Update.
- Press the X button.
- You’ll get a message that informs you if the latest version of your system console has already been installed.
- Otherwise, the message will let you know that you should upgrade your system. To install it, click on Upgrade now.
For PS5 consoles:
- Open Settings.
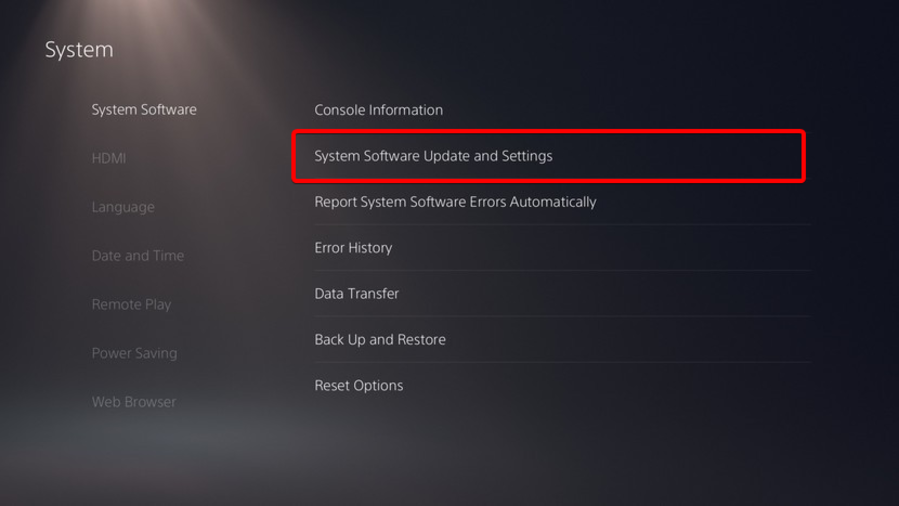
- Go to System.
- In the System Software section, click on System Software Updates and Settings.
- Choose the type of update you want to perform.
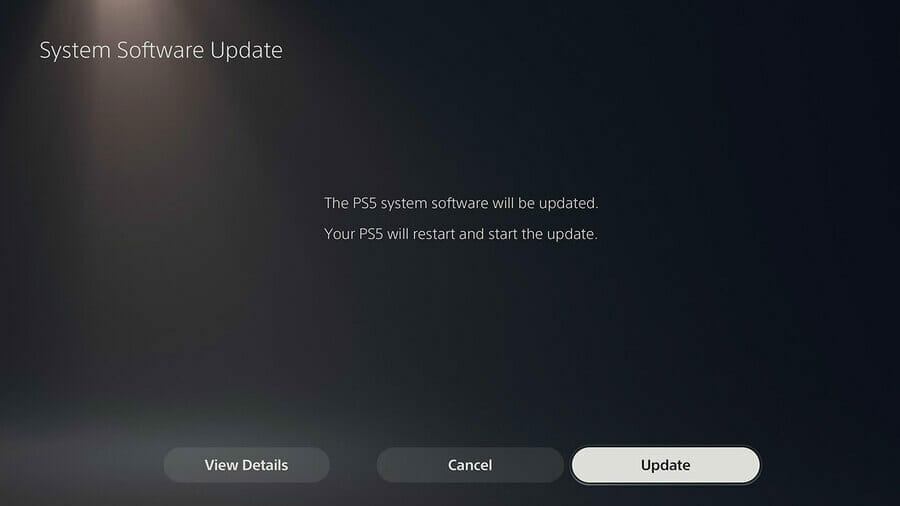
- Click on the Update button, then wait until your console is updated and restarted.
1.1.2 Free up some disk space
For Xbox consoles:
- Press the Xbox button on your controller to open the guide.
- Select Profile & system.
- Go to Settings.
- Choose System.
- Navigate to Storage.
- On the Manage storage devices screen, select: Clear local saved games.
- This deletes games saved to your hard drive, but they’ll still be saved to the cloud.
For PS4 consoles:
- Open your PlayStation 4 Settings.
- Scroll down to System Storage Management.
- Now, you’ll be able to view the disk space distribution and how much free space you have.
- In case it doesn’t seem like having enough space, make sure you clear some saved data from your controller.
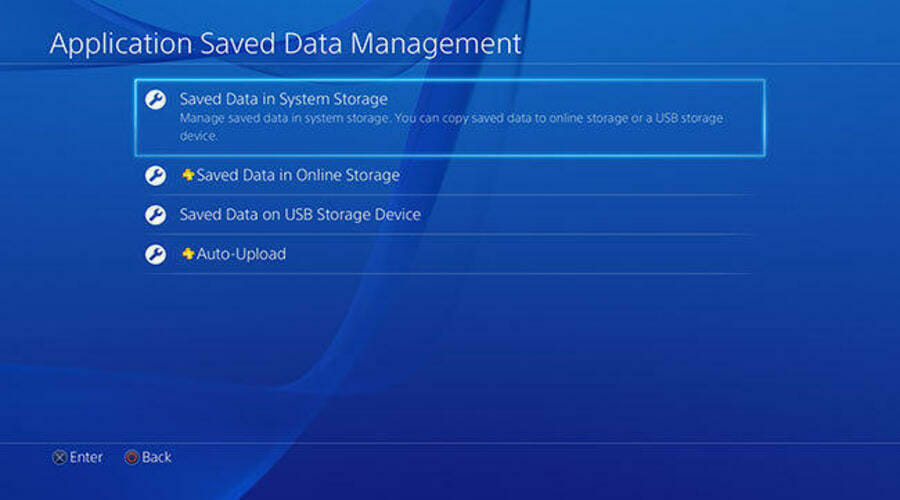
- To do so, go back to your Settings menu, and choose the Application Saved Data Management section.
- Choose what you want to clear.
- Click on Delete.
For PS5 consoles:
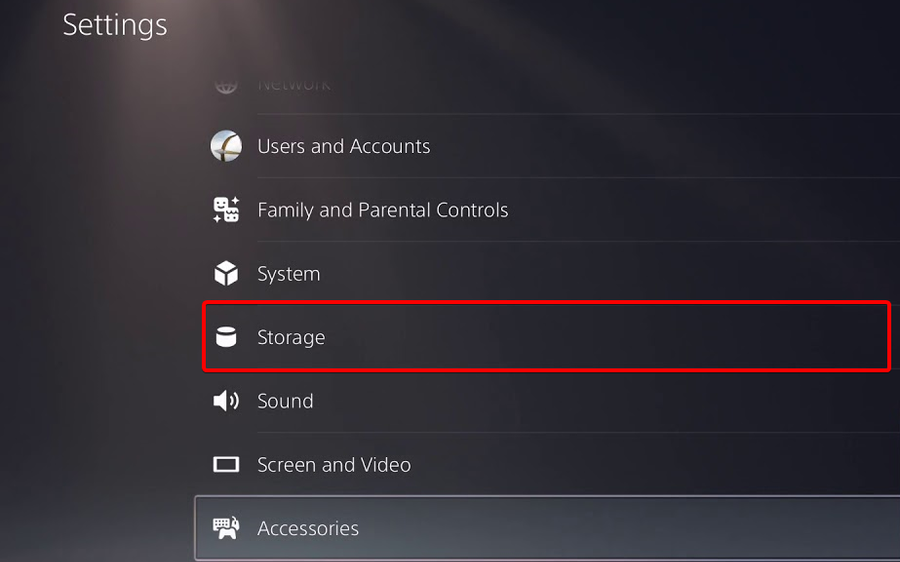
- Open PS5 Settings.
- Navigate to Storage.
- There, you’ll be able to view both the Console Storage and the Extended Storage.
- Click on each of them and check the free disk space.
- If you don’t have enough, make sure you delete other saved data.
- To do so, go back to your PS5 Settings, and navigate to Saved Data and Game/App Settings.
- Choose from Saved Data (PS5) or Saved Data (PS4).
- Select Console Storage.
- Click on Delete.
- Tick the box next to the files you want to delete and select Delete.
1.1.3 Reset the controller and rebuild its database
For Xbox consoles:
- Hold the power button until it turns off.
- Turn it on by holding the power button and wait for two quick beeps.
- Release the button and you will be automatically redirected to the Recovery menu.
- From here, you can restore the file system or rebuild the database.
For PS4 and PS5 consoles:
- Power off your controller then press and hold the power button.
- Release the button after you hear the second beep.
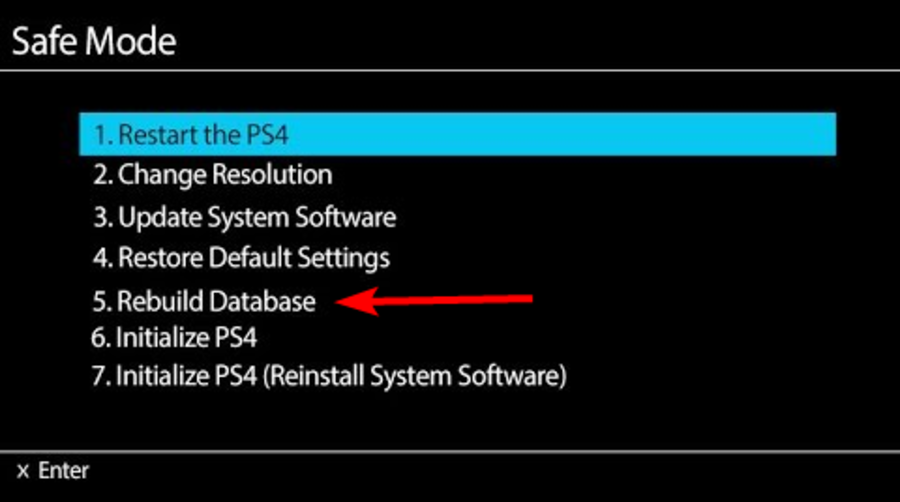
- For PS4, you’ll need to connect your controller via USB, then choose to Rebuild Database.
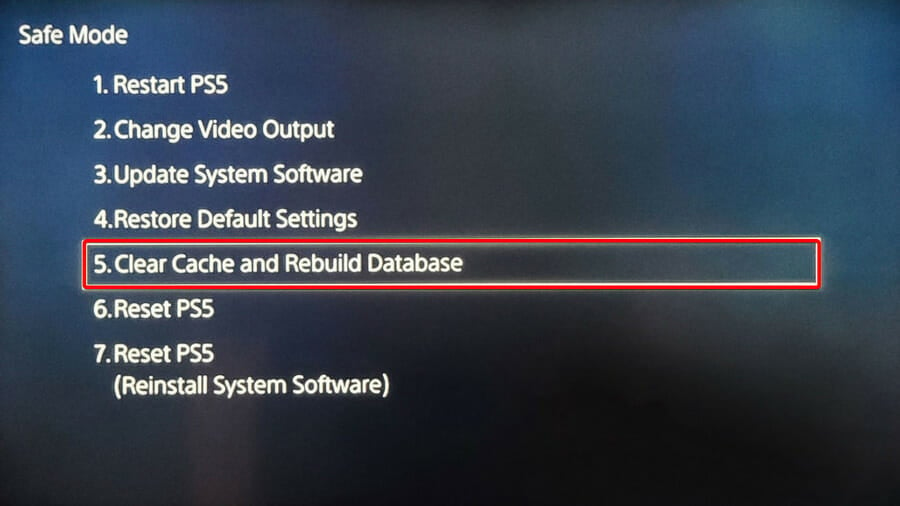
- For PS5, you’ll now boot into Safe Mode. Plug your controller in with the cable, then go down and select Clear Cache and Rebuild Database.
- After that, click on Rebuild Database, then on OK.
2. Flickering and black screen flashes
According to worldwide declarations, display issues appear to be among the most widespread impacting Dying Light 2 players at launch.
Usually, they manifest as black screens and flickering present, especially on console editions. As many gamers claimed, it seems like PS5 versions are the worst impacted, letting users unable to play the game at all.
In this case, until developers come up with some new dedicated fixes, you should try updating your console, as we showed you when presenting the previous Dying Light 2 bug.
If it’s happening to encounter this issue on a PC, for now, you should definitely try updating your graphics drivers, as outdated or corrupted ones are the main reason why you might experience screen issues.
As mentioned before Outbyte Driver Updater is the best tool that can automatically perform this process in a matter of time.
3. Can’t connect to online friends
Dying Light 2 provides cooperative multiplayer, as gamers are allowed to bring friends into a shared adventure open world.
Unfortunately, it seems like server issues didn’t wait to arise right in the early hours after the release.
While your mileage may vary, don’t be surprised if online connectivity isn’t slick. Many users reported this as being one of the most annoying Dying Light 2 bugs.
Techland advises players to complete the Prologue, demanding around two hours of playtime, before attempting to play through friends.
The company’s support page states gamers must reach the Markers of Plague quest, which unlocks multiplayer support.
4. Preorder items missing
Last, but not least, keep in mind that some Dying Light 2 users claimed that their preorder items are unavailable after the game’s launch.
Engineers have acknowledged issues with items, which seemingly include preorder cosmetics and supplementary content, with an official fix assumedly on the way.
So, these are the most common known Dying Light 2 bugs. As you can see, there are simple solutions you can follow to fix most of them.
In case you’re aware of other problems or solutions, make sure you leave a comment in the dedicated section below.






User forum
0 messages