Failed to Open BitLocker Control Panel Tool [Fix 0x80004005]
BitLocker is not available in the Windows 11 Home edition
Key notes
- Many users have reported encountering the Failed to open BitLocker control panel tool error in Windows 11 when launching it.
- First, check if the installed edition of Windows 11 offers the BitLocker feature.
- If it does, you can perform a DISM and SFC scan, or run the related services, amongst other methods here to fix the issue.

BitLocker is a feature in Windows that allows users to encrypt the data stored on the drive and helps ensure privacy and safety against intrusion.
But many users have reported encountering the Failed to open BitLocker Control Panel tool error message in Windows 11.
This message is often followed by an error code, 0x80004005, which may help identify the underlying cause and easily troubleshoot the error. Though, that’s not always the case.
Therefore, we have decided to dedicate this article to list out the reasons for the Failed to open BitLocker control panel tool error in Windows 11 and the most effective fixes for it.
Why do I see Failed to open BitLocker Control Panel tool error in Windows 11?
Whenever trying to identify the underlying cause, always understand that it can be completely different for various users. So, if a method has worked for one user, there’s no surety that it would work for you as well.
But, with a proper understanding of each, you are more likely to identify and eliminate it.
The Failed to open BitLocker control panel tool error in Windows 11 can be caused by a bunch of reasons, but in most cases, the installed edition of Windows 11 does not offer the BitLocker feature.
If you are certain that the feature is available, it most likely has to do with critical services not running or corrupt system files.
Other than that, a bug in the installed version of Windows is also likely to lead to BitLocker not showing in Control Panel in Windows 10/11.
Now that you have a basic understanding of the issues that cause the Failed to open BitLocker control panel tool error in Windows 11, let’s head to the solutions. Follow them in the listed sequence for quick and effective troubleshooting.
How do I fix the Failed to open BitLocker Control Panel tool error in Windows 11?
1. Check if BitLocker is available on the installed edition of Windows 11
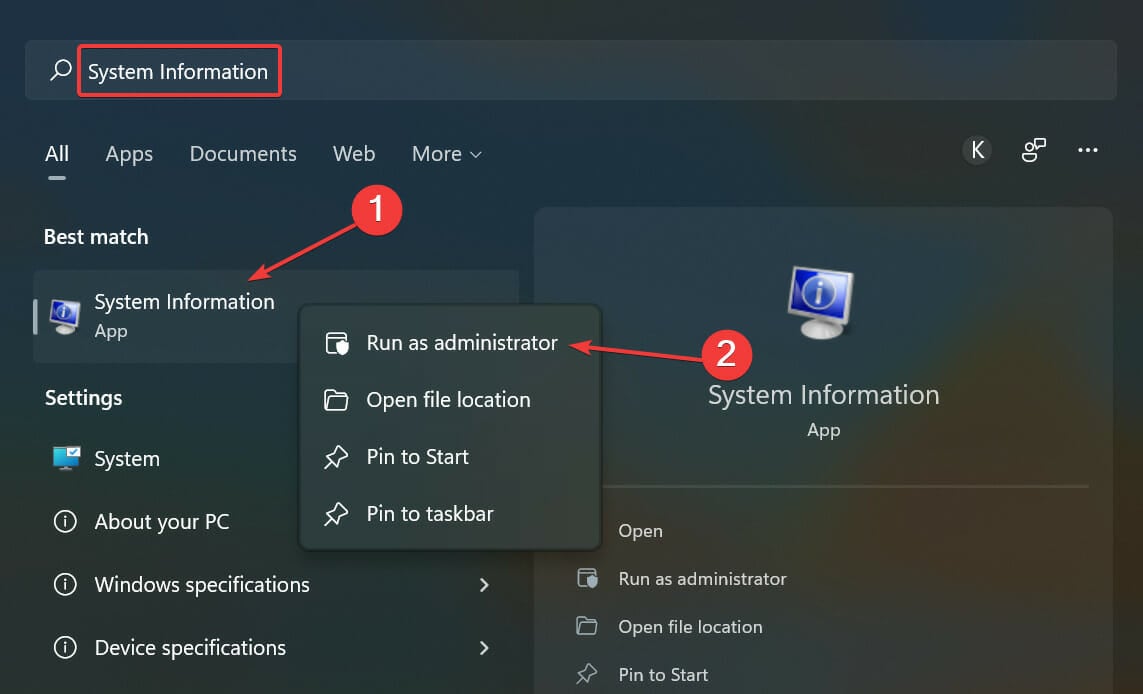
- Press Windows + S to launch the Search menu, enter system Information in the text field at the top, right-click on the relevant search result, and select Run as administrator from the context menu.

- Click Yes in the UAC (User Account Control) prompt that pops up.

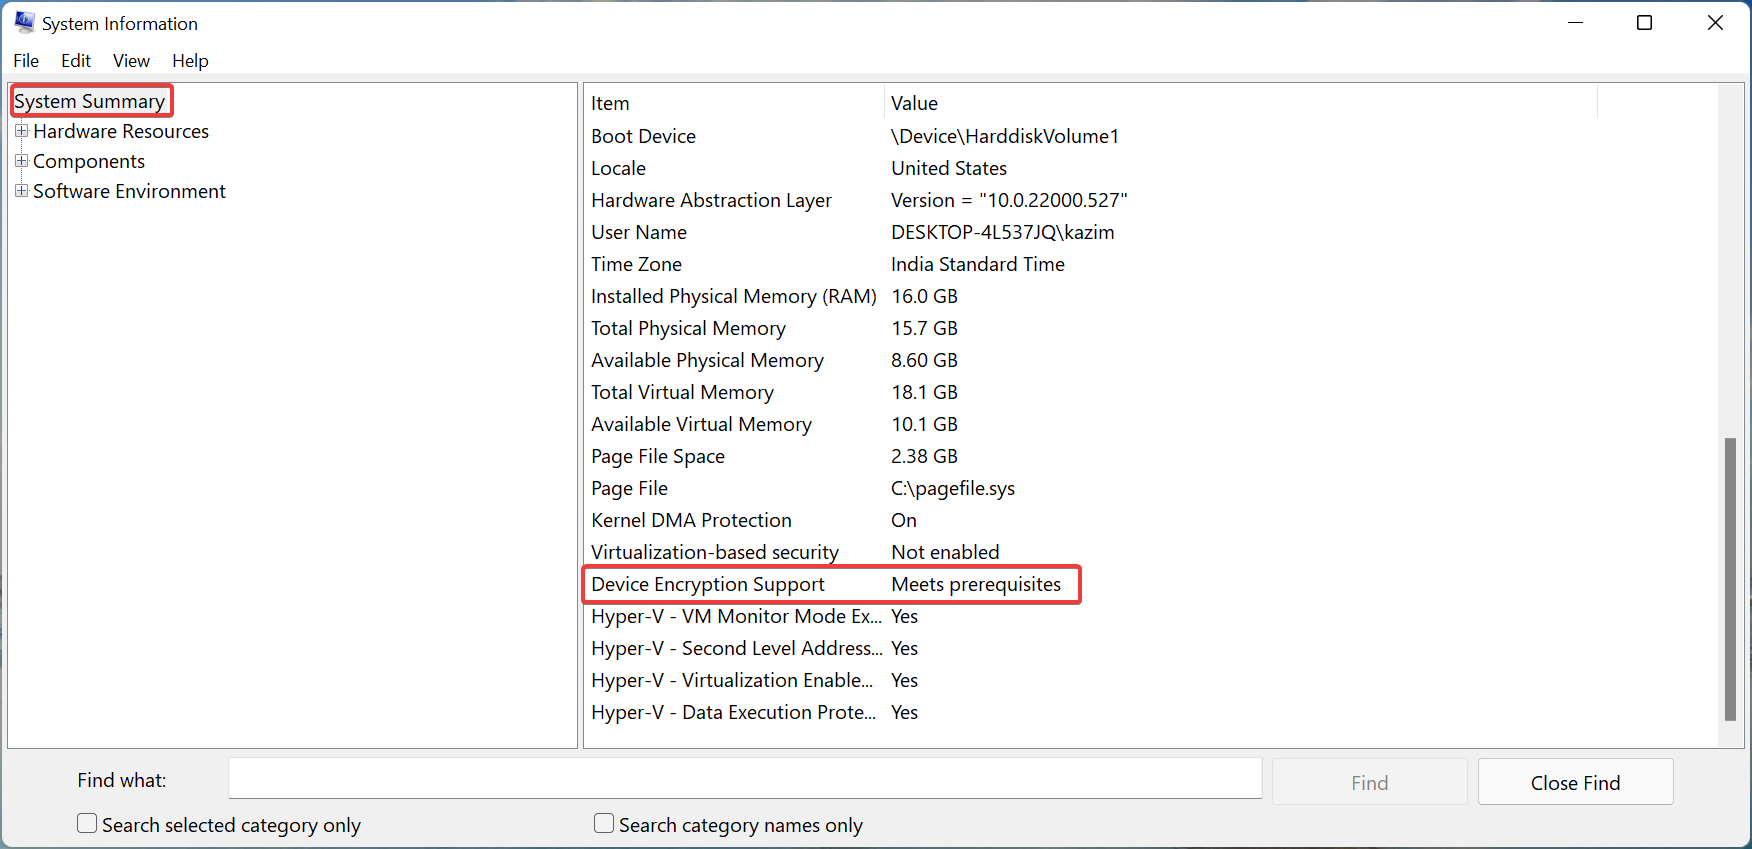
- Now, scroll down on the right in the System Summary tab and check what it reads next to Device Encryption Support. If it says Meets prerequisites, follow the other steps listed here to get BitLocker up and running.

In most cases, users who encountered the Failed to open BitLocker control panel tool error in Windows 11 were found to be running the Home edition which does not support BitLocker. It’s supported on the Pro edition of Windows 11.
So, if you are running the Home edition, it’s time you make the upgrade to access features that are exclusive to the Pro edition.
However, certain devices (2-1 laptops and tablets) running the Windows 11 Home edition support Device Encryption, a feature similar to BitLocker.
2. Perform the DISM and SFC scans
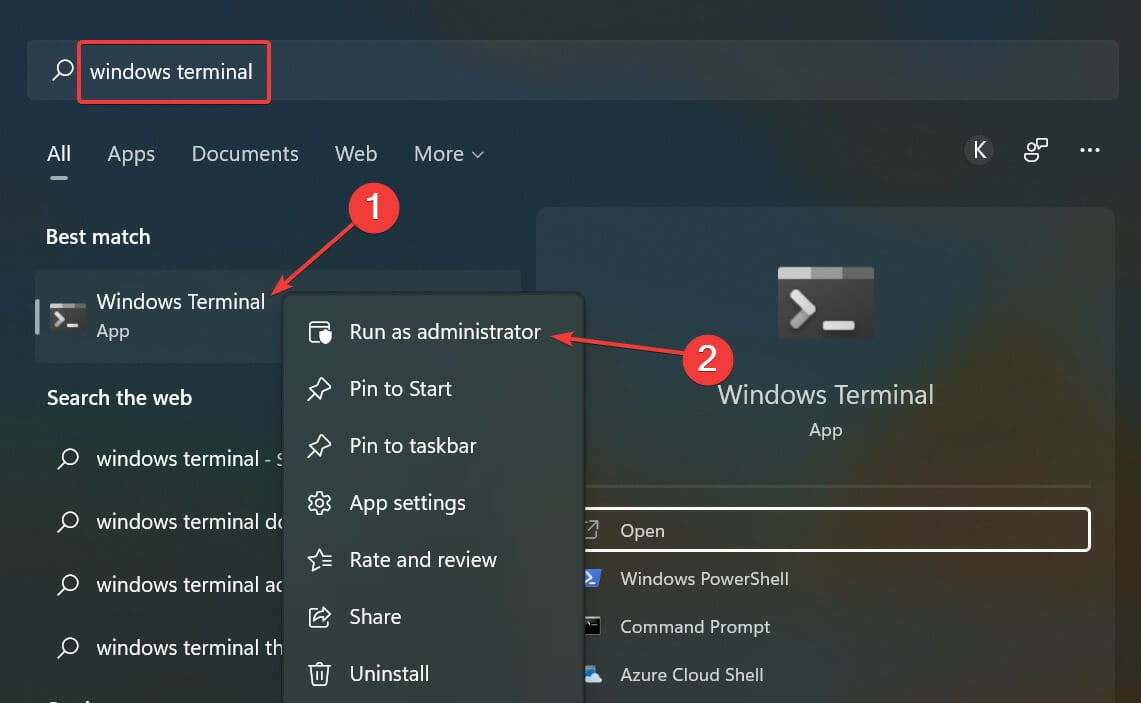
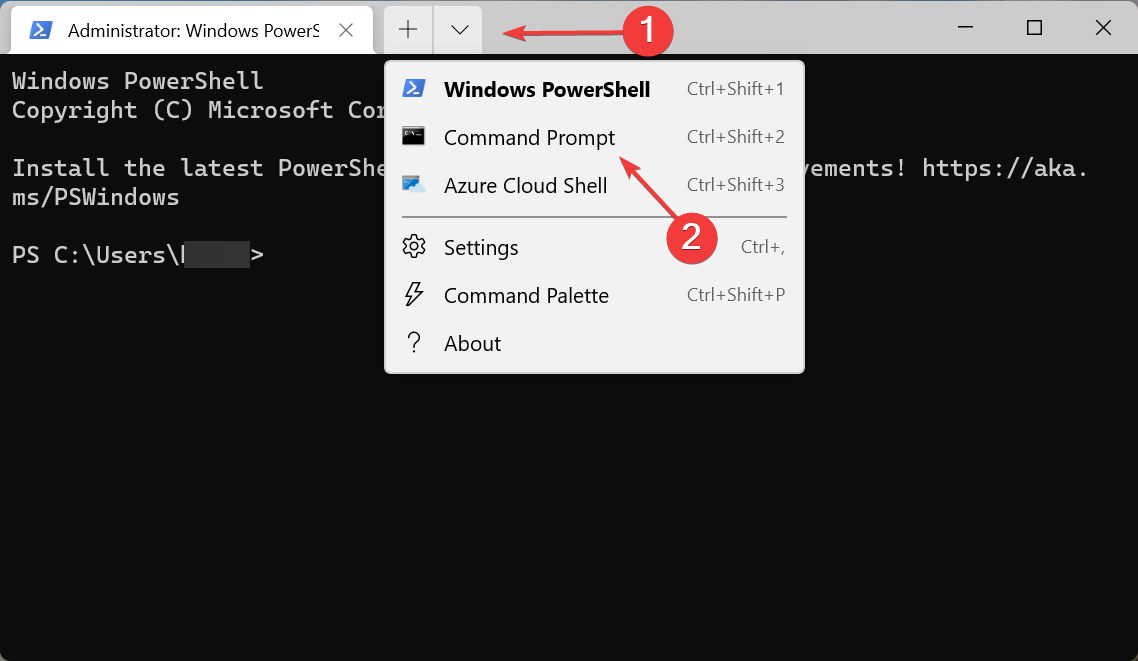
- Press Windows + S to launch the Search menu, enter windows terminal in the text field, right-click on the relevant search result, and select Run as administrator from the context menu.

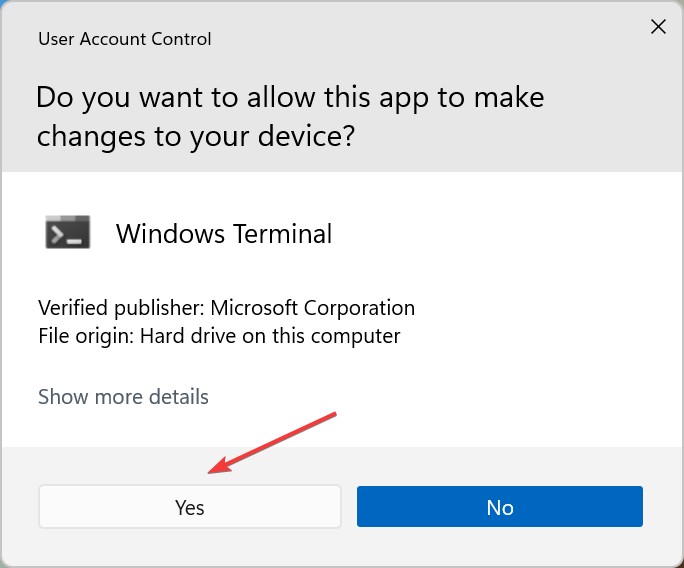
- Click Yes on the UAC (User Account Control) prompt that pops up.

- Now, click on the downward-facing arrow at the top, and select Command Prompt from the list of options. Alternatively, you can hit Ctrl + Shift + 2 to launch Command Prompt in a new tab.

- Now, paste the following and hit Enter to run the DISM tool:
DISM.exe /Online /Cleanup-image /Restorehealth
- Finally, execute the following command to run the SFC scan:
sfc /scannow
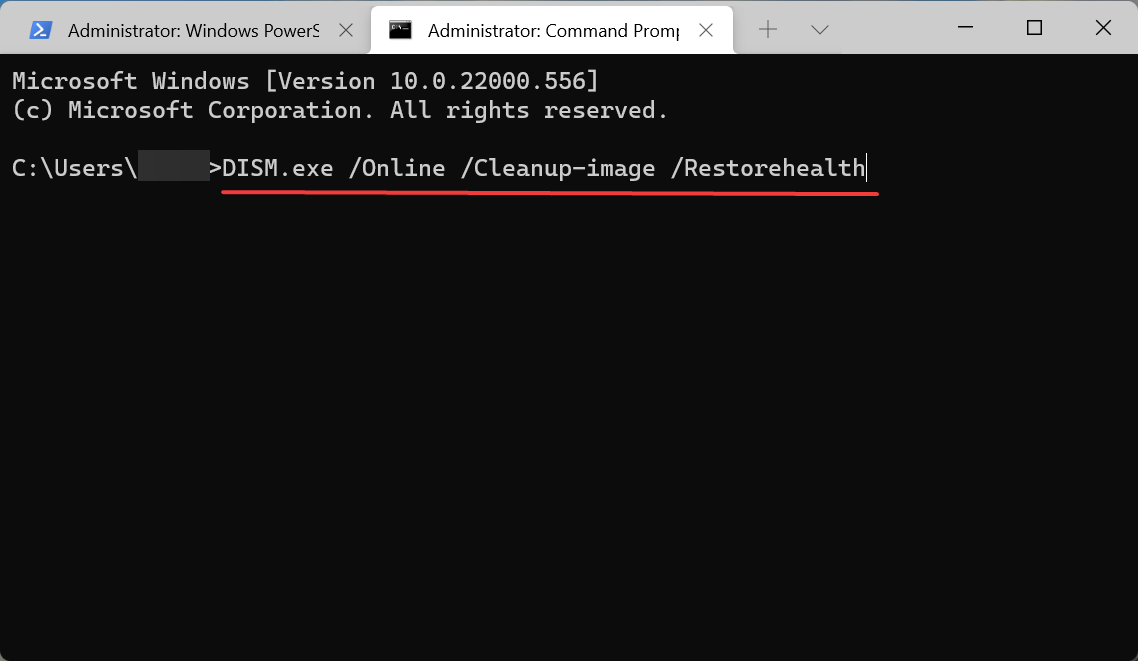
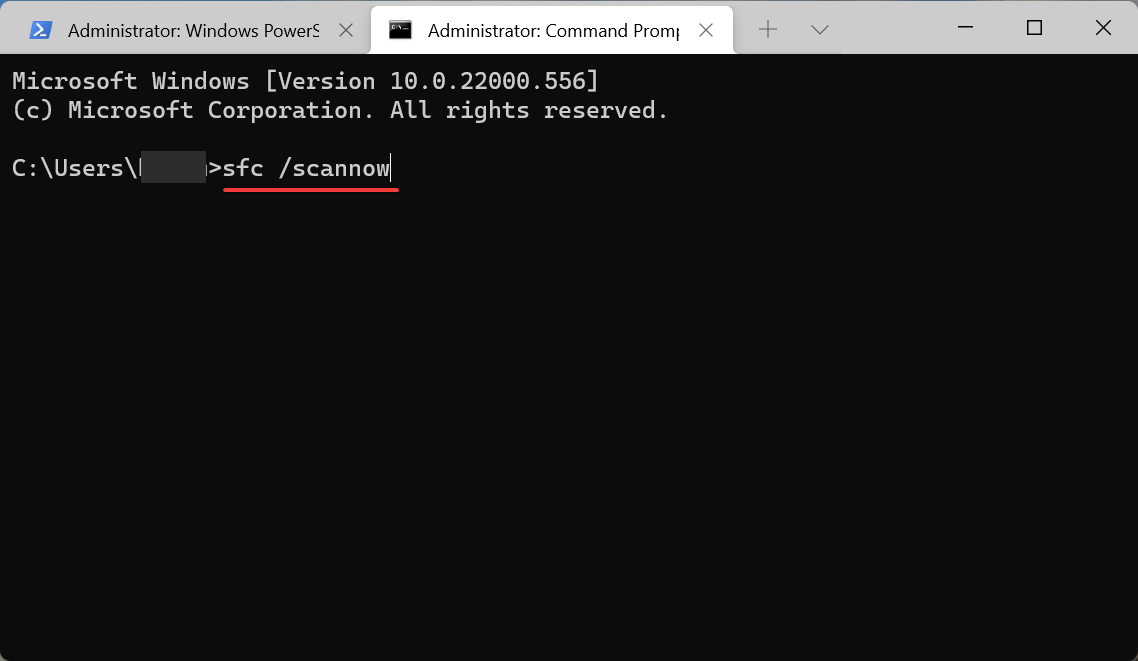
If you are encountering the Failed to open BitLocker control panel tool error in Windows 11 due to corrupt system files, running the DISM (Deployment Image Servicing and Management) and SFC (System File Checker) scan could fix the error.
Or you could use a third-party repair tool that will automatically identify and eliminate most of the errors.
An automatic repair tool simplifies the process of protecting your computer from malware and improves its health to perform maximally at all times.
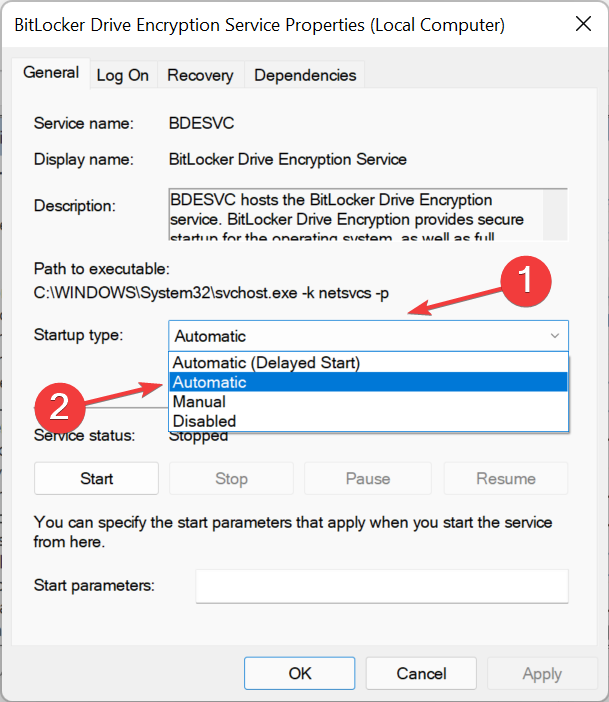
3. Run the Bitlocker Device Encryption Service
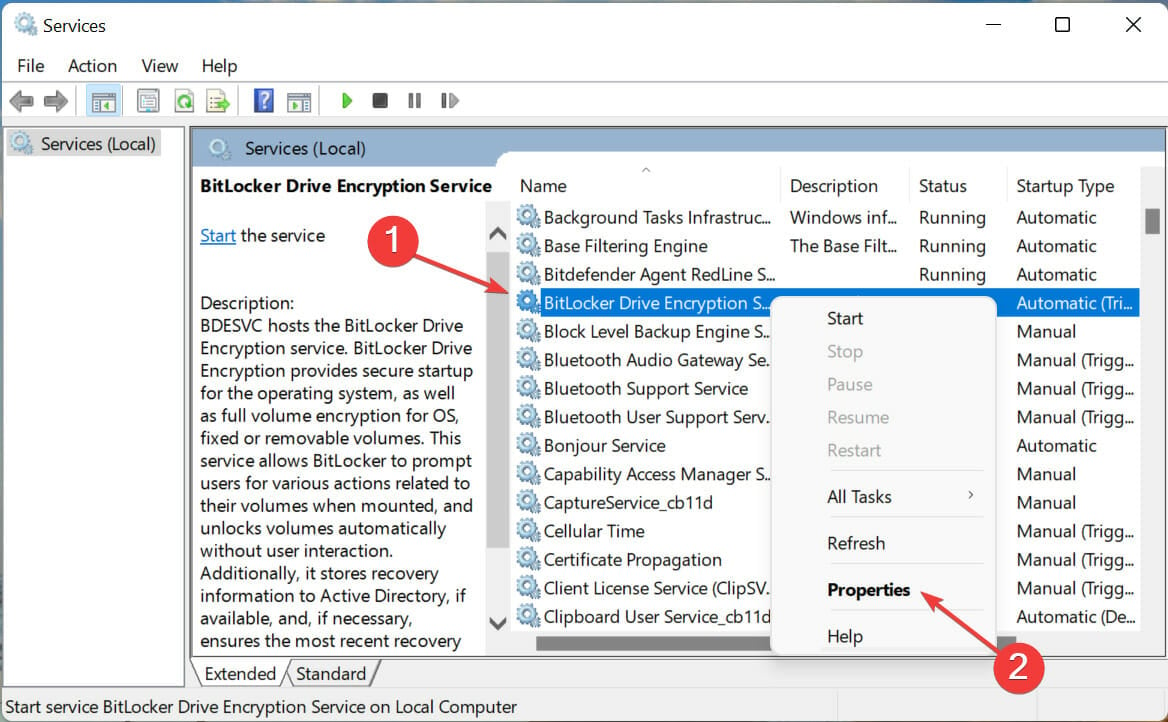
- Press Windows + S to launch the Search menu, enter services in the text field at the top, and click on the relevant search result.

- Now, locate the BitLocker Device Encryption Service, right-click on it, and select Properties from the context menu.

- Now, select Automatic from the Startup type dropdown menu.

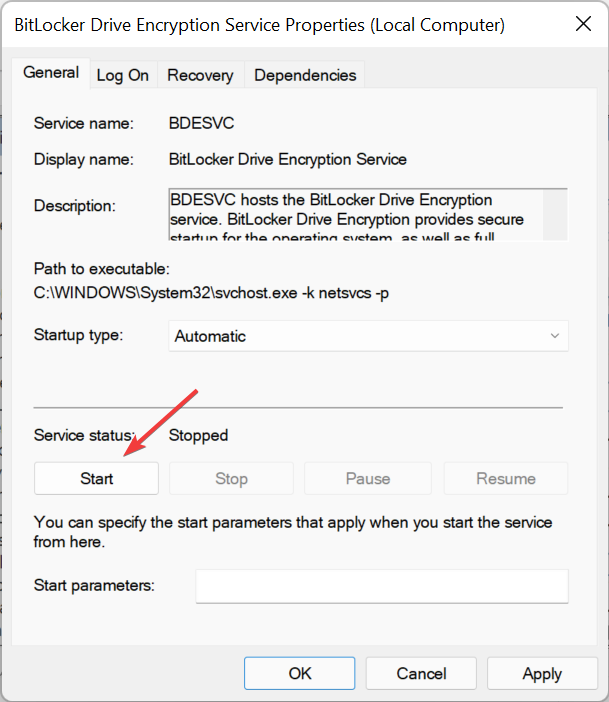
- If the service is not running, click on the Start button under Service status.

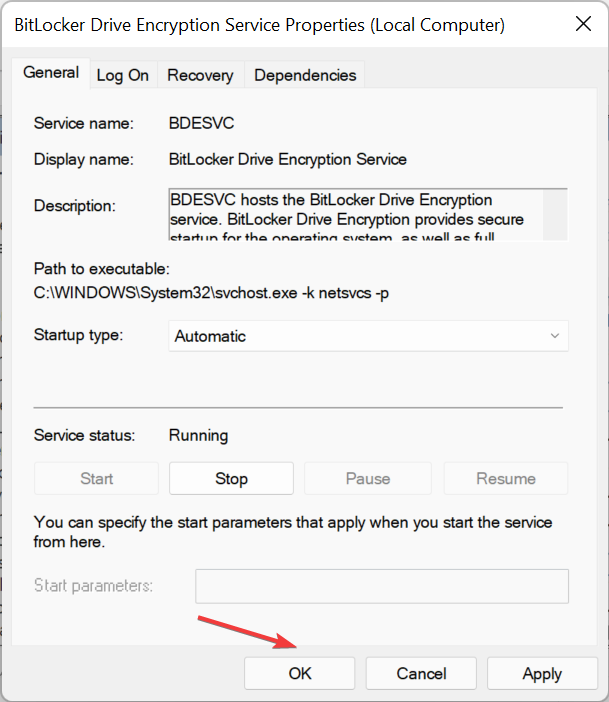
- Once done, click on OK at the bottom to save the changes.

As mentioned earlier, if the critical services are not running on your device, you might face the Failed to open BitLocker control panel tool error in Windows 11.
So, just make sure to run it, and restart the computer for the changes to fully come into effect.
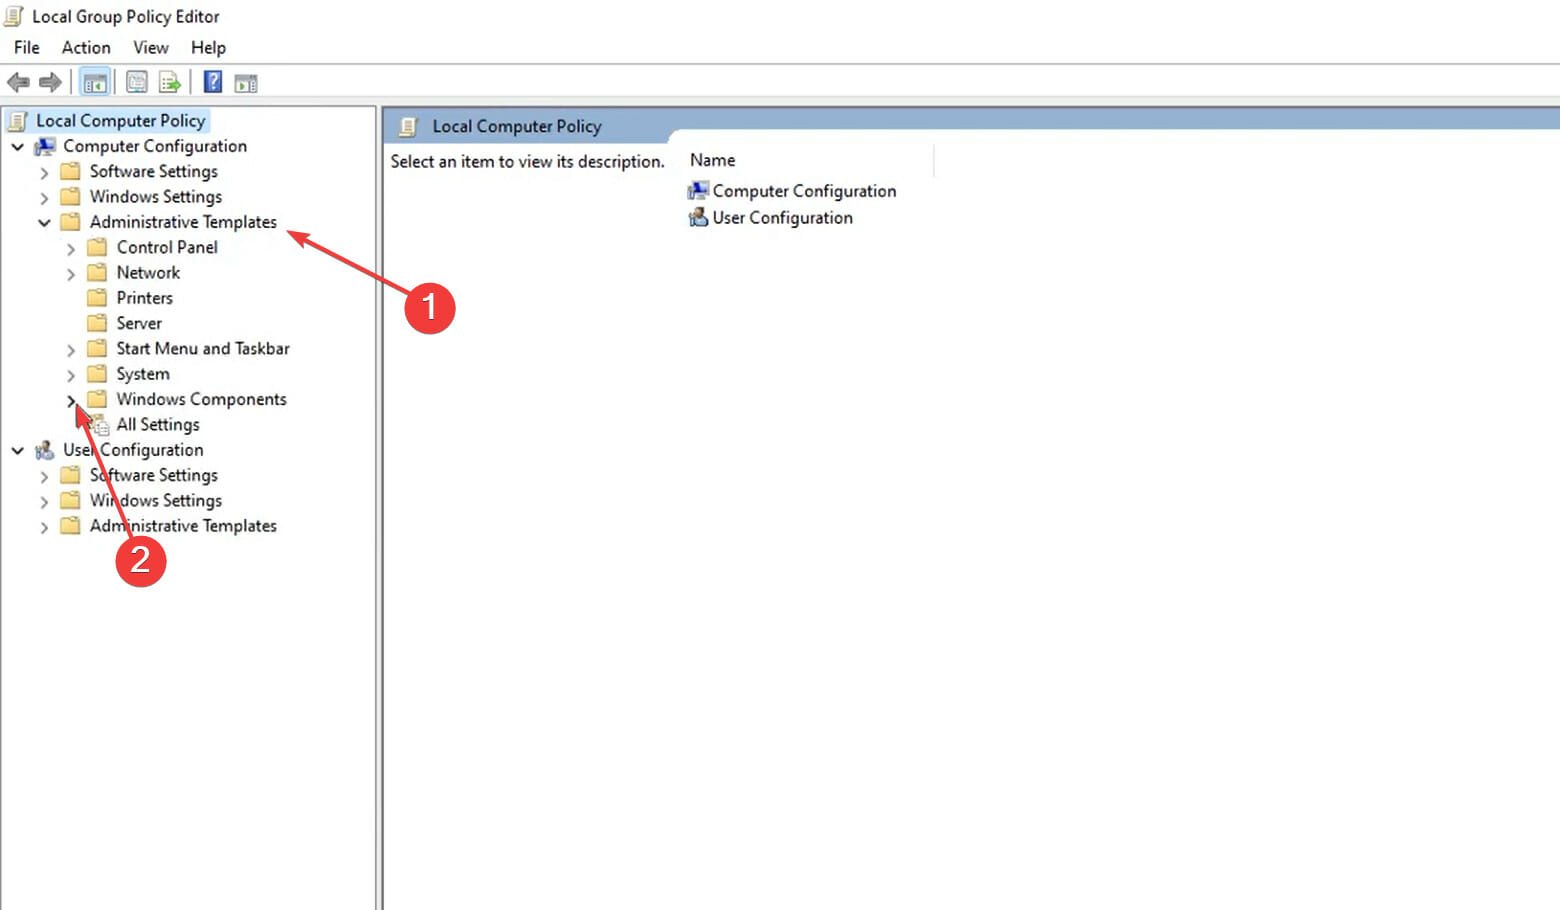
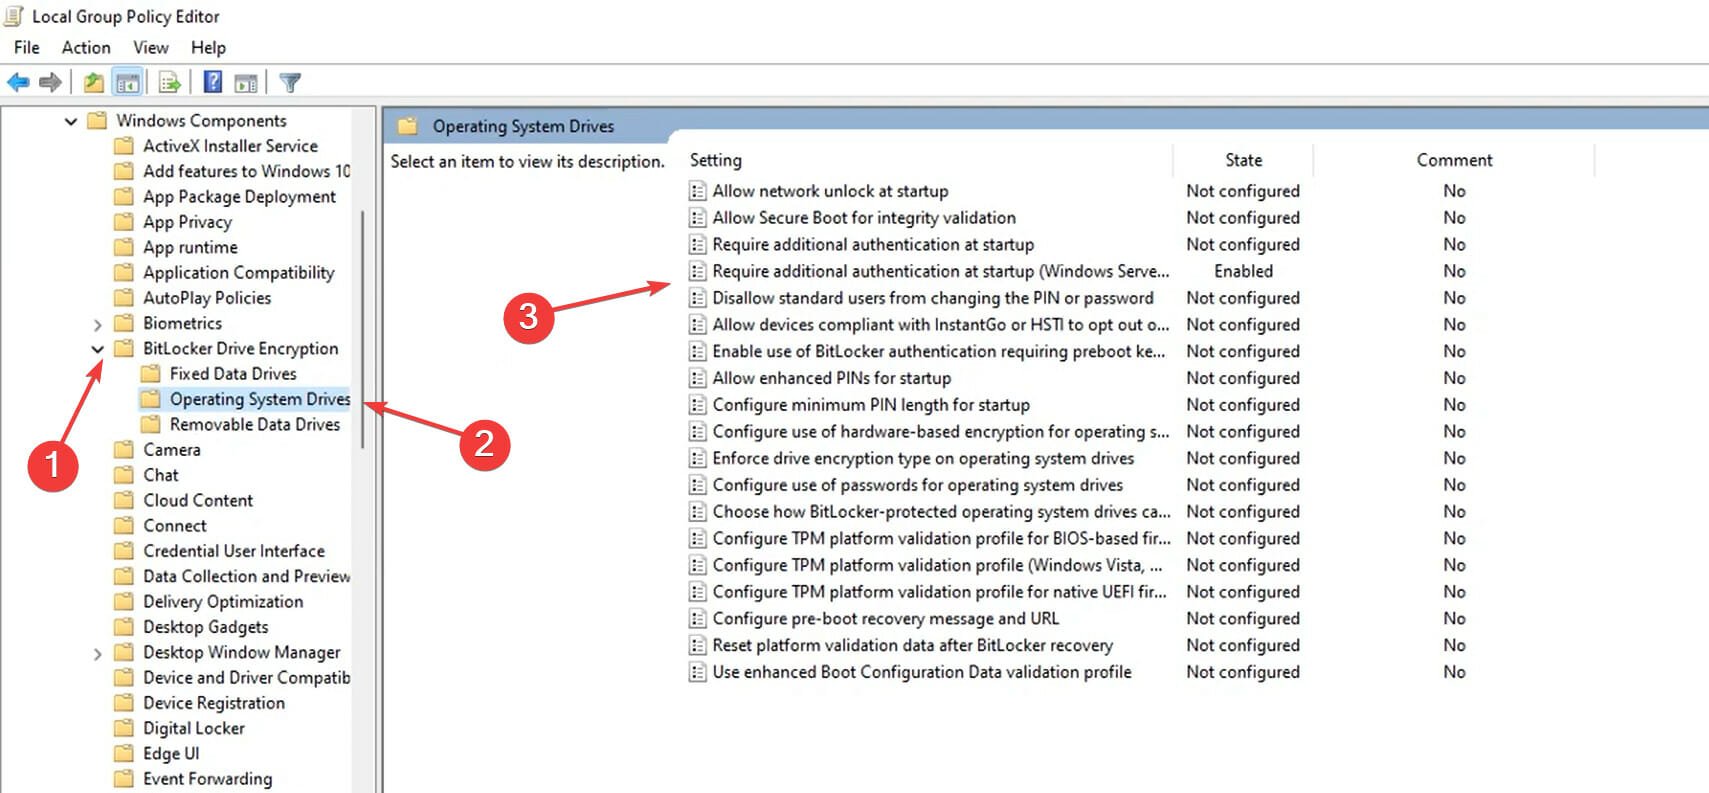
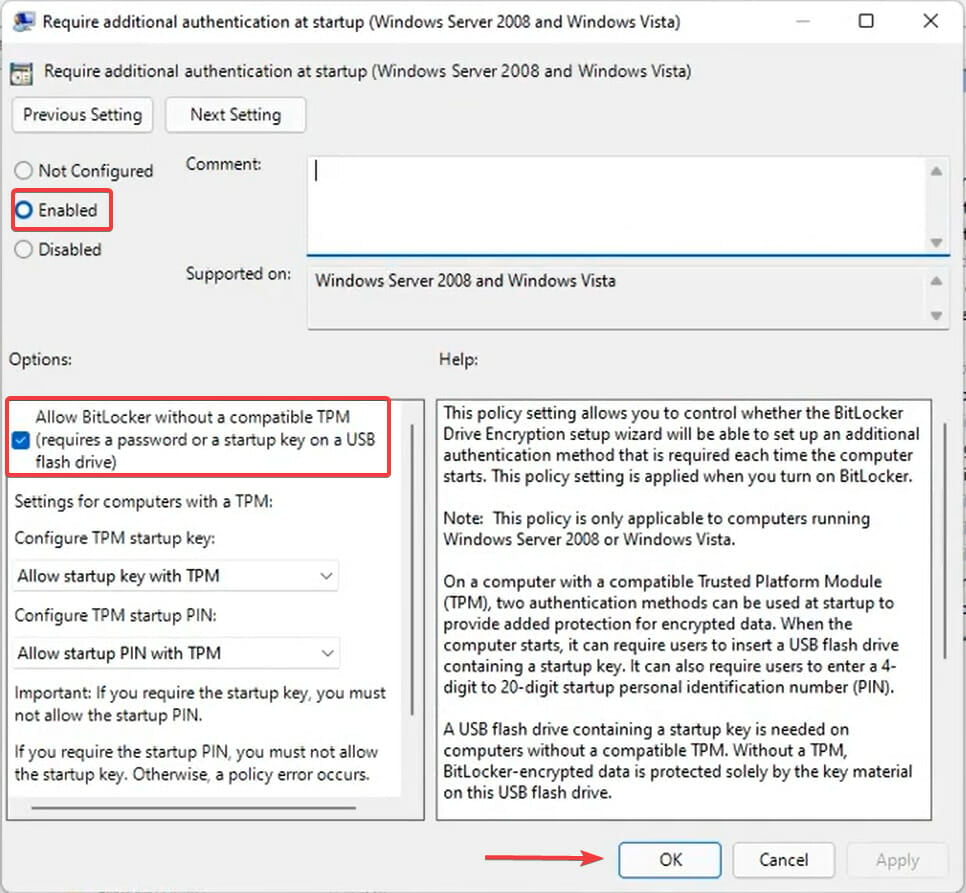
4. Make changes to the Local Group Policy Editor
- Press Windows + R to launch the Run console, enter gpedit in the field, and either click on OK or hit Enter to launch the Local Group Policy Editor.

- Now, double-click on Administrative Templates in the navigation pane on the left and then on the Windows Components option that appears under it.

- Next, double-click on BitLocker Drive Encryption, then on Operating System Drives in the navigation pane, and finally on the Require additional authentication at startup (Windows Server 2008 and Windows Vista) entry on the right.

- Once here, make sure that it’s Enabled, the Allow BitLocker without a compatible TPM option is checked, and then click on OK at the bottom to save the changes.


5. Perform a system restore
- Press Windows Key + R and enter rstrui, then click OK or press Enter.

- Click on Next to proceed and in the next window, select the restore point you wish to revert to and click on Next again.
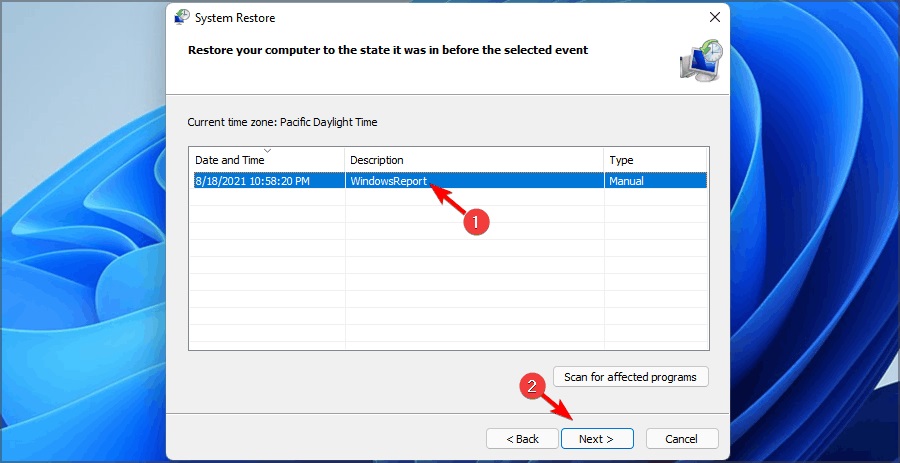
- After you click Finish the PC will restart and restore itself to the selected restore point.
If nothing else has worked, you are left with no option but to perform a system restore. It’s probably the easiest way to eliminate even the most intricate of issues.
But remember that you might end up losing applications and configured settings, though the personal files won’t be affected.
The idea behind a system restore is to take your computer back in time to a point when the error didn’t exist. To achieve that, you will have to select a restore point created before you first encountered the problem.
Also, if the process doesn’t go as planned, or you don’t achieve the desired results, there’s always the option to undo a system restore in Windows 11.
These are all the ways you fix the Failed to open BitLocker control panel tool error in Windows 11, be able to access BitLocker again and make the desired changes.
Also, find out how to disable BitLocker in Windows 11. Besides, if you are encountering an error with BitLocker, the fixes are rather simple, and you can have it up and running in no time.
Tell us which fix worked and your experience with BitLocker, in the comments section below.
Read our disclosure page to find out how can you help Windows Report sustain the editorial team. Read more


Improve this guide


User forum
0 messages