CMOS Checksum Error: Diagnose & How To Fix [ 5 Ways]
Resetting or updating your BIOS should fix this issue convincingly
5 min. read
Updated on
Read our disclosure page to find out how can you help Windows Report sustain the editorial team Read more
Key notes
- The CMOS checksum error is a frustrating issue that can be due to a corrupt battery.
- One quick and effective solution to this problem is to reset your BIOS settings to default.
- Another excellent solution to try is to perform a startup repair on the Advanced startup page.
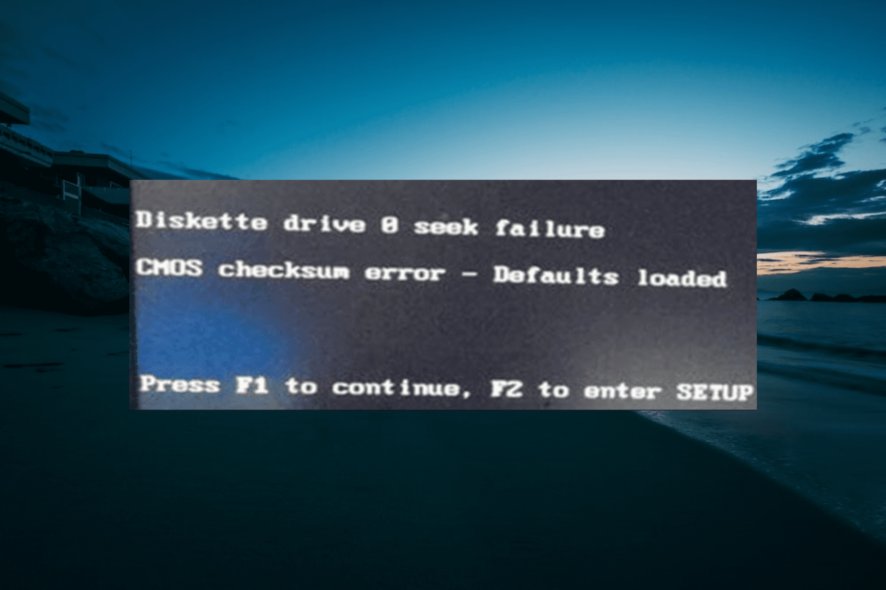
The CMOS checksum error is a conflict between the CMOS and the BIOS that happens when you boot your PC.
When you shut down your PC, the CMOS records a number that must match another that the BIOS generates when you start the computer again.
If these two values don’t match, the PC may return a CMOS checksum error. This is an error detection mechanism referred to as checksum, otherwise known as a redundancy check for picking errors in data.
Why is the CMOS checksum bad?
There are different reasons why a CMOS checksum error – defaults loaded would occur. And different computers deal differently with the error. Let’s look at a few causes of the CMOS checksum error before suggesting a couple of fixes:
- Out-of-date or corrupted BIOS: After a while, a PC’s BIOS will need to be updated to stay in sync with the operating system and all the hardware components you use. Also, an outdated BIOS is prone to viruses that can corrupt the BIOS. This will cause the CMOS checksum error to pop up.
- Dead battery: The computer requires some from the CMOS battery power to enable the CMOS chip to retain all BIOS settings when the PC is switched off. Hence, if this battery is corrupt, you can face issues like this.
- Bad PC shutdowns: Wrong PC shutdown doesn’t give it enough time to generate the checksum number it will need to verify against the BIOS when the computer boots again. This will cause the CMOS checksum error.
How do I fix CMOS checksum errors on Windows 10?
1. Restart the computer
Sometimes abruptly cutting the power to your machine will cause the CMOS checksum error on HP, Dell, and Lenovo the next time you boot up.
Even switching the computer off using the power button without following the normal shutdown procedure can corrupt the BIOS and cause this error to pop up.
If you suspect this could be the reason the error has been OK, follow the computer’s instructions and restart the computer after it finishes booting. The CMOS checksum error should not appear again. Just remember to shut down the correct way next time.
2. Perform a startup repair
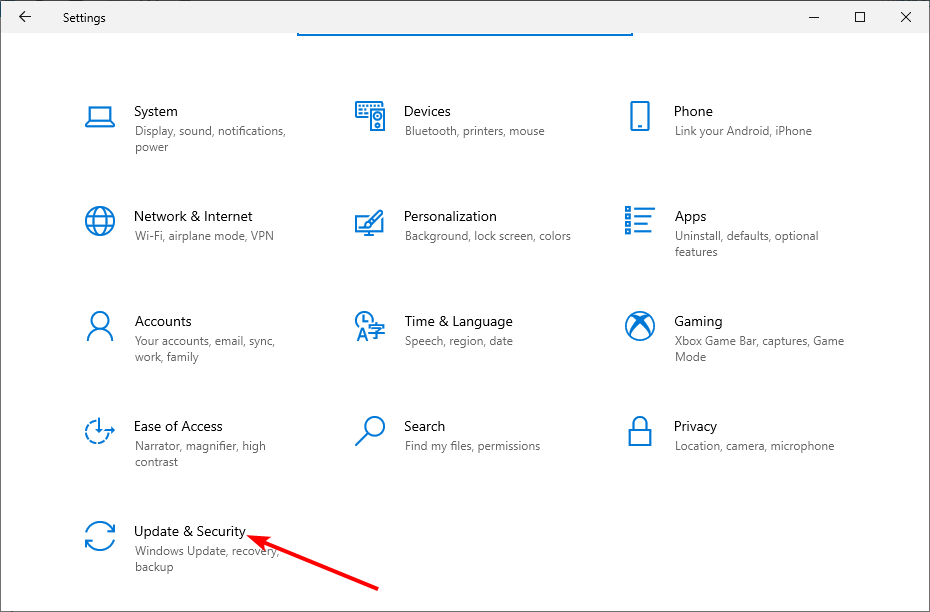
- Press the Windows key + I and select Update & Security.
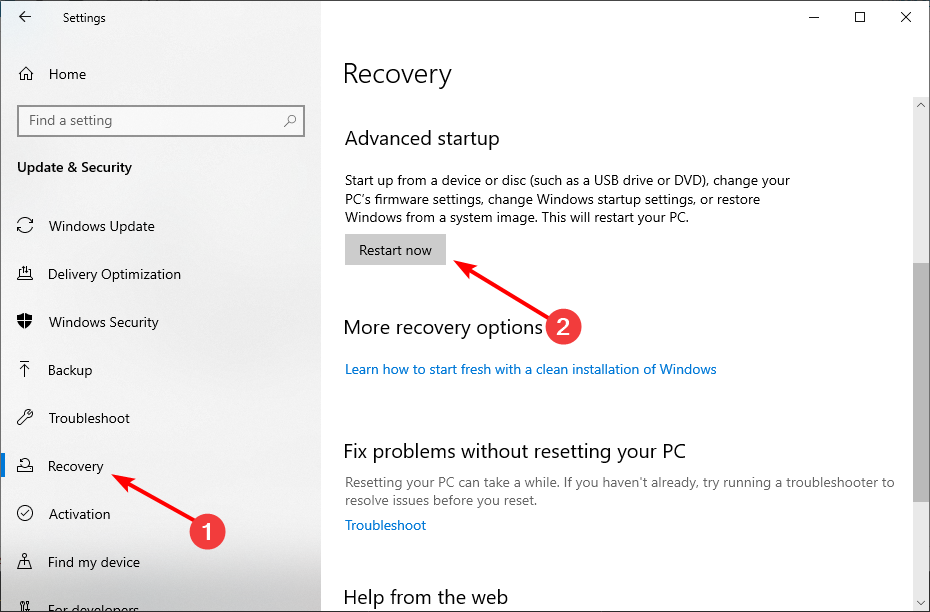
- Select Recovery in the left pane and click the Restart now button under Advanced startup.
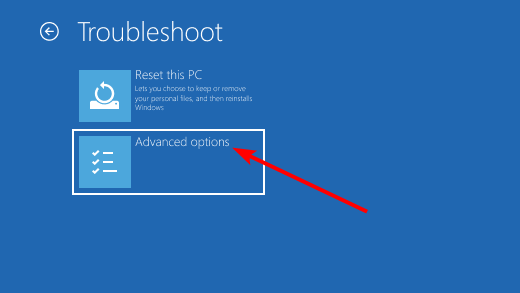
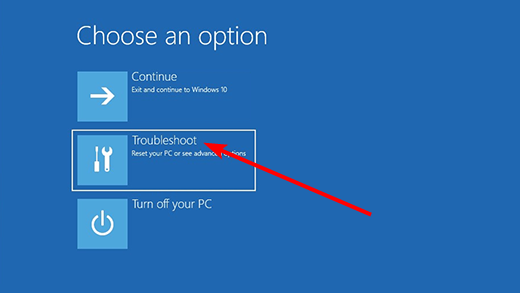
- When your PC restarts, select Troubleshoot > Advanced options.
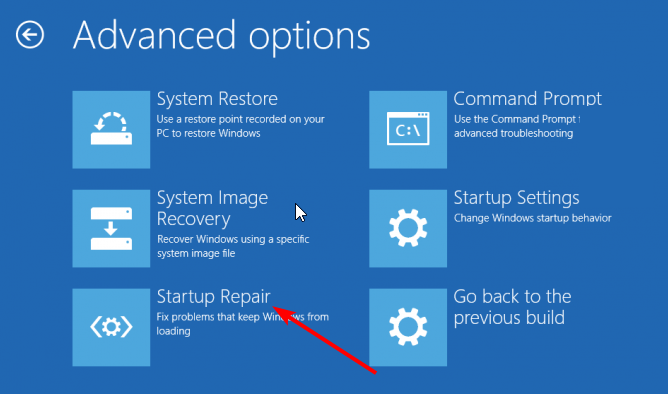
- Now, choose Startup Repair.
- Finally, enter the password for your account, click the Continue button, and follow the onscreen instructions to complete the process.
In rare cases, the CMOS checksum error after replacing the battery might be due to other startup issues. The quickest way to fix this is to perform a Startup Repair, as shown above.
3. Update the BIOS
Sometimes, the CMOS checksum error may simply be due to outdated BIOS. Updating or flashing the BIOS by checking the manufacturer’s website for the latest version should do the trick.
However, you should be careful while updating your BIOS, as any mistake might be costly. So, ensure you follow the instructions carefully or seek the help of a technician.
4. Reset your BIOS
- Press and hold F1 or F2 (keyboard input depends on what is shown on the error page) on the error page to enter the BIOS settings.
- Click the option to reset your BIOS to default (Load default in some cases).
- If you have left the error page, you cannot enter the BIOS using the steps above. So, you need to force shutdown your PC using the Power button.
- Now, Turn on your PC again and force it to shut down when the manufacturer’s logo appears. Repeat this twice to enter the Advanced startup page.
- Next, choose the Troubleshoot option.
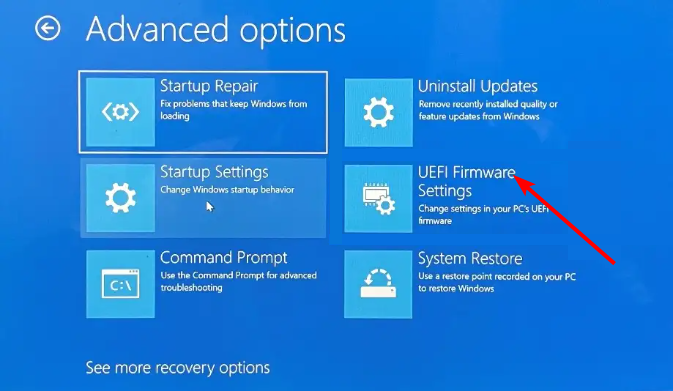
- Select Advanced options.
- Choose UEFI Firmware Settings.
- Now, click the Restart button to enter BIOS.
- Finally, click the Exit tab at the top and choose the option for resetting BIOS, depending on your PC manufacturer.
If you suspect your BIOS has been corrupted by malware or due to a power cut, the best option may be to reset the BIOS to its default or factory settings.
This will also work where the CMOS checksum error occurs after replacing the battery or due to a BIOS update that went wrong. Finally, note that the structure of your BIOS setup page will depend on your PC.
5. Replace the CMOS battery
In some cases, the CMOS battery might be corrupt beyond repair. This small battery on the motherboard provides power to the CMOS, so it remains powered when you switch off the power supply to the computer.
This battery ensures the BIOS loads the correct settings for the computer to start normally. But if it is spoilt, you might keep getting the CMOS checksum error.
Hence, you need to replace the battery to eliminate the error message. However, you need a high level of technical expertise to do this. If you are not sure, it is advised to consult a technician.
The CMOS checksum error can be irritating if you don’t get it fixed. And that irritation will grow into frustration if you fail to find a workable solution to the problem.
Hopefully, the solutions we have discussed here will help you to fix the error and get your PC to behave again. If you still can’t fix the issue after applying the fixes above, you might need to see a technician, as the problem might be caused by hardware damage.
In the same vein, if your CMOS battery is low, check our detailed guide to fix it quickly.
Feel free to let us know the solution that helped you fix this issue in the comments below.

