Fix: VPN Error 809 on Windows 10 & 11
![]() 4 min. read
4 min. read
![]() Updated on
Updated on
Share this article
Improve this guide
Read our disclosure page to find out how can you help Windows Report sustain the editorial team. Read more
Key notes
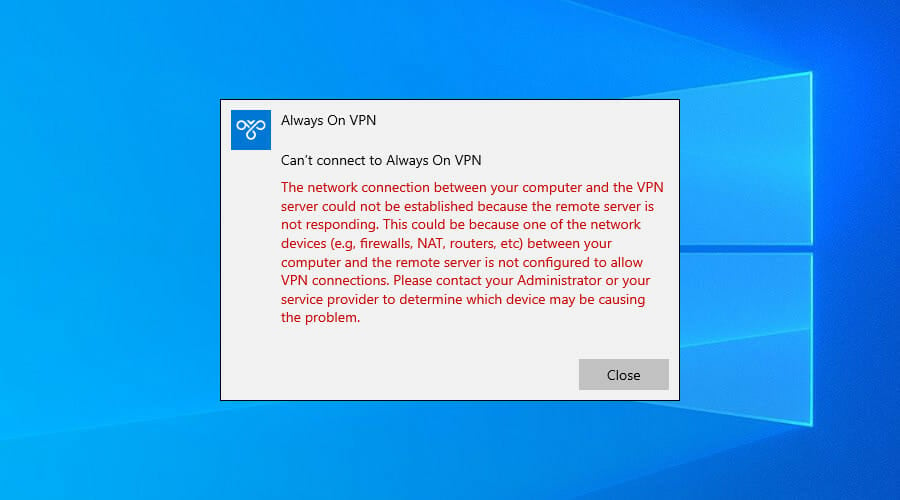
- If you receive the VPN error 809, it means that the network connection between your computer and the VPN server could not be established because the remote server is not responding.
- You can easily fix this error by following our instructions below. However, the best long-term solution is to use a native VPN app instead of a manual VPN connection.
- Discover more solutions to similar issues in our VPN Errors Code section.
- Join our VPN Troubleshooting Hub to master your VPN service.

VPN error 809 is usually caused by the firewall between the client and server, which blocks the ports used by the VPN tunnel.
On top of that, Windows doesn’t support IPsec NAT-T security associations to servers behind a NAT device by default.
When the error appears, the event log too won’t display any related logs because the traffic can’t reach the MX’s WAN interface. But you should be able to solve it on Windows 10.
Here’s the error message we’re talking about.

How can I fix VPN error 809 on Windows 10?
Enable the ports on your firewall or router

You need to open the ports on your firewall or router, depending on which VPN protocol you’re using.
- Port 1723 over TCP for PPTP
- Port 500 or 4500 over UDP for L2TP/IPsec or IKEv2/IPsec
If this is not possible, deploy the SSTP- or OpenVPN-based tunnel on your VPN provider.
This allows the VPN connection to work across the firewall, NAT, and web proxies.
Find out more about how to fix VPN blocked by Windows Firewall.
Use a VPN client instead of a manual VPN connection

Windows 10 is prone to various problems, including VPN errors like 809. It can be the result of incorrect network settings.
Even if you manage to fix the issue, it doesn’t mean you won’t face it again.
So, if you’re looking for a long-term solution to get rid of VPN errors, we suggest opting for Private Internet Access (PIA).
It has a native VPN app ready for Windows 10 as well as older Windows versions and other devices: Mac, Linux, Android, and iOS, and even routers.
You can use PIA to create a secure tunnel to the public Internet. This way, you can protect your privacy, encrypt your data against any hacker attacks, and unblock content that’s not available to your region.
More about PIA:
- Support for OpenVPN and WireGuard protocols
- Native port forwarding
- Kill switch
- No logging, no leaks
- 24/7 live chat support
- 30-day money-back guarantee (no free trial)

Private Internet Access
Use this reliable VPN app to eliminate any VPN errors and enjoy a secure connection on your device.Make a small modification to the system registry
- Right-click Start and select Run
- Type regedit and press Enter
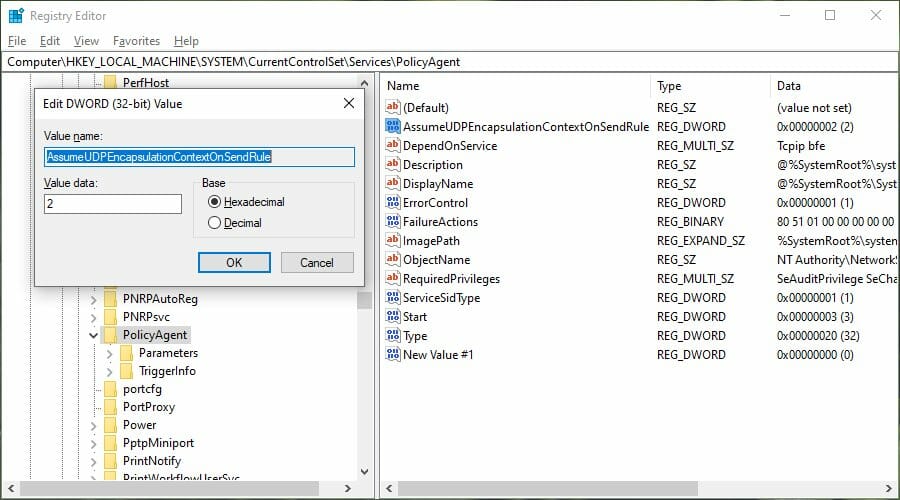
- Go to this location:
HKEY_LOCAL_MACHINESYSTEMCurrentControlSetServicesPolicyAgent - Open the Edit menu, go to New, and click DWORD (32-bit) Value
- Type AssumeUDPEncapsulationContextOnSendRule and press Enter
- Double-click the AssumeUDPEncapsulationContextOnSendRule entry
- Set Base to Hexadecimal
- Set Value data to 2
- Click OK
- Restart your PC.
 NOTE
NOTE
Disable Xbox Live Networking services

- Type services in the search box
- Click on Services from search results
- Find Xbox Live Networking Services and disable it
- Check if your VPN connection works and if the error 809 disappears
If your anti-malware solution is not compatible with Windows 10, it could break down your IPsec connections.
So you should temporarily disable it to see if it’s the root of VPN error 809.
Discover more about how to bypass VPN blocks on Windows 10 PC.
Check PAP settings

- Click Start and select Settings
- Select Network and Internet
- Click VPN on the left pane
- Click Add a VPN connection and use the following:
- For VPN provider, use Windows (built-in)
- For Connection Name, write anything you like as this will be shown on the interface
- For Server name or address, write the external hostname of your VPN
- For VPN type, choose L2TP/IPsec
- For Type of sign-in info, select Username and password
- Click Save
- Select Change adapter options
- Right-click the connection you created and select Properties
- Under the Security tab, click Advanced Settings
- Click Use pre-shared key
- Enter the PSK and click OK
- Set Data encryption to Maximum Strength
- Under Authentication, select Allow these protocols
- Tick the PAP box only
- Restart your computer
In conclusion, you should be able to fix the VPN error 809 on your Windows 10 PC by opening ports in your firewall or router.
You can also make a tiny modification to your system registry and check PAP settings when creating the VPN connection.
However, the surest way to get rid of VPN errors is by using a native VPN app for Windows instead of setting up a manual VPN connection.
And we can’t think of a more suited VPN provider than Private Internet Access.


User forum
4 messages