Google Photos: Original vs High Quality [Quick Explanation]
![]() 3 min. read
3 min. read
![]() Updated on
Updated on
Share this article

Improve this guide
Read our disclosure page to find out how can you help Windows Report sustain the editorial team Read more
Key notes
- Google Photos users can select High quality or Original when uploading images.
- This article explains the difference between the Original and High quality options.
- Our Digital Photography Hub includes many other useful articles on this topic.
- Check out the Web & Cloud section to browse through other thorough guides.
The Google Photos web app provides 15 GB of free storage space for your favorite photographs and images. With this app, you can edit photographs and set up slideshow albums for them.
Google Photos includes two alternative upload options for photos. And this can confuse some people.
You can select an Original or High Quality setting for uploading images.
If you’re wondering what the difference is between those settings, you’ve come to the right page!
High quality vs. Original Google Photo upload options
What’s the difference between the Original and High Quality upload settings?
The primary difference between the two upload options is that the High Quality setting compresses photographs. Selecting that option can reduce both the resolution and file size of uploaded photos and videos.
In contrast, the Original option doesn’t compress snapshots. Thus, uploading them with that setting will ensure they are saved with their original resolutions.
What should I choose to preserve the original picture quality?
The Original setting is certainly the best for preserving original picture quality as no compression is applied to photos or videos. That’s especially the case for photos that eclipse 16 MP as the High Quality option will reduce them to exactly a 16 MP resolution.
Selecting High Quality won’t have so much impact on lower resolution images. However, photos with resolutions less than 16 MP might still be scaled down when uploaded to Google Photos with this option selected.
What’s the best option to select for saving storage space in Google Photos?
![]()
High Quality is the best option for saving storage space in Google Photos. Its compression will always reduce the file size of photographs uploaded to Google Photos
High quality is even better for saving storage space as it comes with unlimited with free storage. That means photographs and videos uploaded with that setting selected won’t consume any of your Google Photos storage space at all.
In that respect, the High Quality image compression might seem a little pointless.
However, remember that your image files will still be the same reduced file size when you download them to your hard drive.
How can I change the photo upload setting in Photos?
- Open Google Photos in your browser.
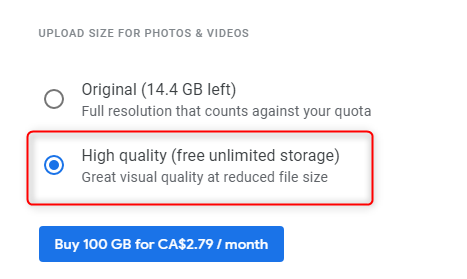
- Click the Settings button to open the options shown directly below.

- Select the High Quality or Original radio button.
- If you select the High Quality option, the dialog box shown directly below might open, which includes an option to recover account storage. Select the checkbox on the dialog box to recover the specified amount of storage space.

- Then click the Confirm button.


So, select the Original option if you need to retain the original picture quality of your photos and photos.
The High quality setting will impact picture quality primarily by reducing image resolutions, but it will save you a lot of storage space in Google Photos.
[wl_navigator]