How to Change Power and Sleep Settings in Windows 11
Want your PC to stop sleeping too soon or save more power? Windows 11 lets you customize power and sleep settings to match your usage style. Here’s how to do it step-by-step.
How to Change Power and Sleep Settings in Windows 11
Step by step for changing quickly Power and Sleep settings in Windows 11
- Open Settings
-> Press Windows + I to launch the Settings app.
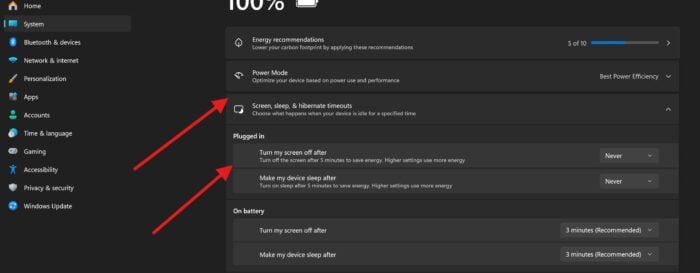
- Navigate to System > Power & Battery
-> In the left panel, click System.
-> Scroll down and select Power & battery
- Expand Screen and Sleep Settings
-> Under the Power section, click the dropdown for Screen and sleep.
- Set Sleep and Screen Timers
-> Choose how long your screen stays on when on battery or plugged in.
-> Choose when your PC goes to sleep in both scenarios. - Save and Exit
-> Settings apply automatically.
-> You can now close the Settings window.

Related Fixes and Tips
Read our disclosure page to find out how can you help Windows Report sustain the editorial team. Read more
Improve this guide


User forum
0 messages