Install ChatGPT App Locally: Why & How to Do It
Follow the step by step guide to get this done
Key notes
- Installing ChatGPT locally is tricky but can be useful as there will be a faster response time.
- This guide will help you with detailed steps to get this done.
ChatGPT is designed to provide fast responses to your queries. You can access ChatGPT online; however, if you prefer to install the app, this guide can help.
We will discuss the step-by-step method to install the ChatGPT app locally so that you can use it to get faster responses with increased privacy.
Why install the ChatGPT app locally?
There are several benefits of installing the AI model on your computer, some of which are mentioned here:
- Fast and responsive – You can directly run it on your device. This means the app will use the device’s processor and memory, which will work more efficiently than when working on the remote server.
- Increased privacy and security – Using the app locally will enhance the privacy and security of your private data. The data will no longer be transferred from your device to a remote server.
- Customizable – Installing the app locally will allow you to customize the app as per your preferences and requirements. You can change the user interface, app functions, and more.
- No need to face downtime – If the app is locally installed, you won’t have to sign in again or wait for the server to respond if it is busy. Hence no downtime.
How can I install the ChatGPT app locally?
Before engaging in steps to install the ChatGPT app locally, you should consider performing the following checks:
- First, install the Node.js extension on VS code.
- Then, get Git extension on VS code.
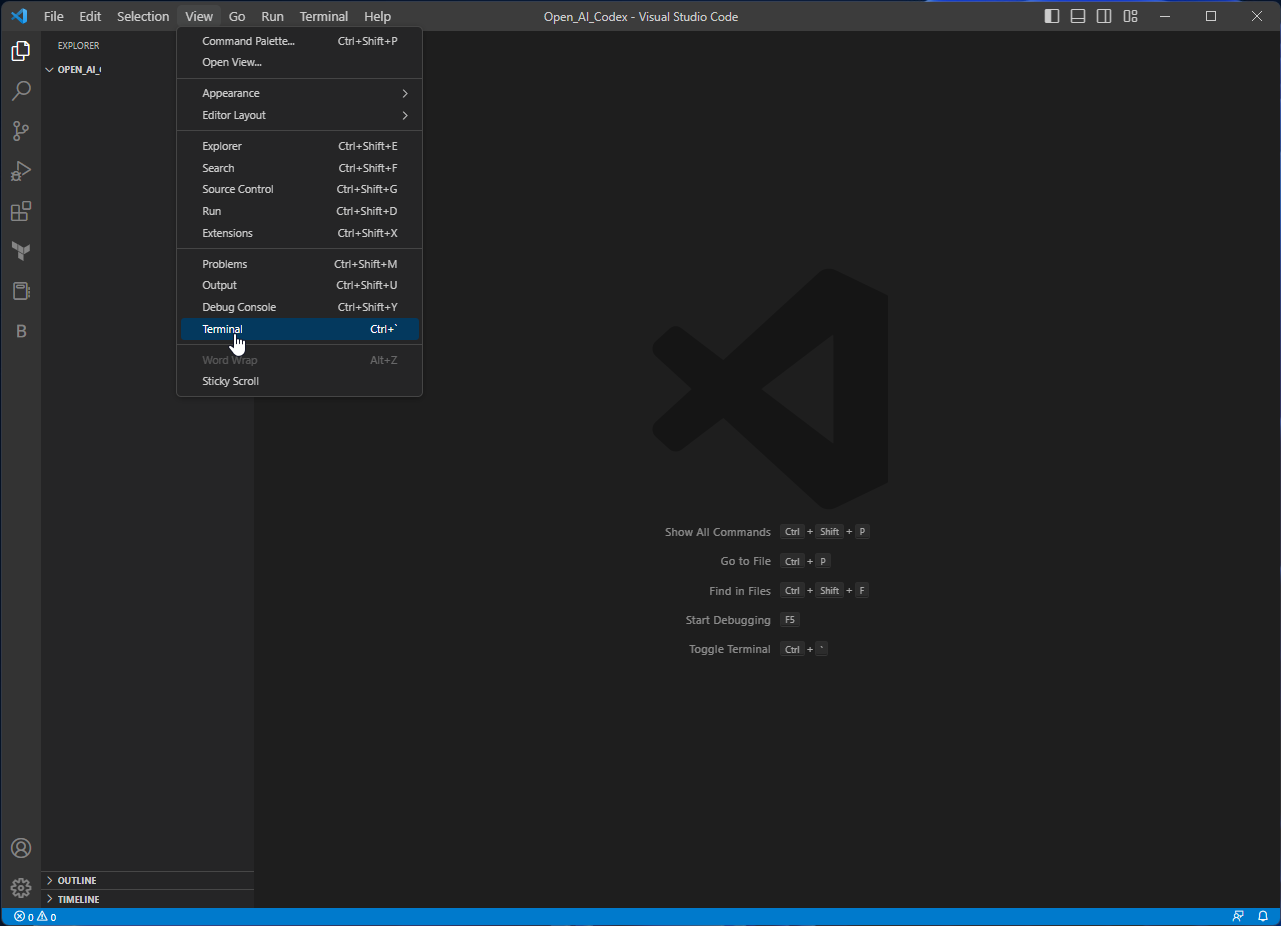
1. Create a folder & open it in Visual Studio Code
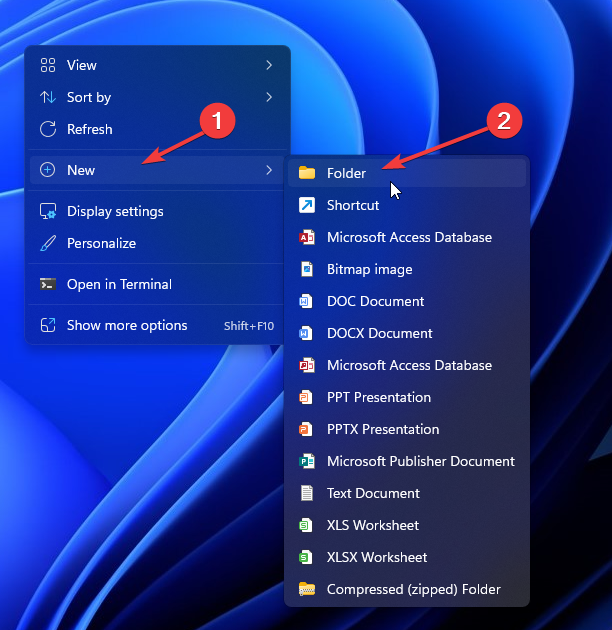
- Right-click on the empty space on the desktop, select New, then Folder.
- Rename the folder as Open_AI_ChatGPT app.
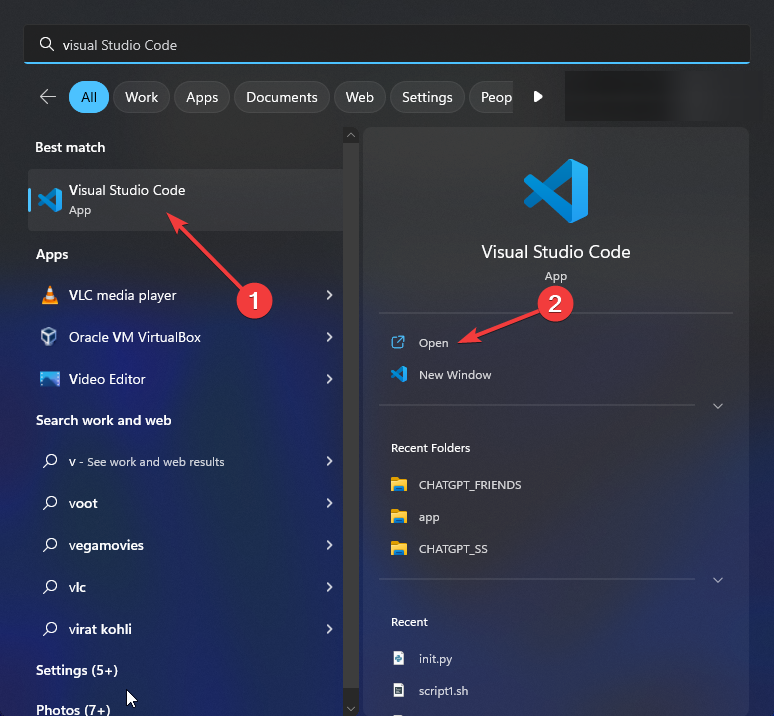
- Press the Windows key, type Visual Studio Code, and click Open.
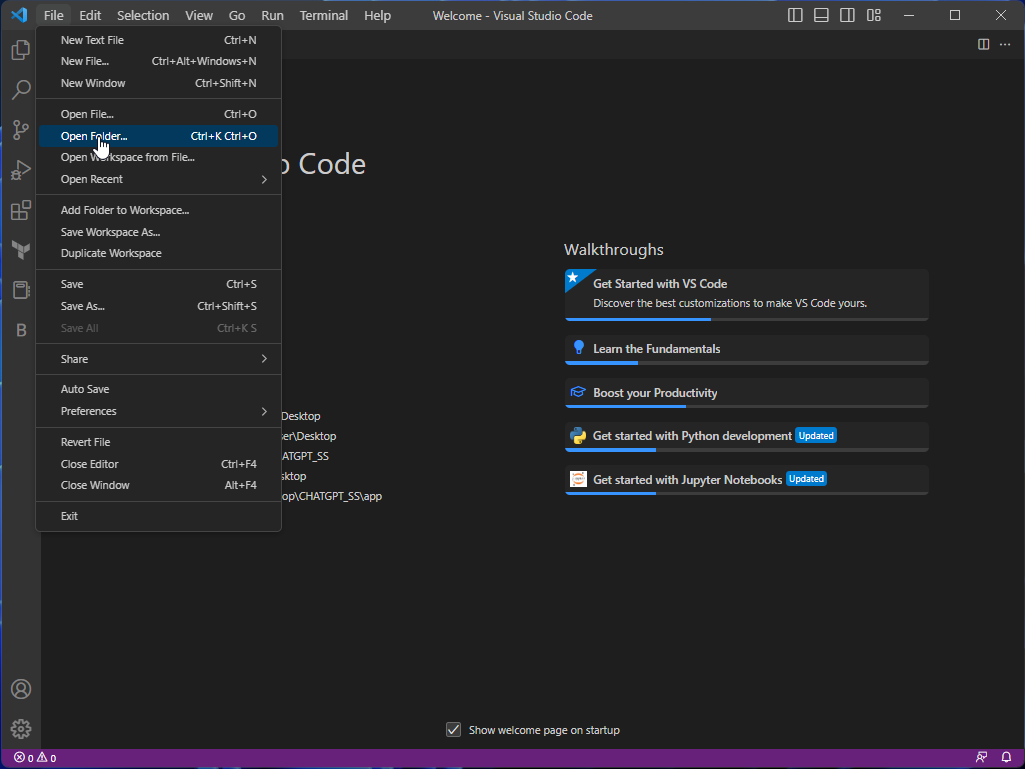
- Go to the File menu, and select Open Folder.
- Choose the folder and click Select Folder.
- Next, go to the View menu and select Terminal.
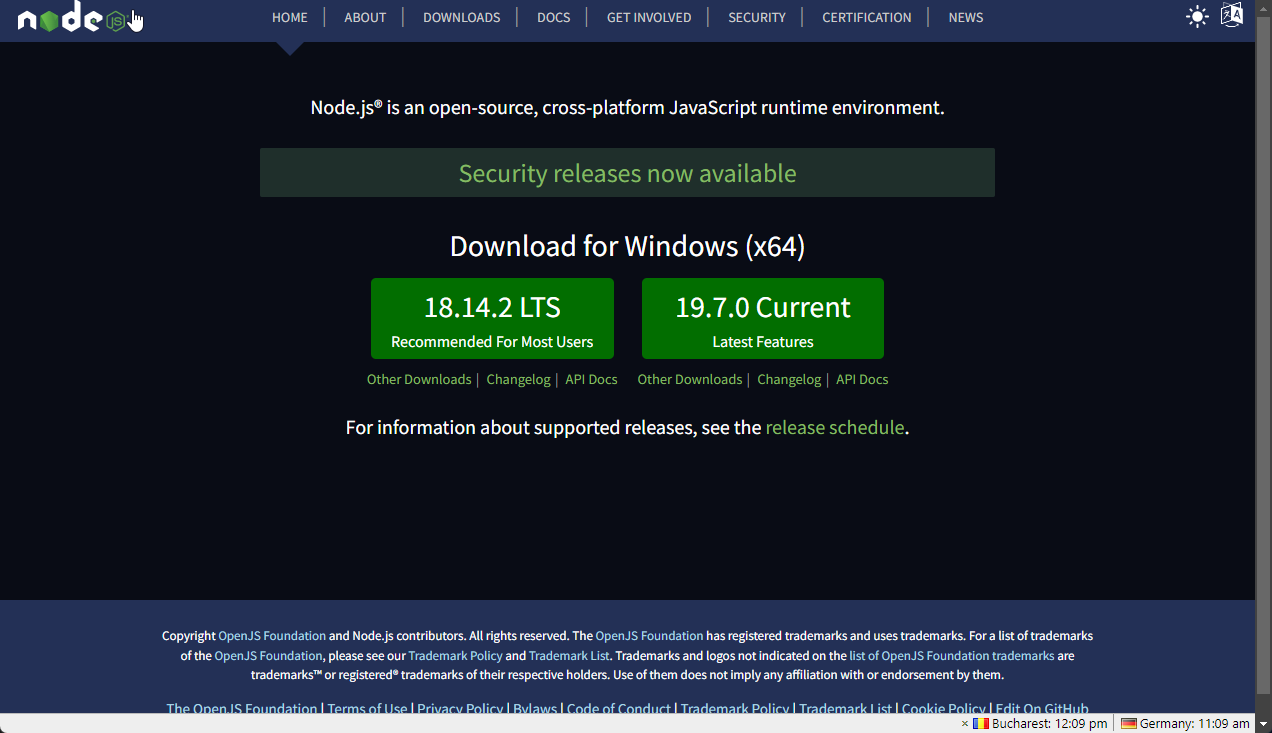
2. Check if Node.js is installed
- Type the following code to check if you have node.js installed and press Enter:
node -v - If it comes with an error, proceed with the next step.
- Go to the Node.js website and download Node.js
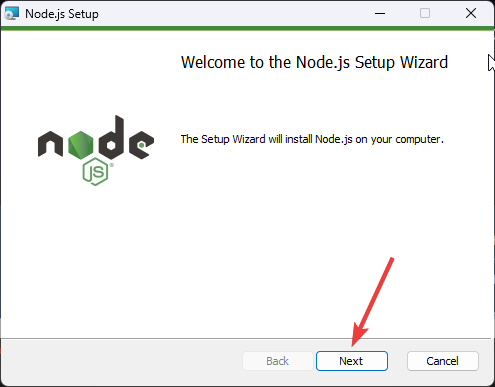
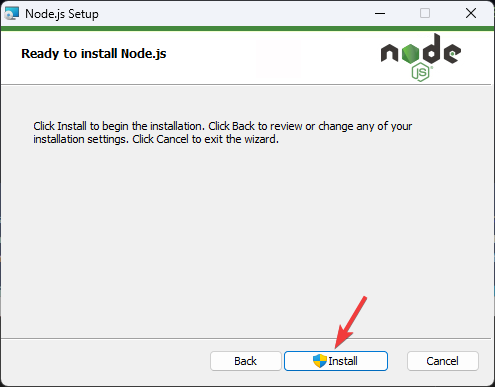
- Double-click to open the installer file. Click Next.
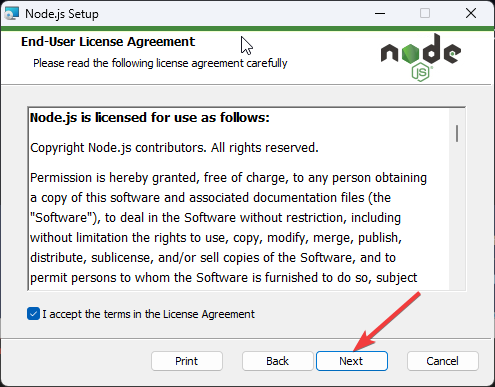
- Now accept all the terms and conditions and click Next.
- Click Next on all the following windows, then click Install to initiate the installation.
- Now restart Visual Studio Code.
- Once done, return to the terminal, type the following code to create a Vanilla JavaScript repository, and press Enter:
npm create vite@latest client --template vanilla - Next, type Y and press Enter.
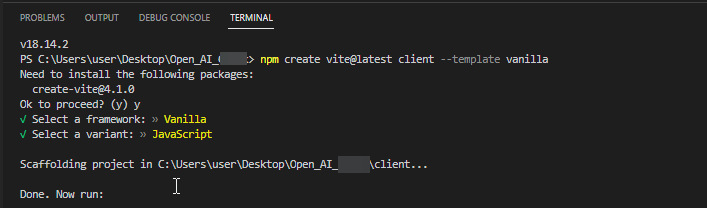
- Select Vanilla as the framework when prompted.
- Select JavaScript as a variant when asked. You will see many files and folders created under the Open_AI_ChatGPT app folder.
3. Install dependencies
- Type the following command to enter the client directory and press Enter:
cd .\client\ - Next, copy and paste the following command and press Enter:
npm install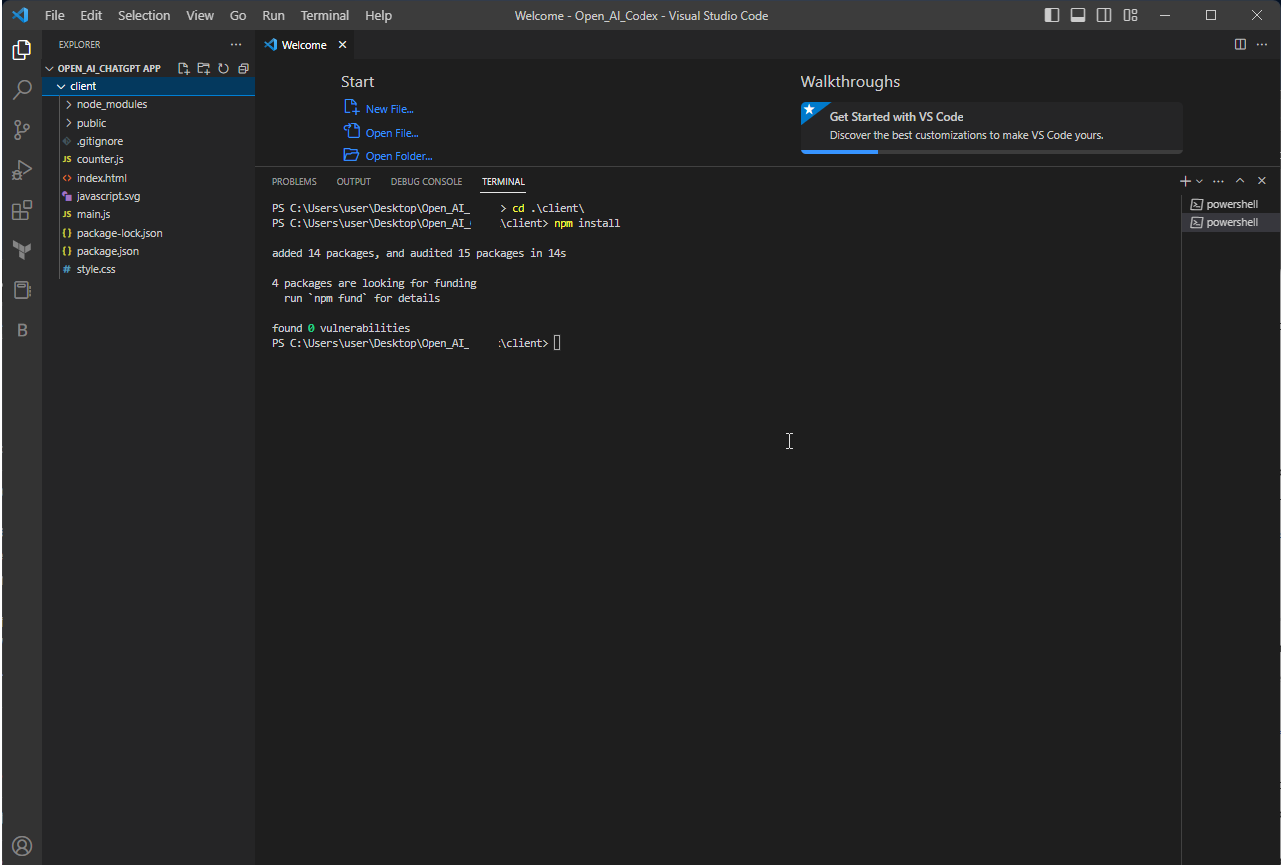
- Go to this link and download the zipped folder named assets.
- Now copy the extracted assets folder to the client folder.
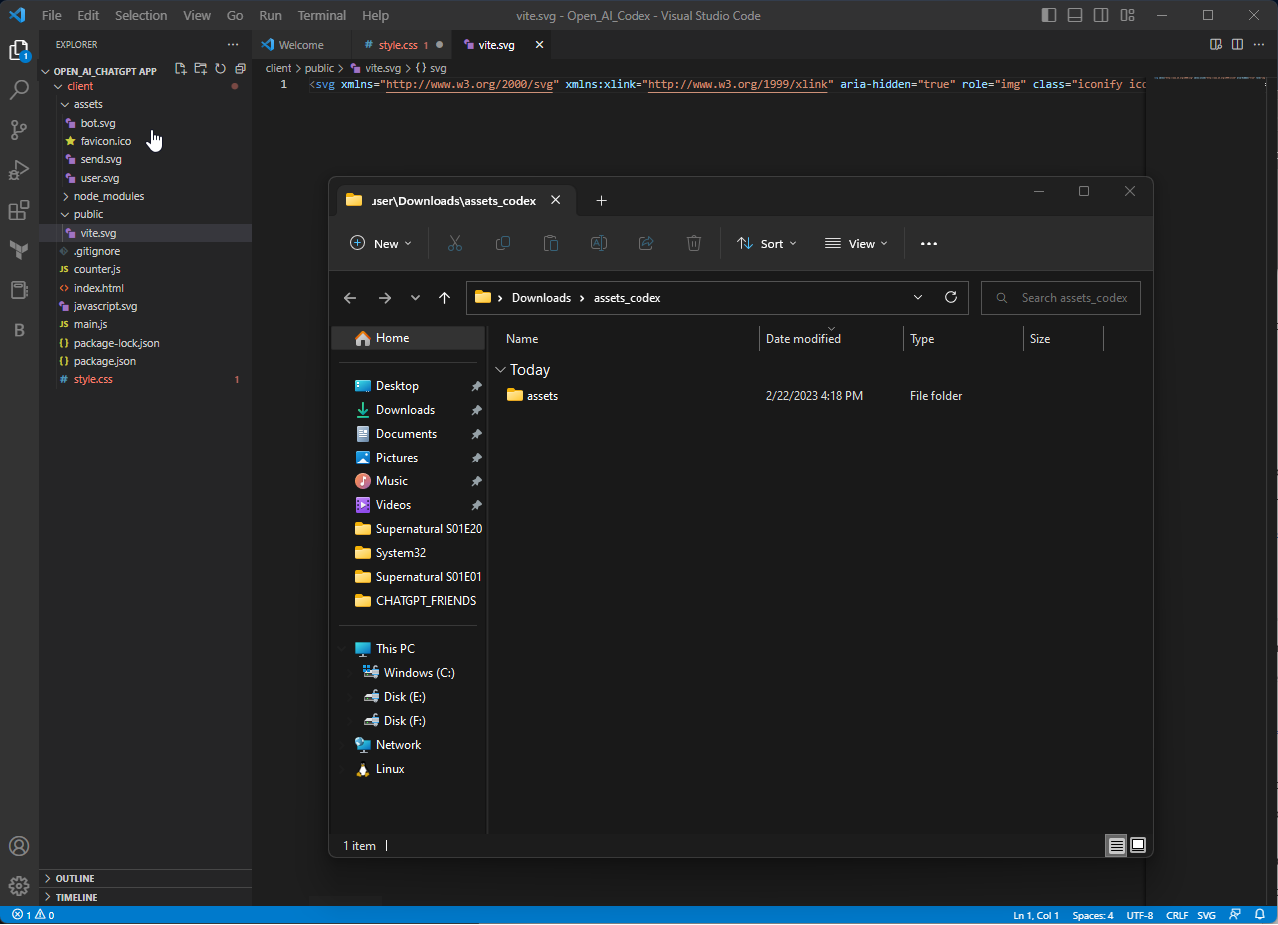
- Next, remove the vite.svg and counter.js files.
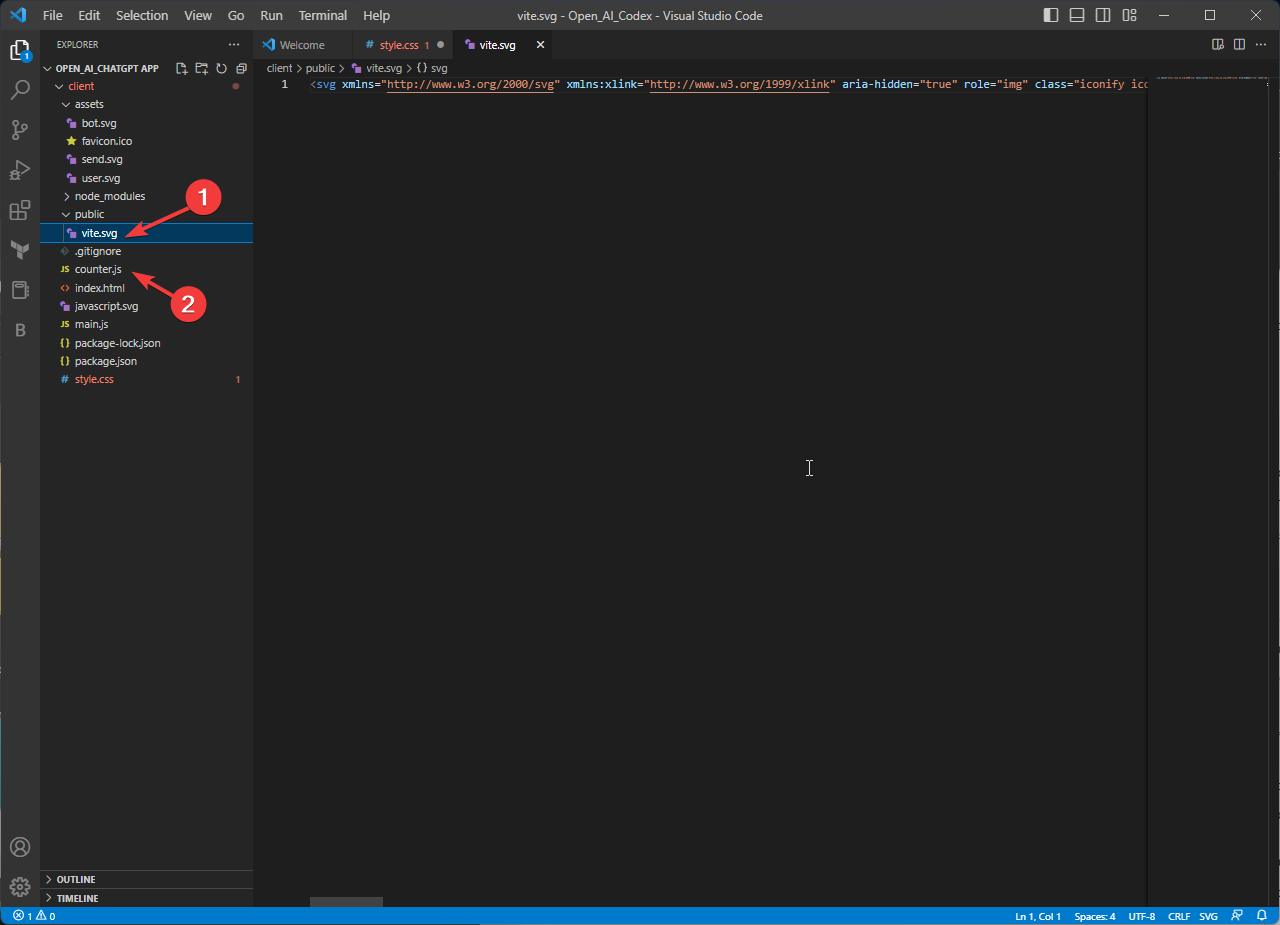
- Finally, move the favicon file from the assets folder to the public folder.
4. Write code in style.css
- Copy and paste the below-mentioned code as it is in the style.css folder:
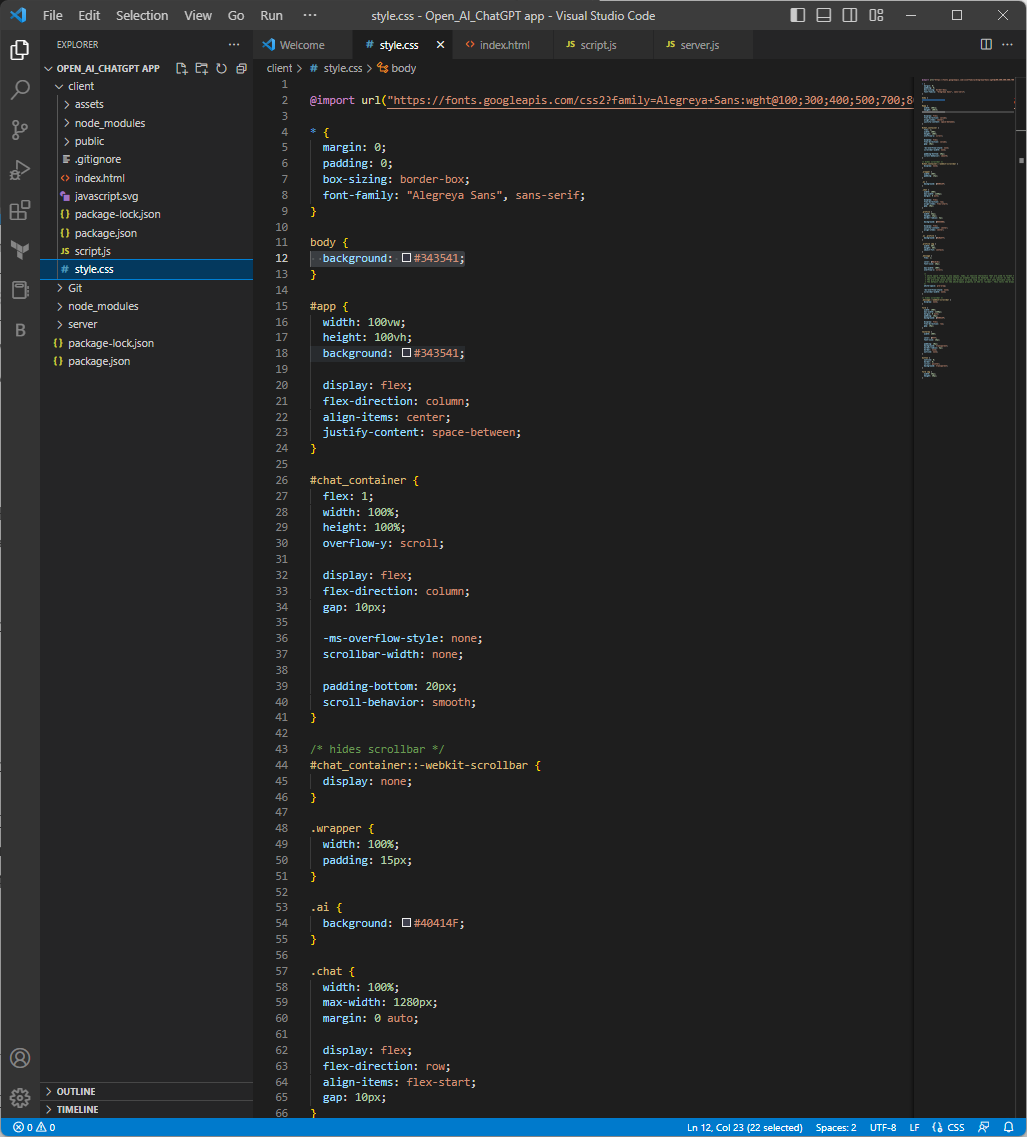
@import url("https://fonts.googleapis.com/css2?family=Alegreya+Sans:wght@100;300;400;500;700;800;900&display=swap");
* {
 margin: 0;
 padding: 0;
 box-sizing: border-box;
 font-family: "Alegreya Sans", sans-serif;
}
body {
  background: #343541;
}
#app {
  width: 100vw;
  height: 100vh;
  background: #343541;
  display: flex;
  flex-direction: column;
  align-items: center;
  justify-content: space-between;
}
#chat_container {
  flex: 1;
  width: 100%;
  height: 100%;
  overflow-y: scroll;
  display: flex;
  flex-direction: column;
  gap: 10px;
  -ms-overflow-style: none;
  scrollbar-width: none;
  padding-bottom: 20px;
  scroll-behavior: smooth;
}
/* hides scrollbar */
#chat_container::-webkit-scrollbar {
  display: none;
}
.wrapper {
  width: 100%;
  padding: 15px;
}
.ai {
  background: #40414F;
}
.chat {
  width: 100%;
  max-width: 1280px;
  margin: 0 auto;
 display: flex;
  flex-direction: row;
  align-items: flex-start;
  gap: 10px;
}
.profile {
  width: 36px;
  height: 36px;
  border-radius: 5px;
  background: #5436DA;
  display: flex;
  justify-content: center;
  align-items: center;
}
.ai .profile {
  background: #10a37f;
}
.profile img {
  width: 60%;
  height: 60%;
  object-fit: contain;
}
.message {
  flex: 1;
  color: #dcdcdc;
  font-size: 20px;
  max-width: 100%;
  overflow-x: scroll;
  /*
   * white space refers to any spaces, tabs, or newline characters that are used to format the CSS code
       * specifies how white space within an element should be handled. It is similar to the "pre" value, which tells the browser to treat all white space as significant and to preserve it exactly as it appears in the source code.
  * The pre-wrap value allows the browser to wrap long lines of text onto multiple lines if necessary.
   * The default value for the white-space property in CSS is "normal". This tells the browser to collapse multiple white space characters into a single space, and to wrap text onto multiple lines as needed to fit within its container.
  */
  white-space: pre-wrap;
  -ms-overflow-style: none;
  scrollbar-width: none;}
/* hides scrollbar */
.message::-webkit-scrollbar {
  display: none;
}
form {
  width: 100%;
  max-width: 1280px;
  margin: 0 auto;
  padding: 10px;
  background: #40414F;
  display: flex;
  flex-direction: row;
  gap: 10px;
}
textarea {
  width: 100%;
  color: #fff;
  font-size: 18px;
  padding: 10px;
  background: transparent;
  border-radius: 5px;
  border: none;
  outline: none;
}
button {
  outline: 0;
  border: 0;  cursor: pointer;
  background: transparent;
}
form img {
  width: 30px;
  height: 30px;
}
5. Write code in Index.html
- Type the following code in the index.html file:
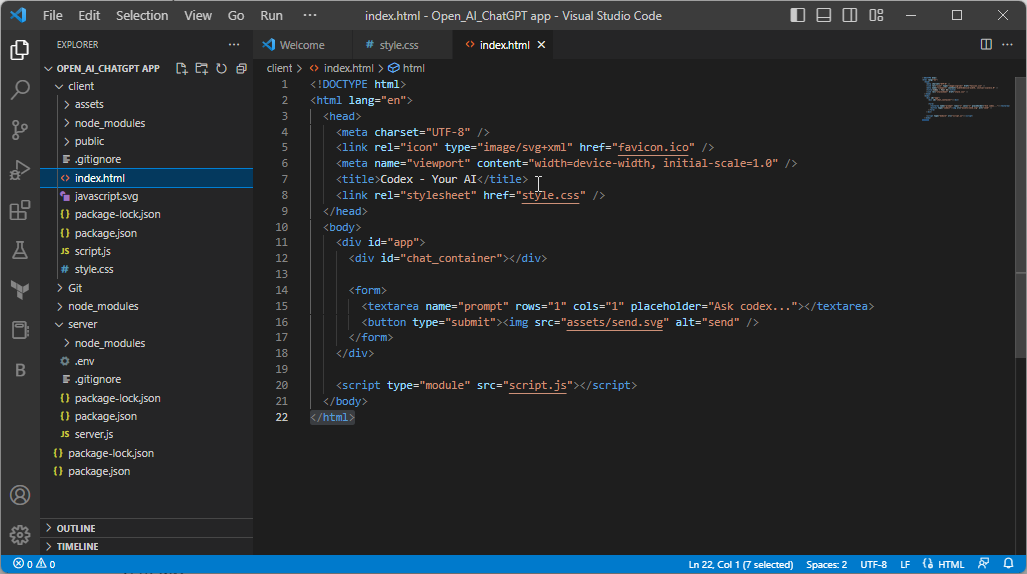
<!DOCTYPE html>
<html lang="en">
  <head>
    <meta charset="UTF-8" />
    <link rel="icon" type="image/svg+xml" href="favicon.ico" />
    <meta name="viewport" content="width=device-width, initial-scale=1.0" />
    <title>Codex - Your AI</title>
    <link rel="stylesheet" href="style.css" />
  </head>
  <body>
    <div id="app">
      <div id="chat_container"></div>
      <form>
        <textarea name="prompt" rows="1" cols="1" placeholder="Ask codex..."></textarea>
        <button type="submit"><img src="assets/send.svg" alt="send" />
      </form>
    </div>
    <script type="module" src="script.js"></script>
  </body>
</html> - Press Ctrl + S to save the script.
- Go to the left pane on Visual Studio Code and rename main.js to script.js.
6. Run commands on the Terminal
- Go to the terminal and press Ctrl + C to see where you would write commands. You should be in the client folder. If not, type the following command and press Enter:
cd client - Type the following command and press Enter:
npm run dev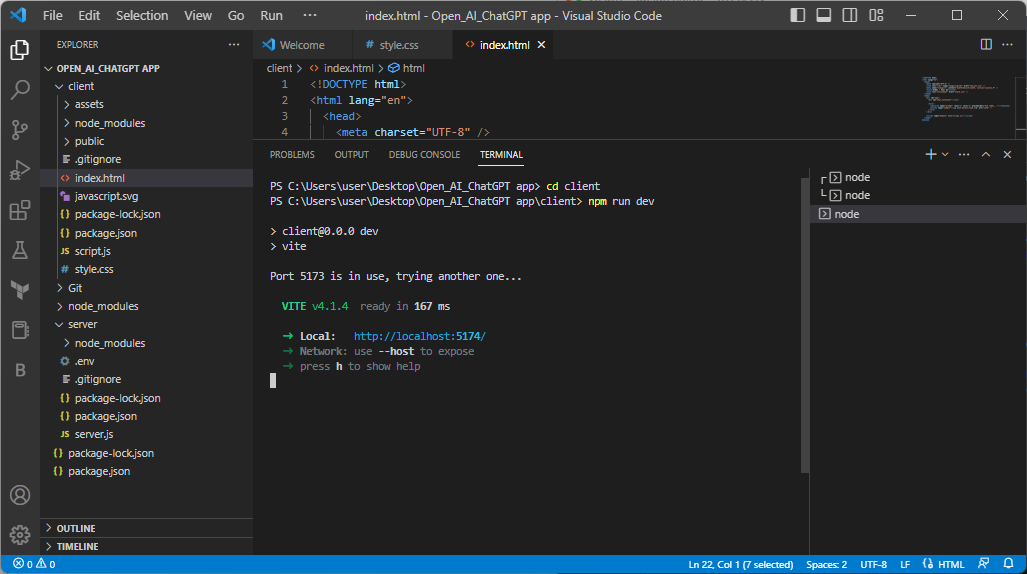
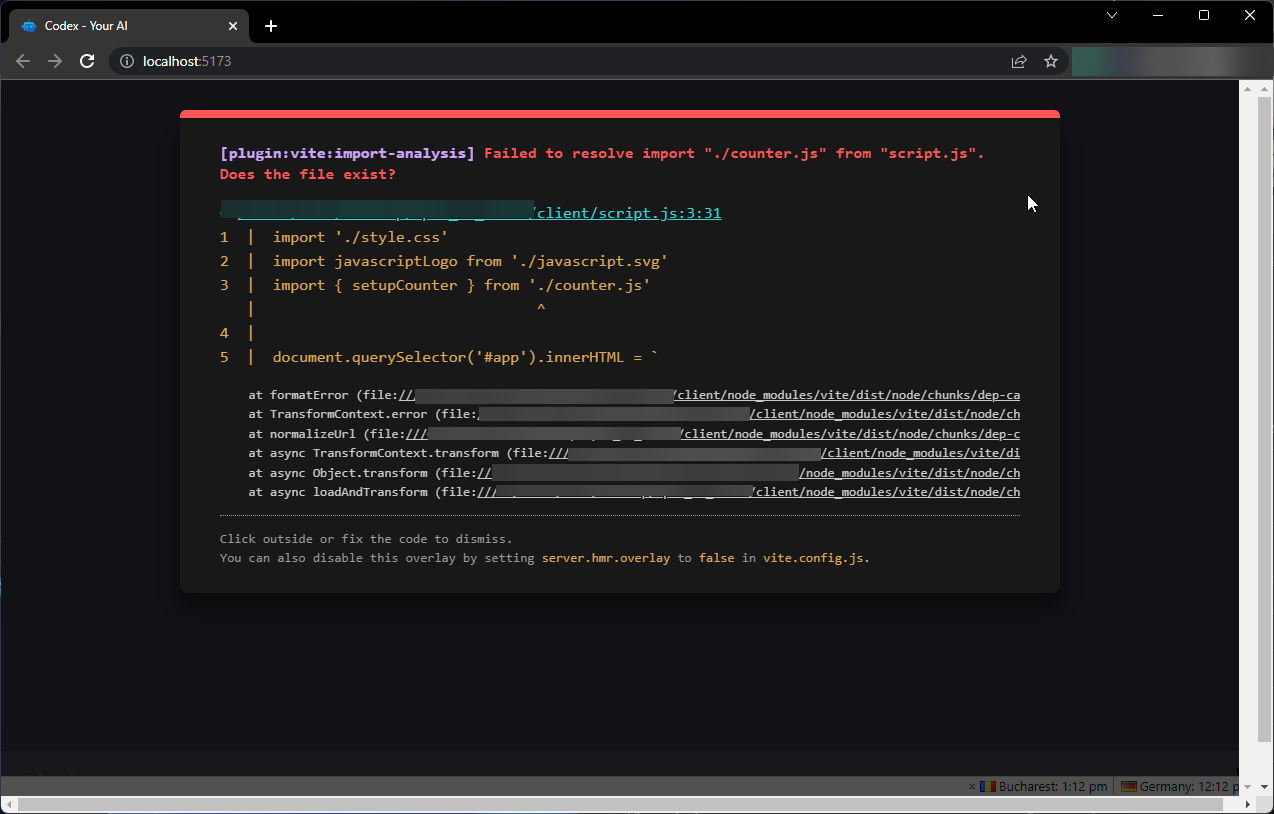
- You will get a web address to see how it looks so far. If you get the error mentioned in the screenshot, then move forward.
7. Write code in the script.js file
- Remove the content present in the script.js file, and copy and paste the following code:
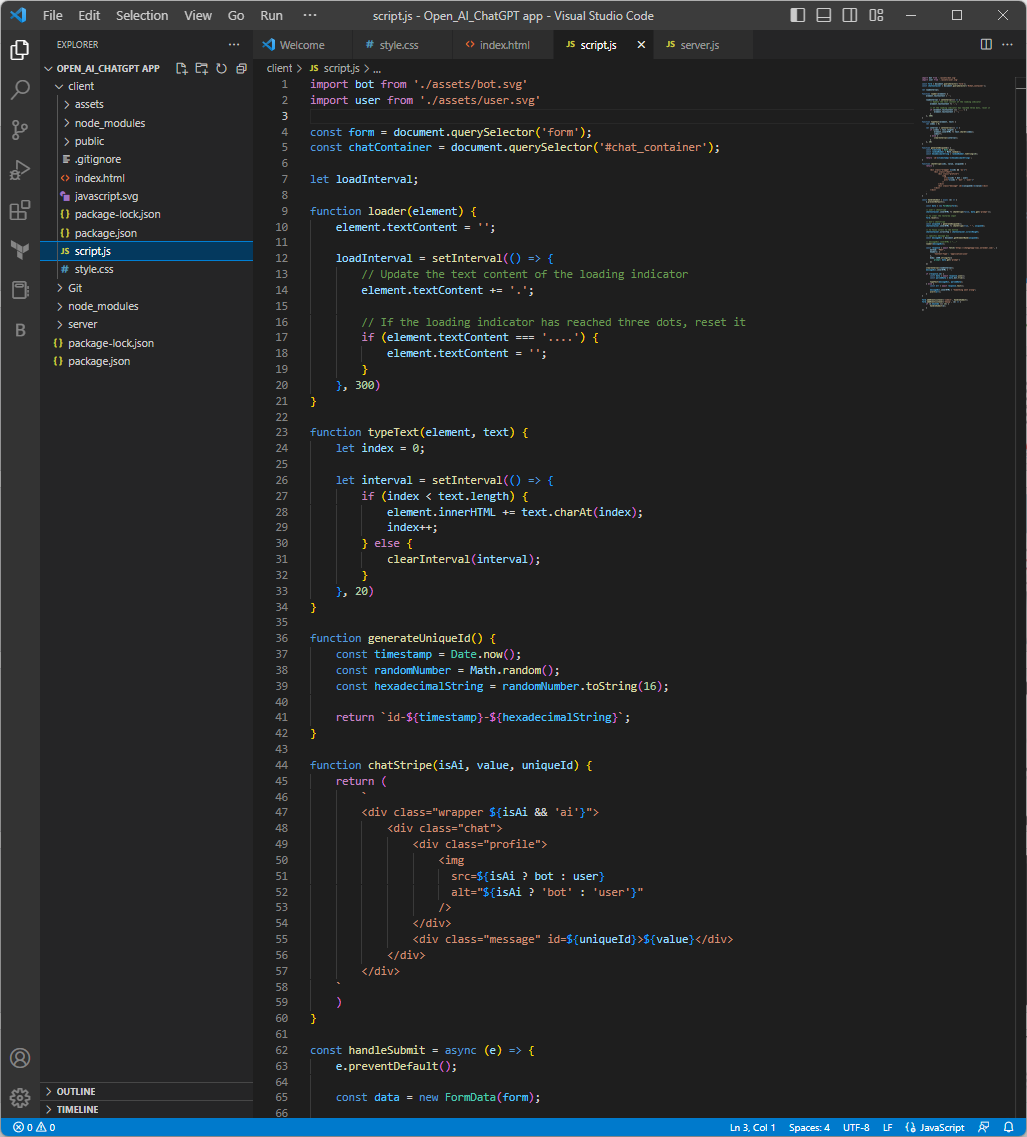
import bot from './assets/bot.svg'
import user from './assets/user.svg'
const form = document.querySelector('form');
const chatContainer = document.querySelector('#chat_container');
let loadInterval;
function loader(element) {
    element.textContent = '';
    loadInterval = setInterval(() => {
        // Update the text content of the loading indicator
        element.textContent += '.';
        // If the loading indicator has reached three dots, reset it
        if (element.textContent === '....') {
            element.textContent = '';
        }
    }, 300)
}
function typeText(element, text) {
    let index = 0;
    let interval = setInterval(() => {
        if (index < text.length) {
            element.innerHTML += text.charAt(index);
            index++;
        } else {
            clearInterval(interval);
        }
    }, 20)
}
function generateUniqueId() {
    const timestamp = Date.now();
    const randomNumber = Math.random();
    const hexadecimalString = randomNumber.toString(16);
    return `id-${timestamp}-${hexadecimalString}`;
}
function chatStripe(isAi, value, uniqueId) {
    return (
        `
        <div class="wrapper ${isAi && 'ai'}">
            <div class="chat">
                <div class="profile">
                    <img
                      src=${isAi ? bot : user}
                      alt="${isAi ? 'bot' : 'user'}"
                    />
                </div>
                <div class="message" id=${uniqueId}>${value}</div>
            </div>
        </div>
    `
    )
}
const handleSubmit = async (e) => {
    e.preventDefault();
    const data = new FormData(form);
// user's chatstripe
    chatContainer.innerHTML += chatStripe(false, data.get('prompt'));
// to clear the textarea input
    form.reset();
// bot's chatstripe
    const uniqueId = generateUniqueId();
    chatContainer.innerHTML += chatStripe(true, " ", uniqueId);
// to focus scroll to the bottom
    chatContainer.scrollTop = chatContainer.scrollHeight;
// specific message div
    const messageDiv = document.getElementById(uniqueId);
 // messageDiv.innerHTML = "..."
    loader(messageDiv);
const response = await fetch('https://localhost:8001/', {
        method: 'POST',
        headers: {
            'Content-Type': 'application/json'
        },
body: JSON.stringify({
            prompt: data.get('prompt')
        })
    })
clearInterval(loadInterval);
    messageDiv.innerHTML = '';
    if (response.ok) {
        const data = await response.json();
        const parsedData = data.bot.trim();
typeText(messageDiv, parsedData);
   } else {
        const err = await response.text();
messageDiv.innerHTML = "Something went wrong";
        alert(err);
    }
}
form.addEventListener('submit', handleSubmit);
form.addEventListener('keyup', (e) => {
    if (e.keyCode === 13) {
        handleSubmit(e);
    }
}) - Then, press Ctrl + S to save the script.
8. Create a new folder inside the Open_AI_ChatGPT app folder and install modules
- Create a folder in the Open_AI_ChatGPT app folder and name it Server.
- Open Terminal and press Crtl + C to stop the running app.
- Type the following command and press Enter to come out of the Client folder:
cd .. - Copy and paste the following command to enter the Server directory and press Enter:
cd server - Type the following command and press Enter to generate a package.json file in the server folder:
npm init -y
- To install dependencies, type the following command and press Enter. This will create a new file named package-lock.json:
npm install cors dotenv express nodemon openai
9. Generate the API key and mention it in .env
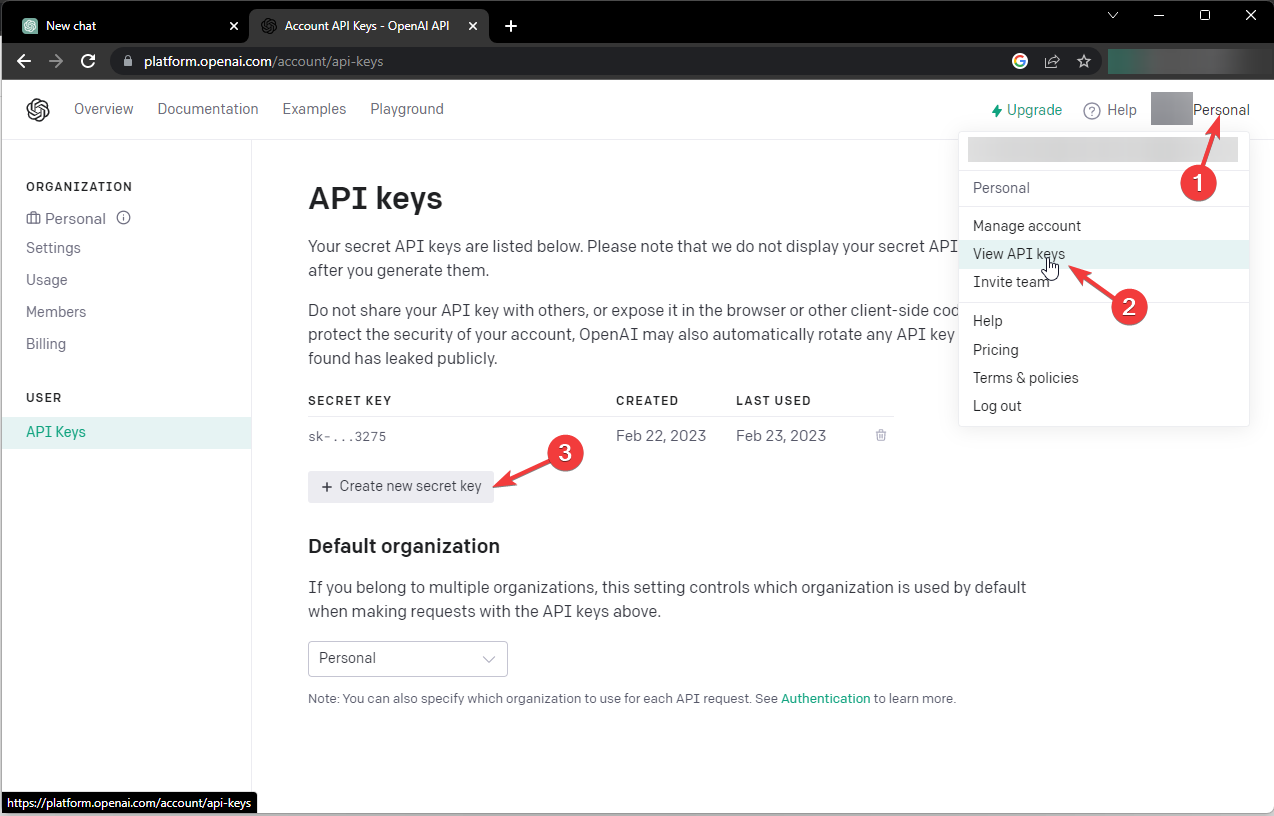
- Go to the Open API website and log in.
- Now click Personal and select View API keys.
- Click Create new secret key and copy the key.
- In the server folder, create a new file and name it .env.
- In the .env file, type the following code after replacing The API Key with the key you copied from the Open API website and press Enter:
OPENAI_API_KEY="The API Key"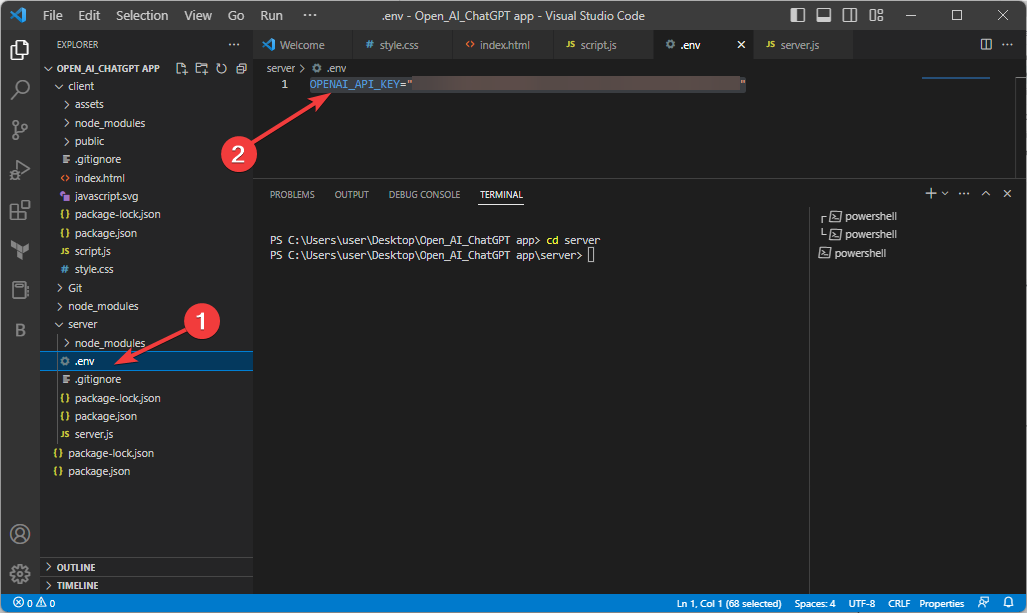
10. Create new file server.js and write a script
- Create a new file in the server folder and rename it server.js.
- Copy and paste the following script inside this file and press Ctrl+S to save the file:
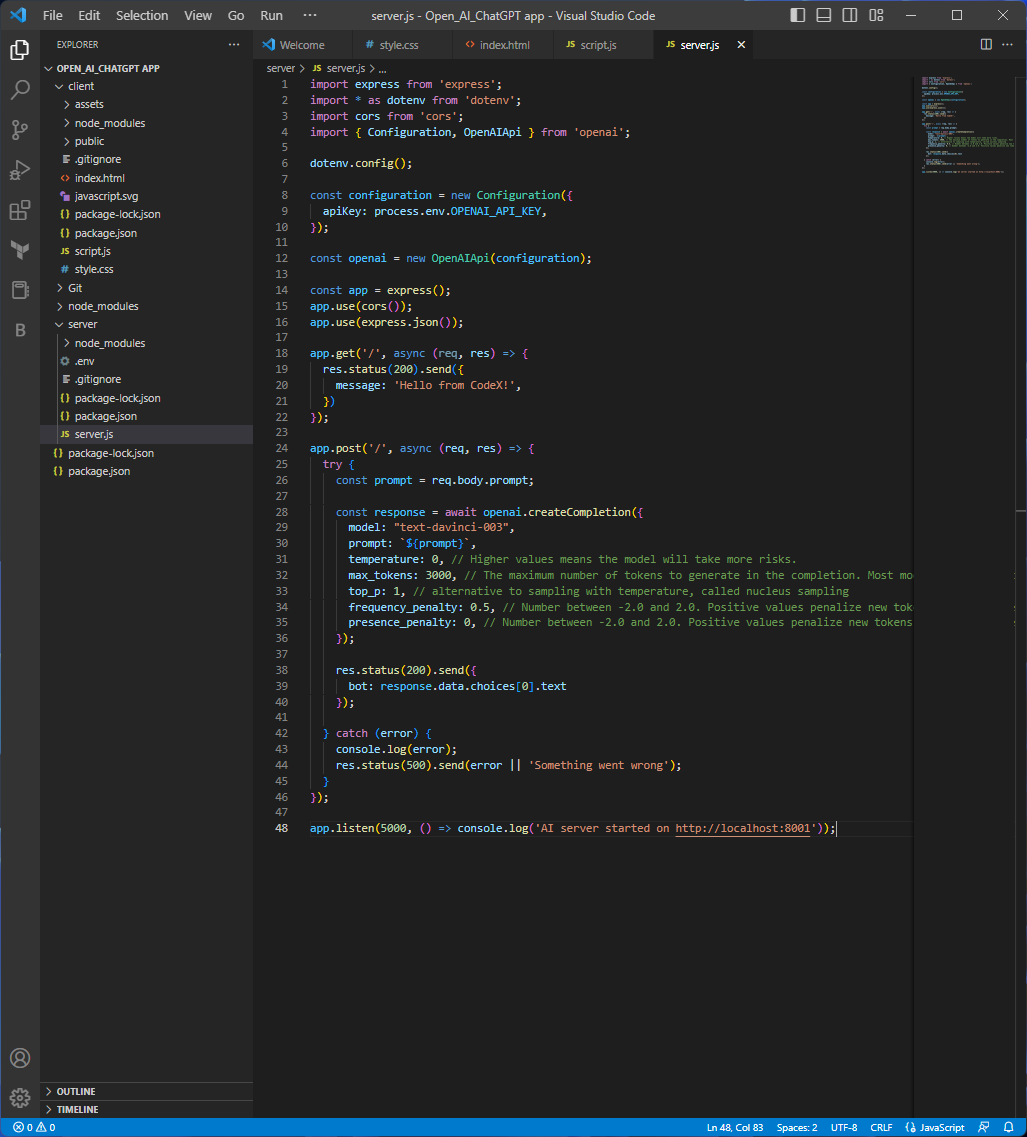
import express from 'express';
import * as dotenv from 'dotenv';
import cors from 'cors';
import { Configuration, OpenAIApi } from 'openai';
dotenv.config();
const configuration = new Configuration({
  apiKey: process.env.OPENAI_API_KEY,
});
const openai = new OpenAIApi(configuration);
const app = express();
app.use(cors());
app.use(express.json());
app.get('/', async (req, res) => {
  res.status(200).send({
    message: 'Hello from GPT!',
  })
});
app.post('/', async (req, res) => {
  try {
    const prompt = req.body.prompt;
    const response = await openai.createCompletion({
      model: "text-davinci-003",
      prompt: `${prompt}`,
      temperature: 0, // Higher values means the model will take more risks.
      max_tokens: 3000, // The maximum number of tokens to generate in the completion. Most models have a context length of 2048 tokens (except for the newest models, which support 4096).
      top_p: 1, // alternative to sampling with temperature, called nucleus sampling
      frequency_penalty: 0.5, // Number between -2.0 and 2.0. Positive values penalize new tokens based on their existing frequency in the text so far, decreasing the model's likelihood to repeat the same line verbatim.
      presence_penalty: 0, // Number between -2.0 and 2.0. Positive values penalize new tokens based on whether they appear in the text so far, increasing the model's likelihood to talk about new topics.
    });
    res.status(200).send({
      bot: response.data.choices[0].text
    });
  } catch (error) {
    console.log(error);
    res.status(500).send(error || 'Something went wrong');
  }
});
app.listen(5000, () => console.log('AI server started on https://localhost:8001'));
11. Write code in the package.json
- Copy and paste the following code and press Ctrl + S to save:
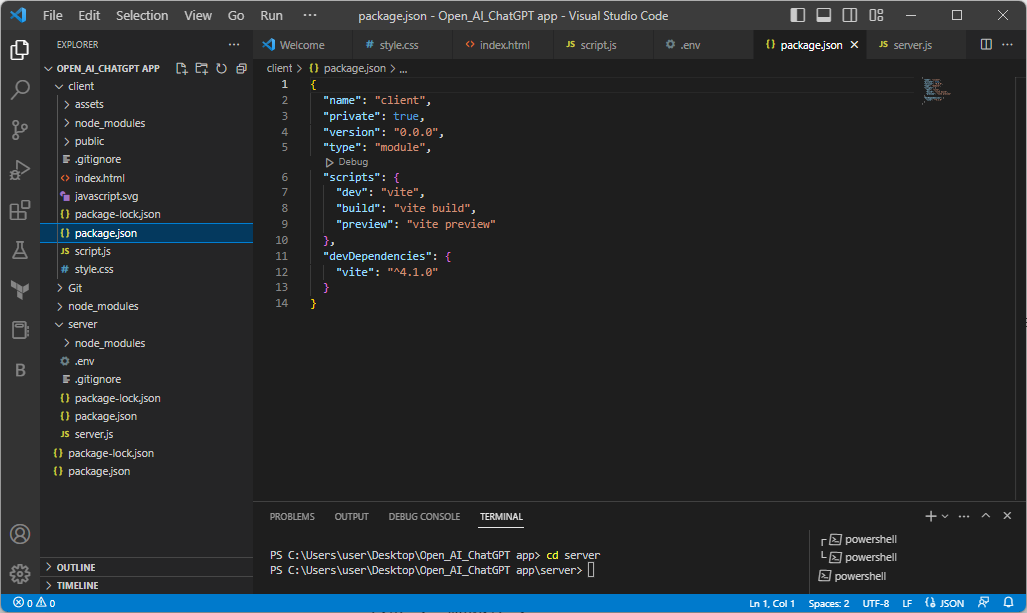
{
"name": "server",
"version": "1.0.0",
"description": "",
"type": "module",
"scripts":{
"server": "nodemon server"
},
"keywords": [],
"author": "",
"license": "ISC",
"dependencies": {
"cors": "^2.8.5",
"dotenv": "^16.0.3",
"express": "^4.18.2",
"nodemon": "^2.0.20",
"openai": "^3.1.0"
}
}
12. Test the code
- Now, click the Terminal menu on Visual Studio Code and select Spilt Terminal.
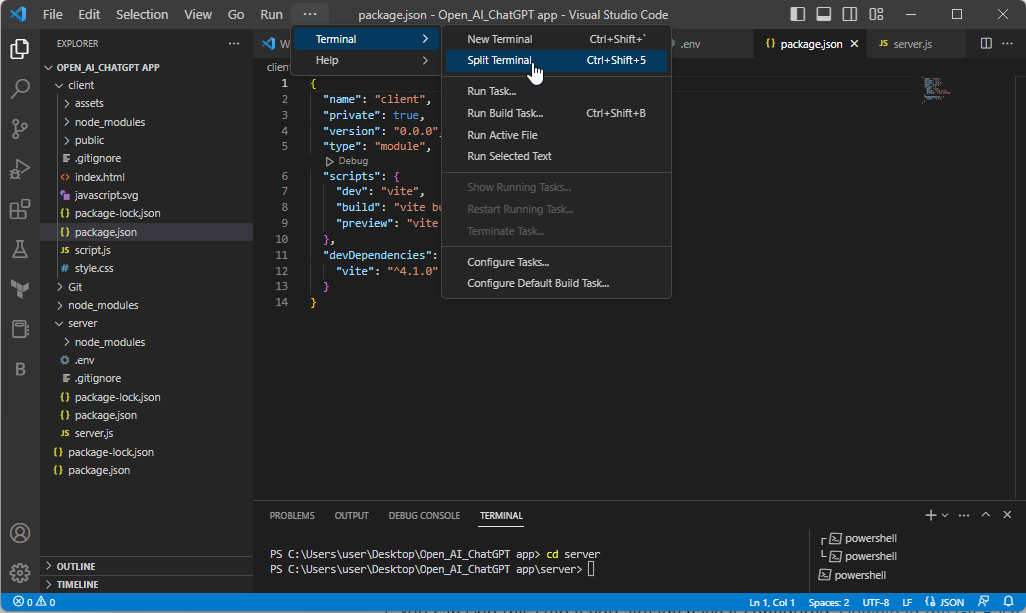
- You will have two terminals; let’s call them Terminal Server and Terminal Client.
- On Terminal Server, press Ctrl + C. Type the following command to enter the server directory, and press Enter: cd server
- Next, copy and paste the following command and press Enter to run the server:
npm run server - Click on the link presented, and you will see the message Hello from GPT on the page
- Now on Terminal Client, press Ctrl + C. Type the following command to enter the client directory, and press Enter:
cd client - Copy and paste the following command and press Enter to run the client:
npm run dev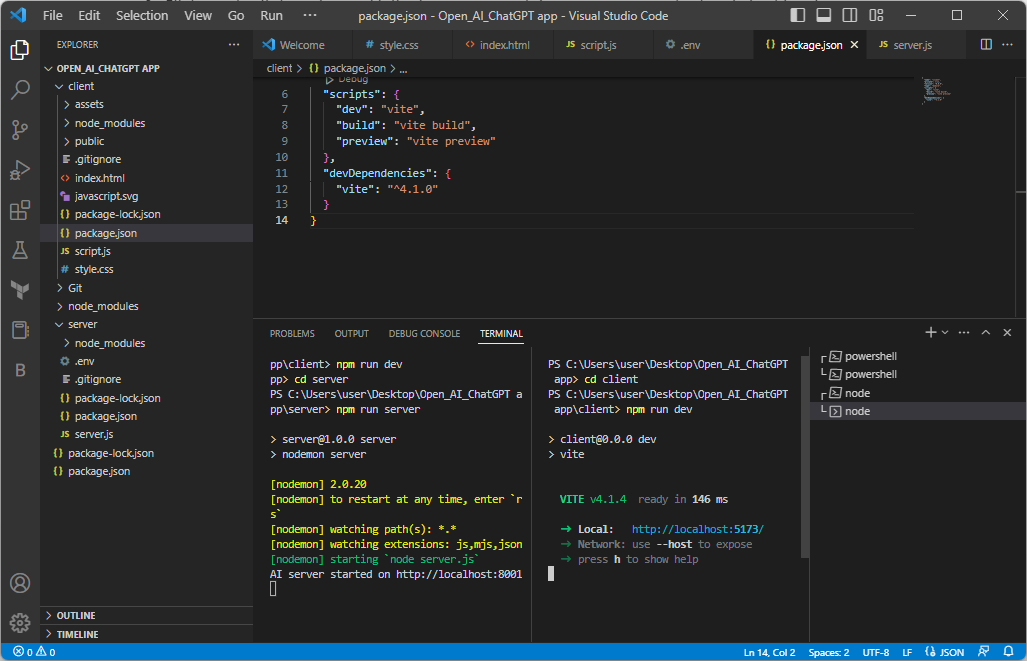
- Next, click on the link and type Hello, how are you doing; you can see the bot is looking for an answer.
13. Install the Git Bash app and configure it with your GitHub account
- You can skip this step if you already have it configured. Download the Git Bash app.
- Log in to your GitHub account.
- At the time of installation, please save it to the Open_AI_ChatGPT folder.
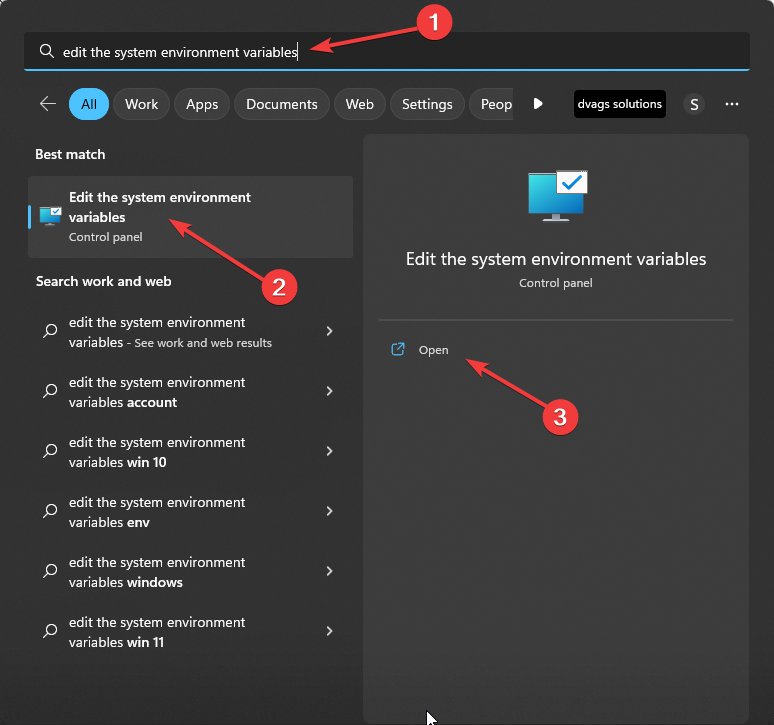
- Next, press the Windows key, type edit the system environment variables, and click Open.
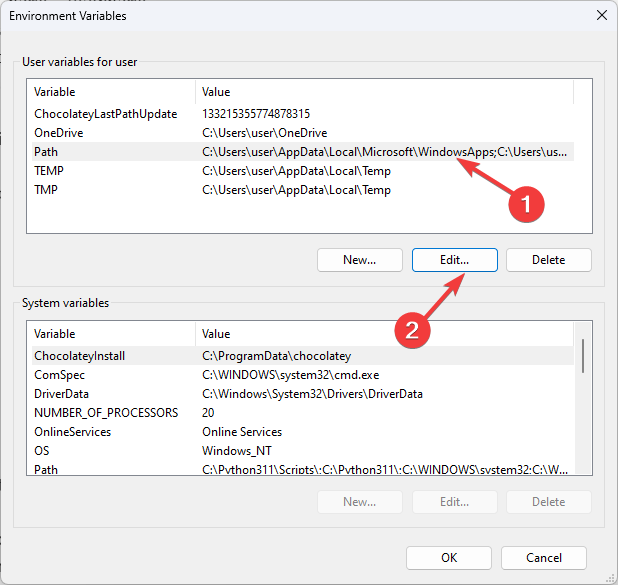
- Double-click on the Path, and click Edit.
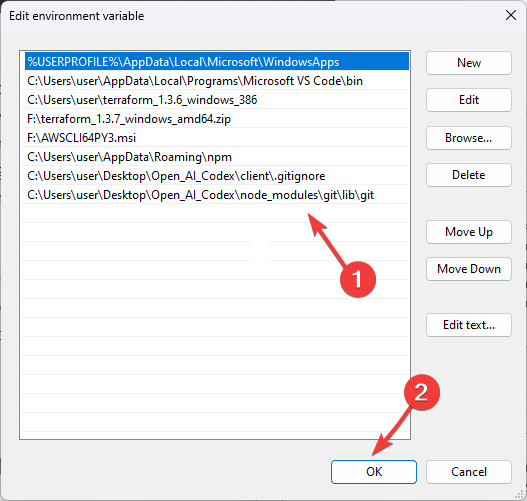
- Add the path of the git file here, then click OK and OK.
- Launch Git Bash, type the following command after replacing the username with your GitHub account username, and press Enter:
git config --global user.name "username" - Copy and paste the following command after replacing the email address with your email address and press Enter:
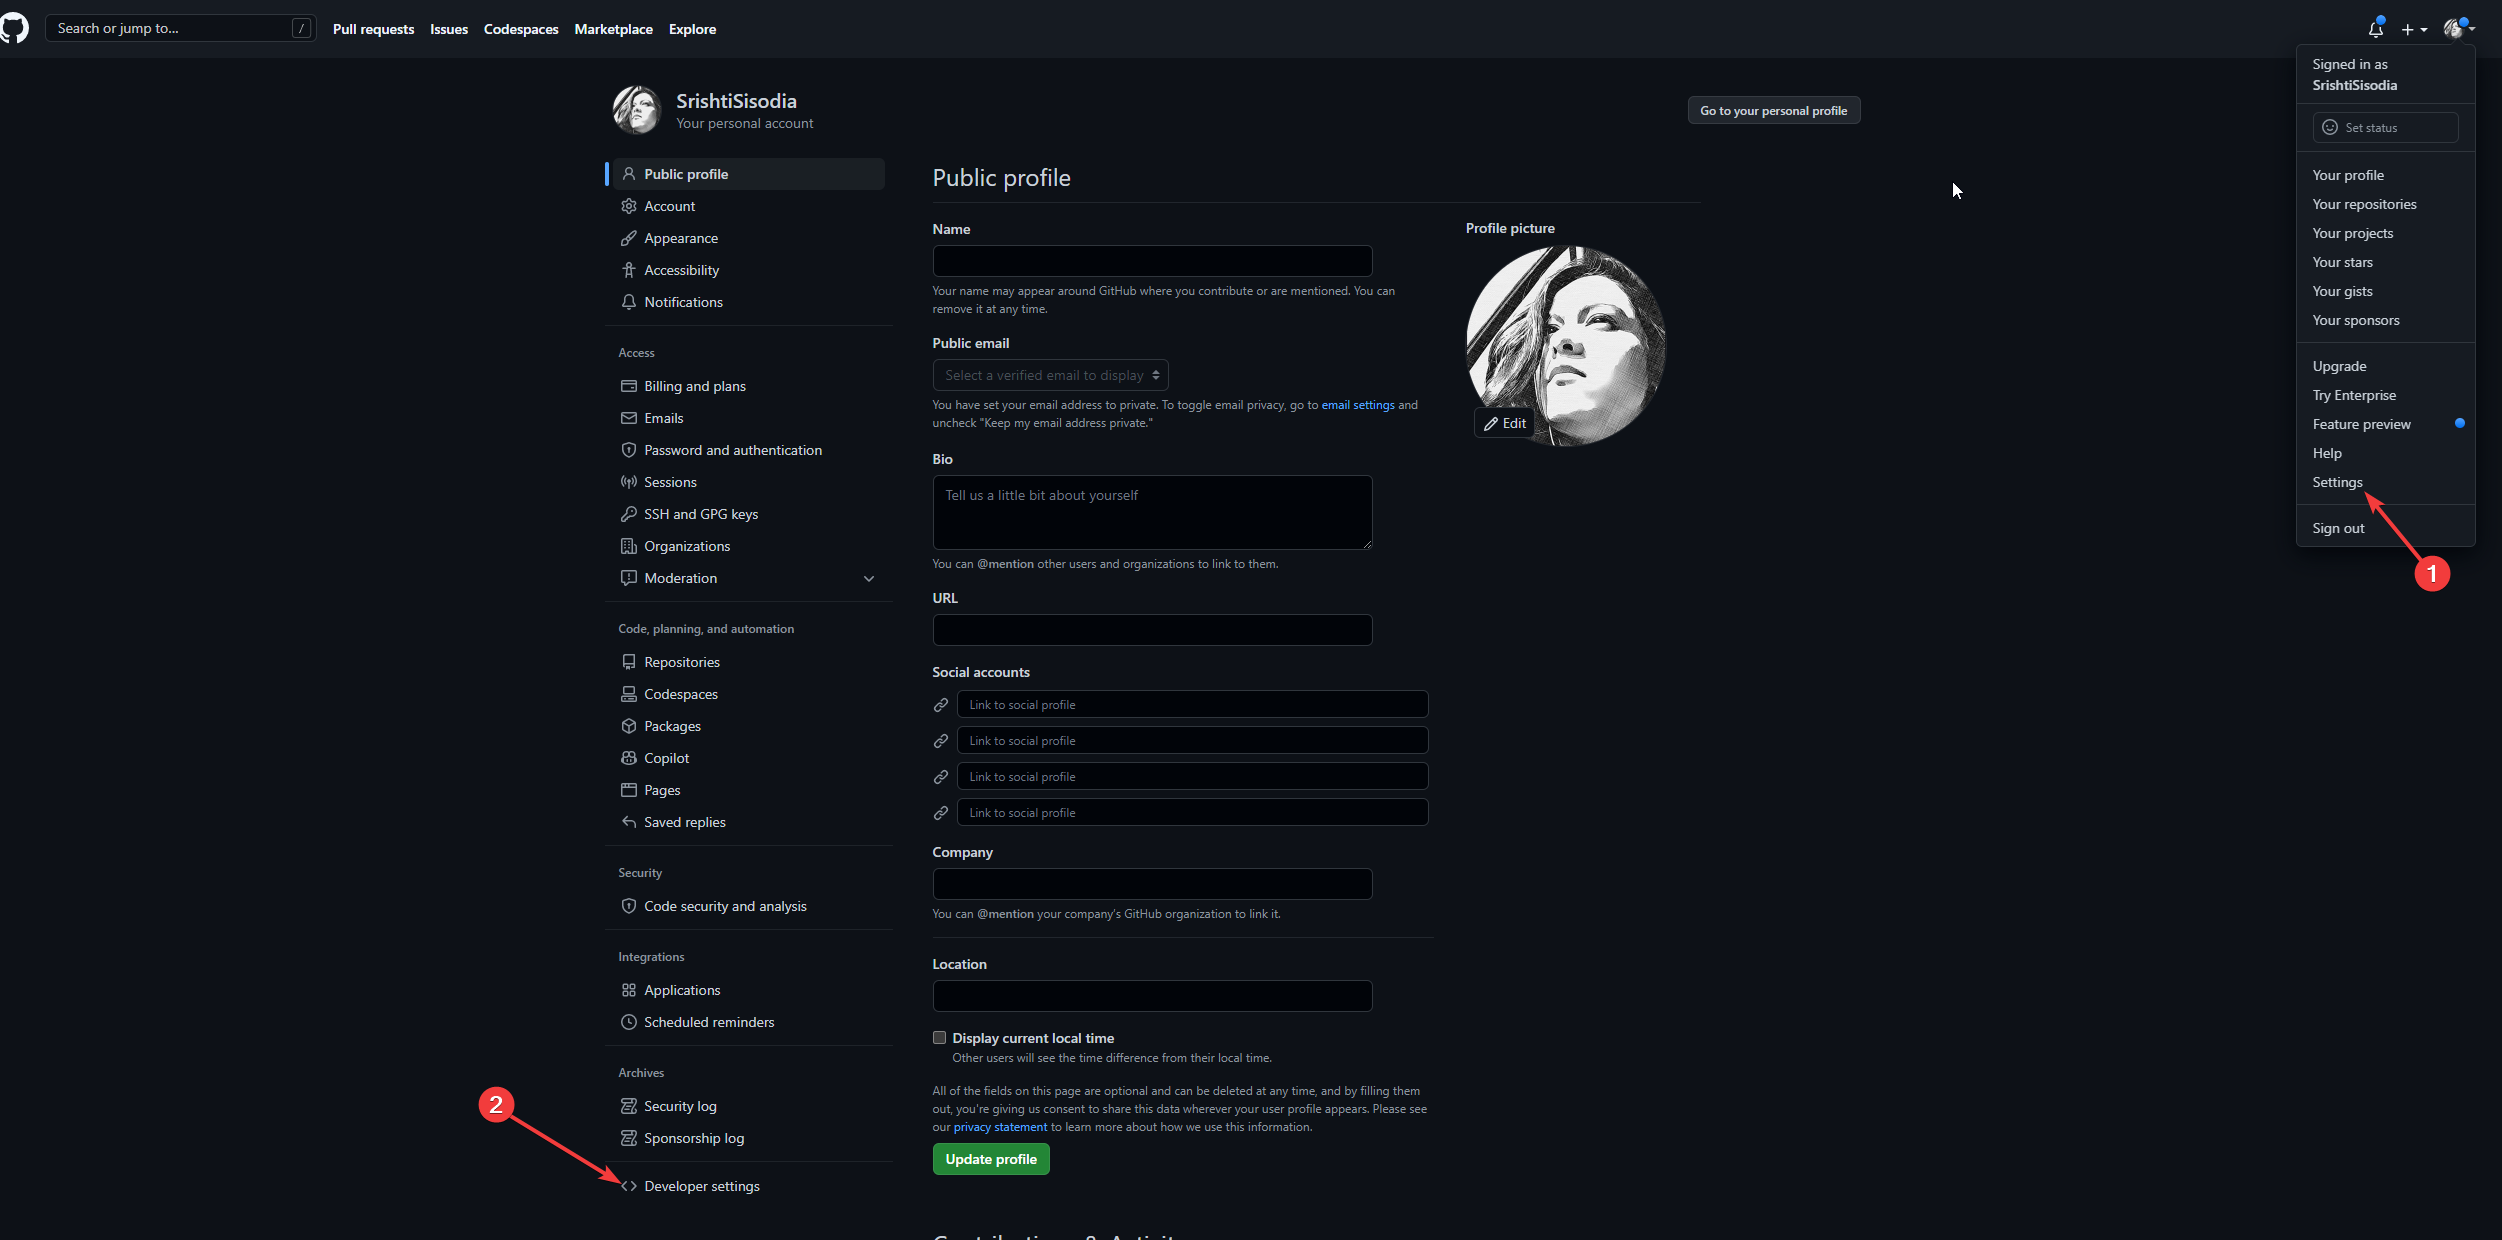
git config --global user.email "email address" - Go to the GitHub account, click the drop-down arrow, and select Settings. Now go to Developer settings.
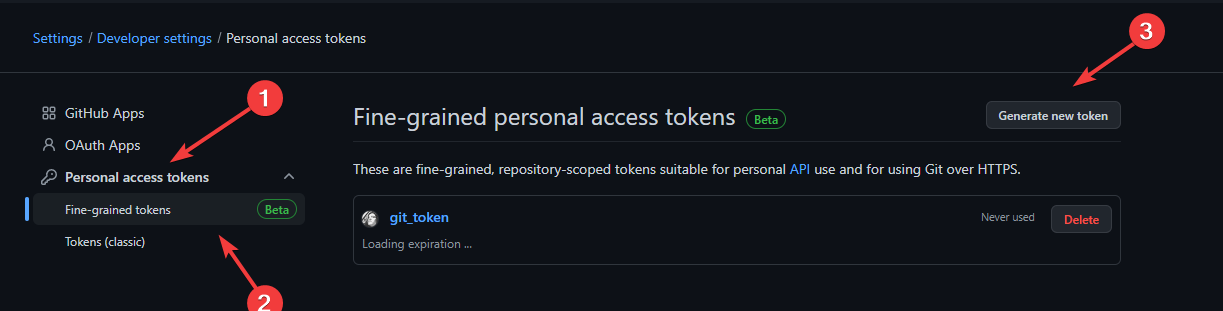
- Expand Personal access tokens, and select Fine-grained tokens. Click Generate new token.
- Rename it and select the validity. Then, copy the token and save it on a notepad.
- Type the following commands one by one and press Enter:
git config --global credential.helper wincredgit credential-manager-core configure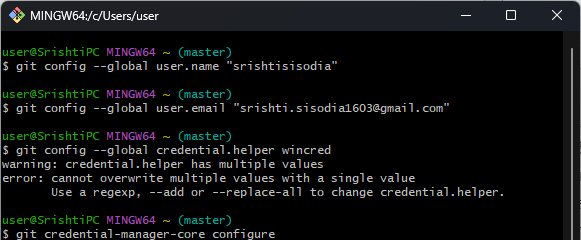
- Follow the prompts to configure it and paste the token generated when prompted for your password.
- Close the Git Bash app.
14. Create a repository, and publish code
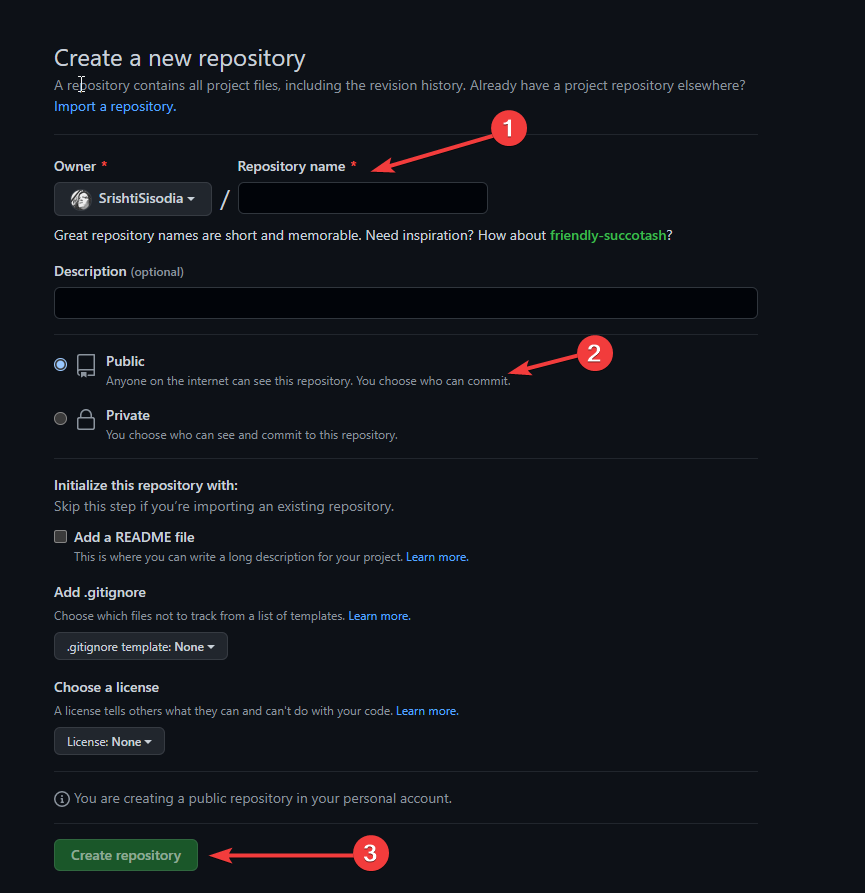
14.1 Create a repository
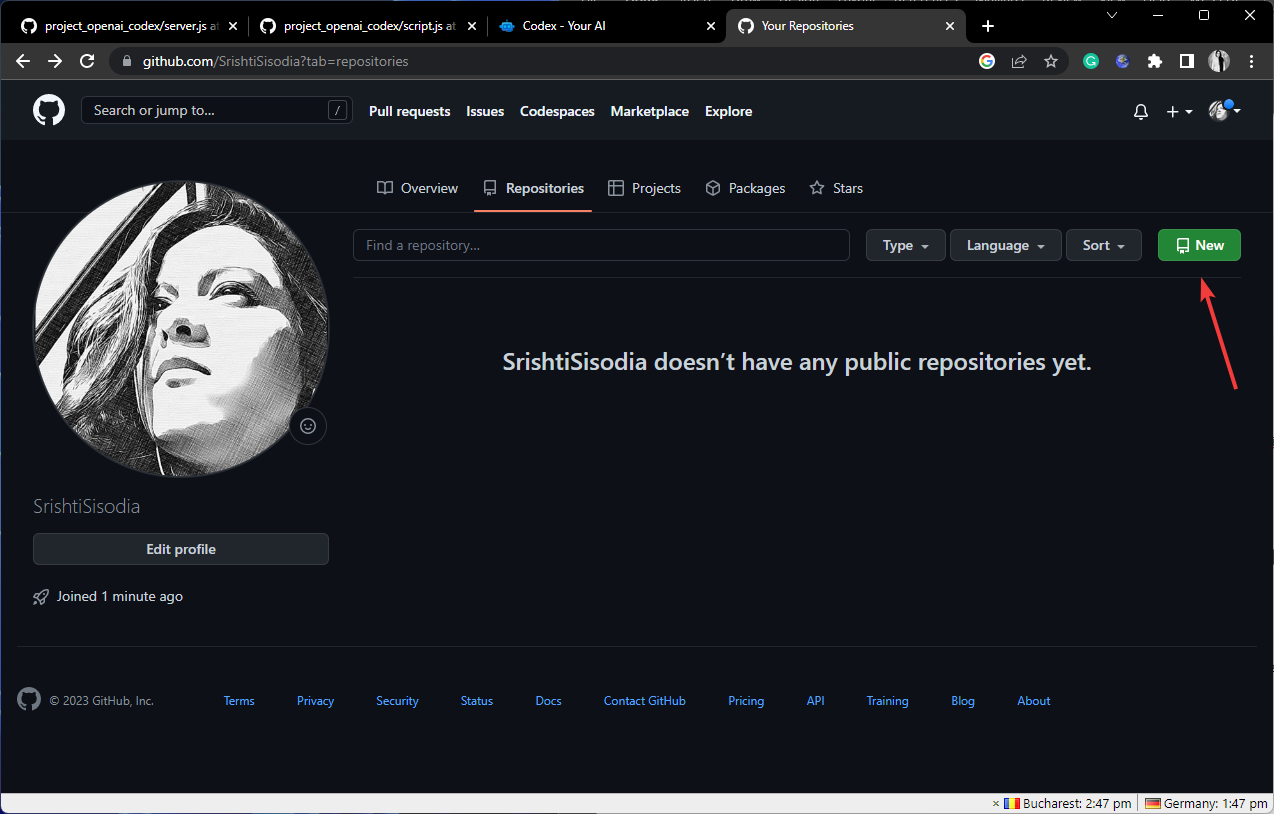
- Log in to your GitHub account.
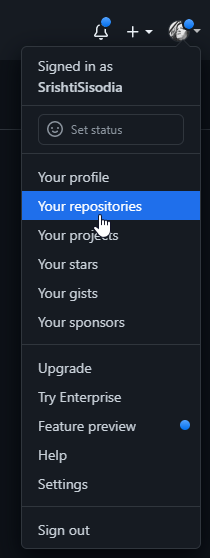
- Locate the drop-down arrow next to your profile picture and select Your repositories.
- Click New.
- Type the Repository Name, select Public, and click Create repository.
- Go to VS code, press Ctrl + C, and ensure you are in the Open_AI_ChatGPT app or the root folder. If not, type the following code and press Enter:
cd - Then, in the server folder, add a new file and name it .gitignore.
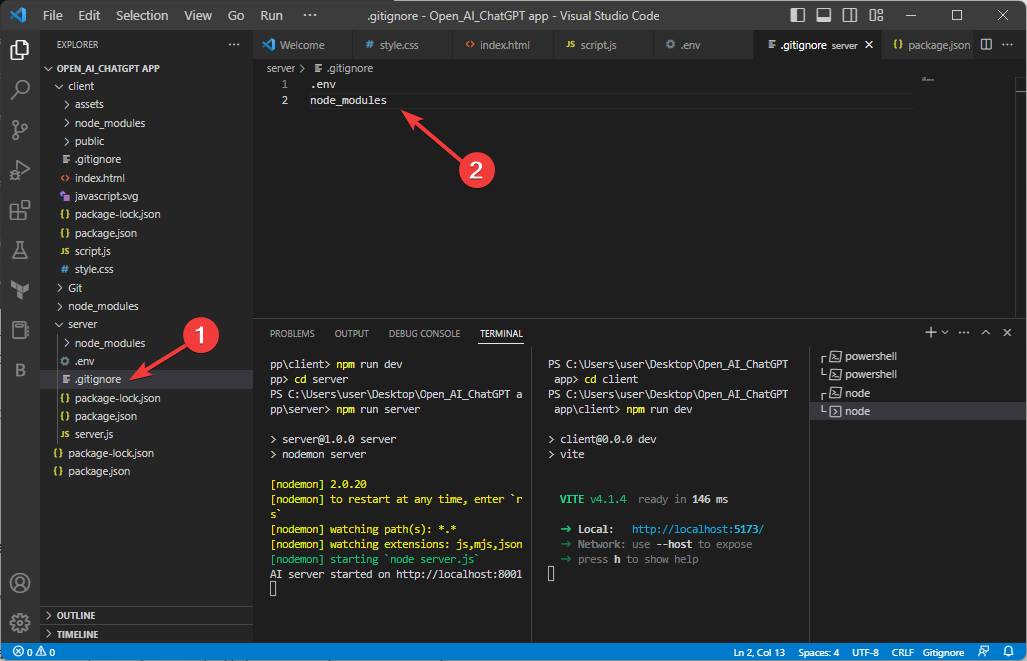
- In the .gitignore file, type the following code to make sure .env and node_modules are not pushed in GitHub:
.env
node_modules
14.2 Publish your code on the repository
- Go to VS code, copy and paste the following commands one by one and press Enter after every command:
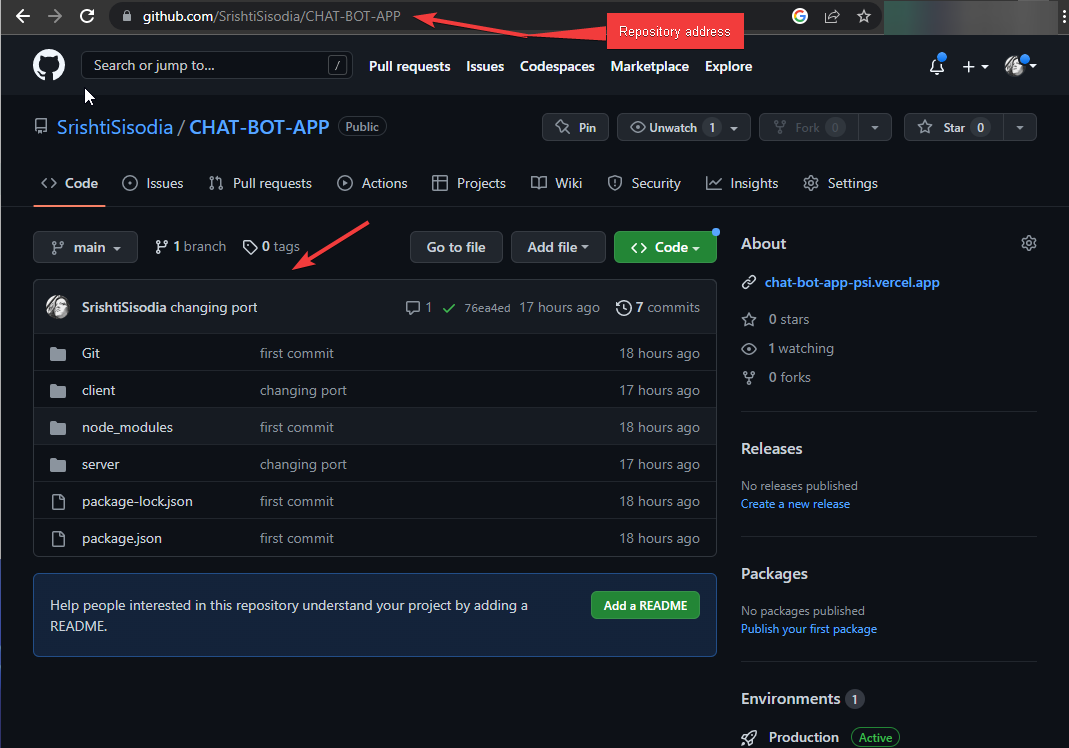
git initgit commit -m "first commit"git branch -M main - Type the following command after replacing the https://github.com/SrishtiSisodia/CHAT-BOT-APP with your repository address mentioned on GitHub:
git remote add origin https://github.com/SrishtiSisodia/CHAT-BOT-APP - Now to push the code, type the following command and press Enter:
git push -u origin main - Reload your GitHub page, and your code will be uploaded there.
- On VS code, press Ctrl + C on both Terminal Server and Terminal Client to stop them from running.
15. Deploy the server
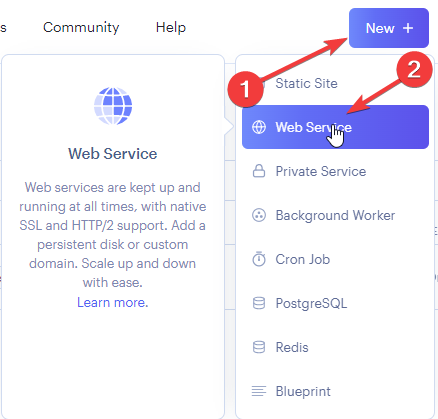
- Go to render the website and sign up using GitHub.
- You will see the Dashboard, click New, then select Web Services.
- Locate Connect a new repository, enter the URL of your storage under the Public Git repository, and click Connect.
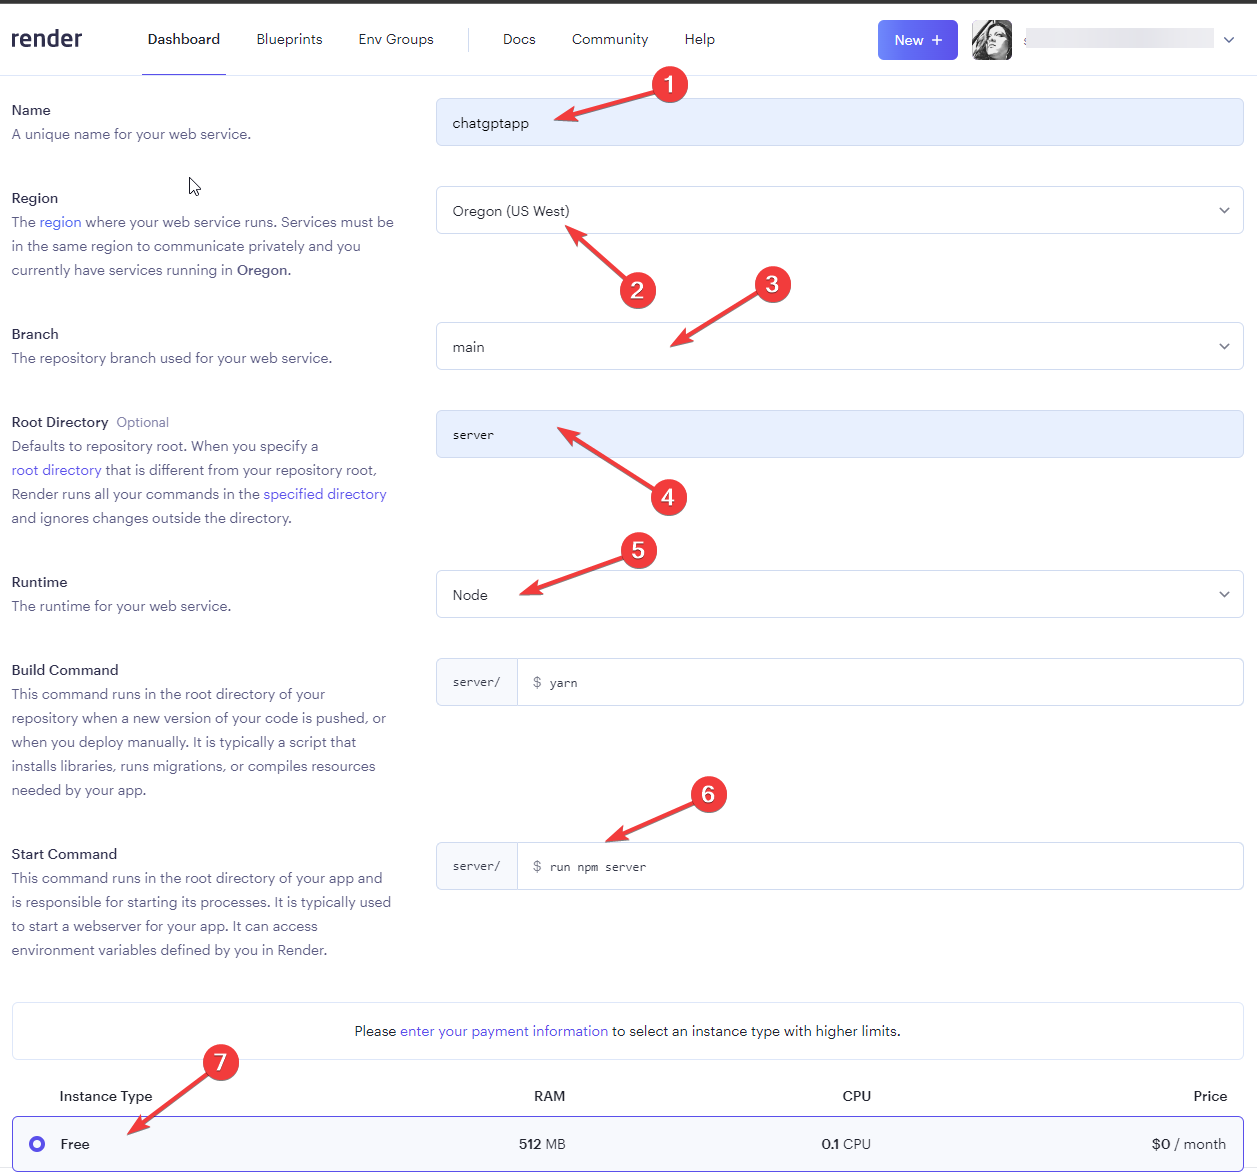
- On the next page, add Name, select the Region, select Branch as main, select Root Directory as a server, choose Environment as Node, and type
Start Command - run npm server - Click Free and click Create Web Service.
- The server will be deployed; please wait until the Deployment status is Live.
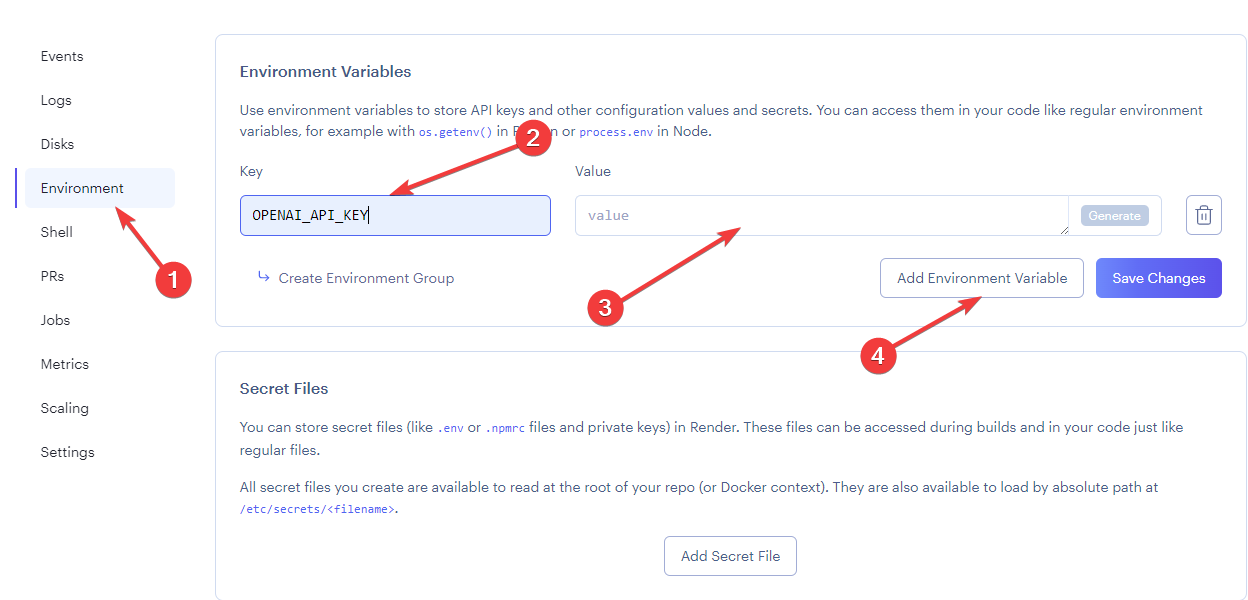
- Go to Environment; for Key, type OpenAI_API_Key, and for value, type the secret API key you generated in step 9.
- You will now have a web address; add it to the script.js file. Then, on VS code, go to the script.js file and replace the web address in the code mentioned below with the new web address from the rendered website:
const response = await fetch('https://localhost:8001/'const response = await fetch('https://chatgptapp-lswi.onrender.com/'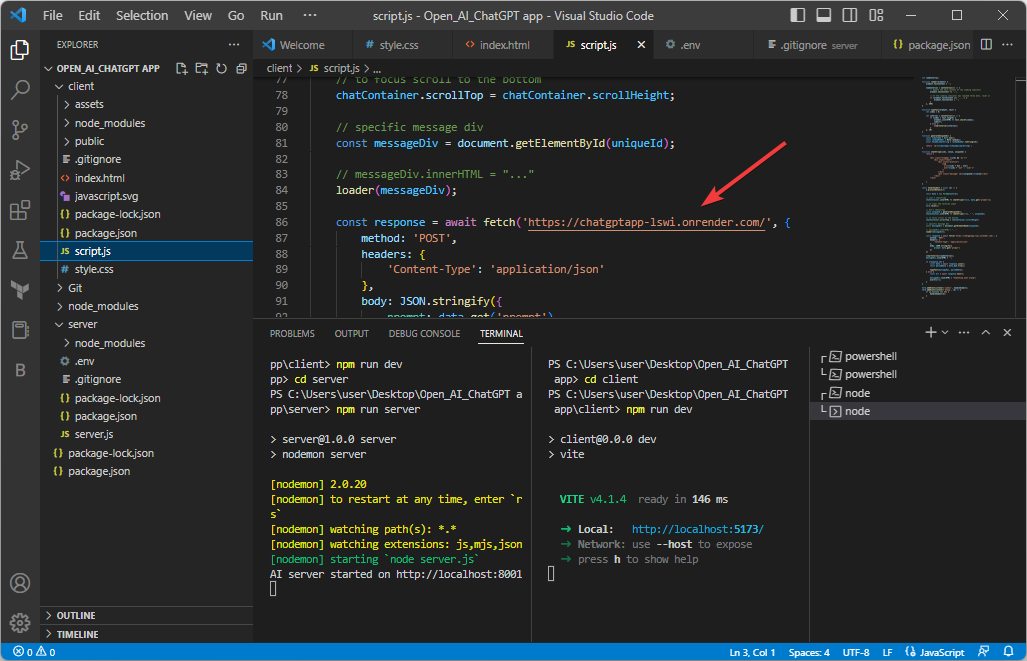
- On the VS code Terminal, type the following commands one by one and press Enter after every command:
git add.git commit -m 'update the server URL'git push
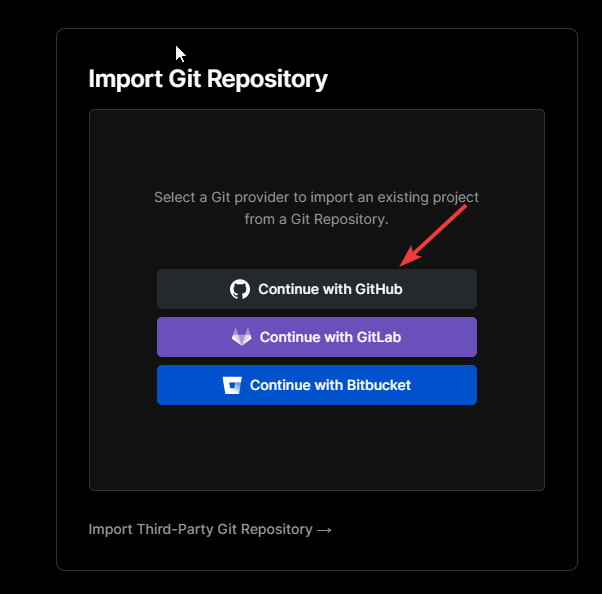
16. Deploy the front end
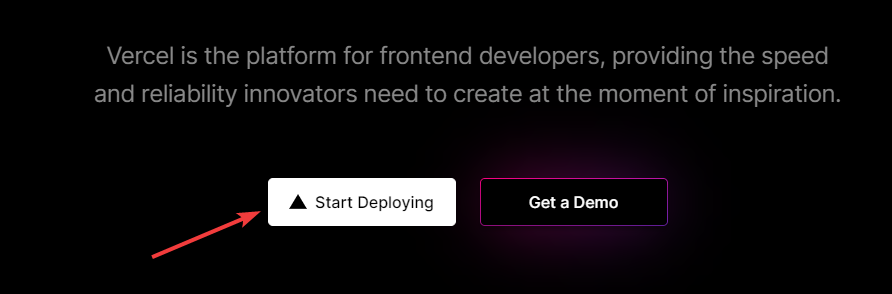
- Go to the Vercel website.
- Click Start Deploying.
- Under Import Git Repository, click Continue with GitHub.
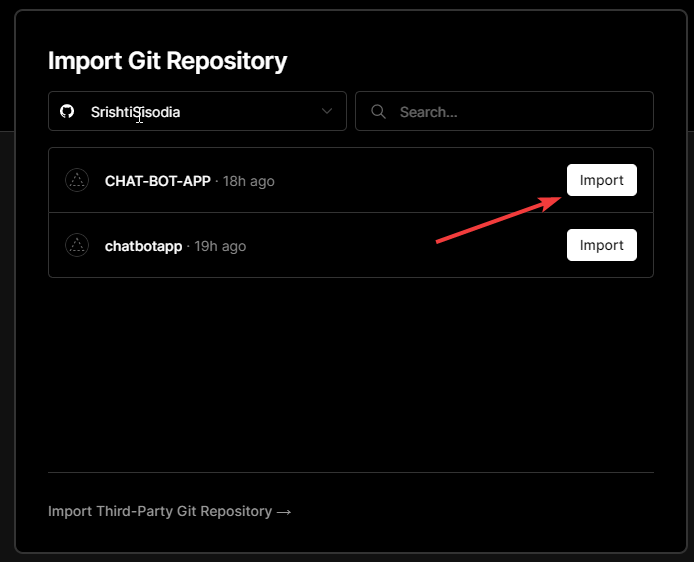
- Type your GitHub username and select the repository name and click Import.
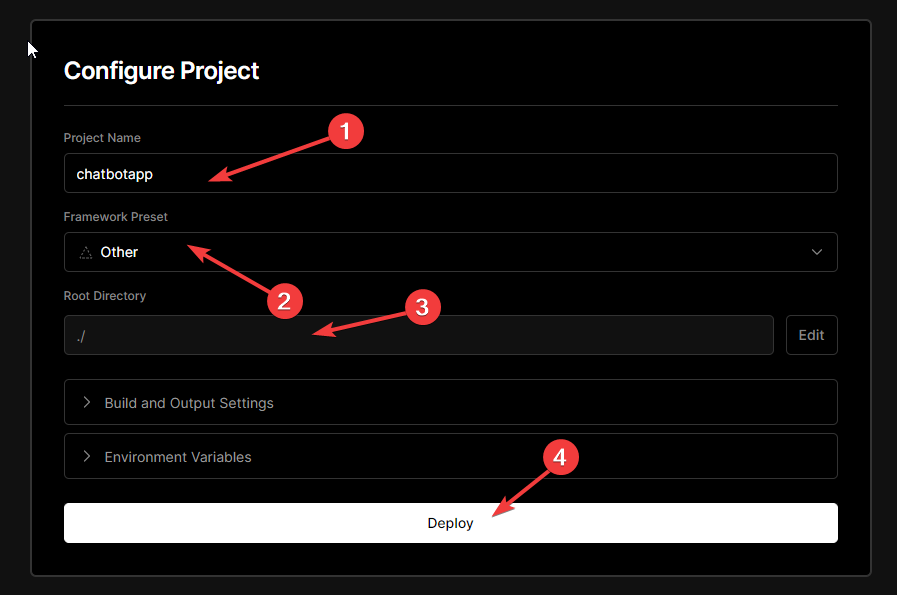
- Under Configure Project, select a name.
- Change the root directory from / to client, click Continue and Deploy.
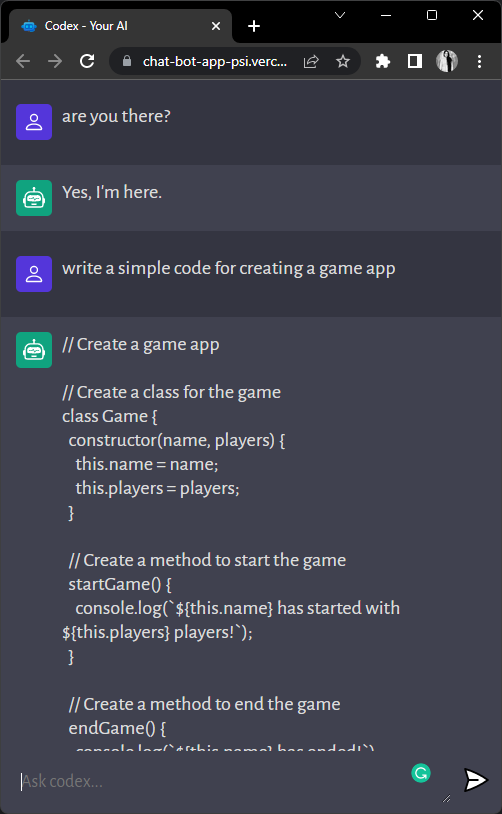
- Go back to your dashboard and click Visit.

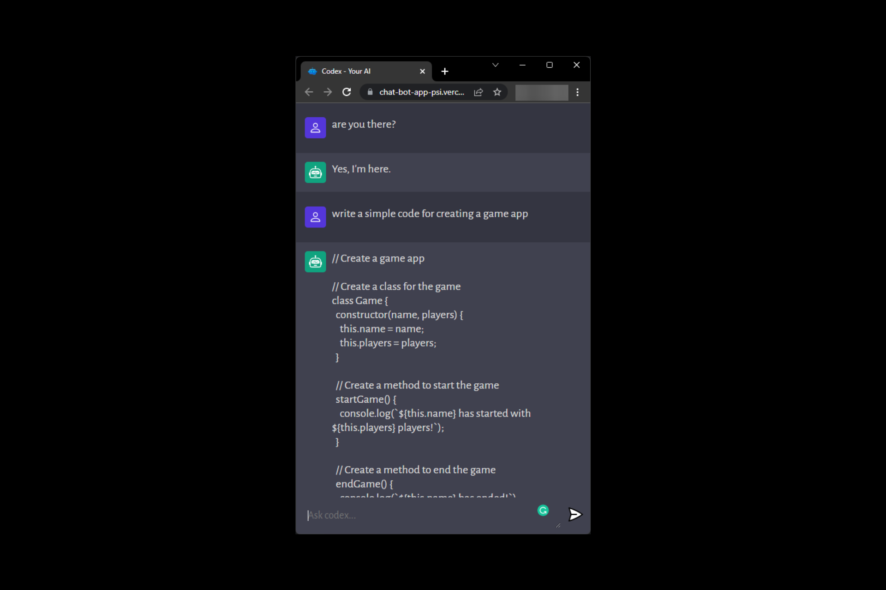
- You can now see the application.
So, these are the detailed steps to install the ChatGPT app locally on your device. Stuck somewhere? Please mention your questions or concerns in the comments section below.
Read our disclosure page to find out how can you help Windows Report sustain the editorial team. Read more


Improve this guide


User forum
0 messages