Install Printer Driver Without Admin Rights: How to Force it
Modifying GPO is the right way to do it

Is it possible to install a printer driver without admin rights? This guide will answer this question, so keep on reading.
How do I install a printer driver without admin rights?
Before trying anything else, try using type 4 drivers or preload the drivers via config management.
1. Change Security Options in GPO
- Press the Windows + R shortcut to open Run.
- In the Run box, type gpedit.msc and click OK to open Group Policy Editor.
- In Group Policy Editor, navigate to the following location:
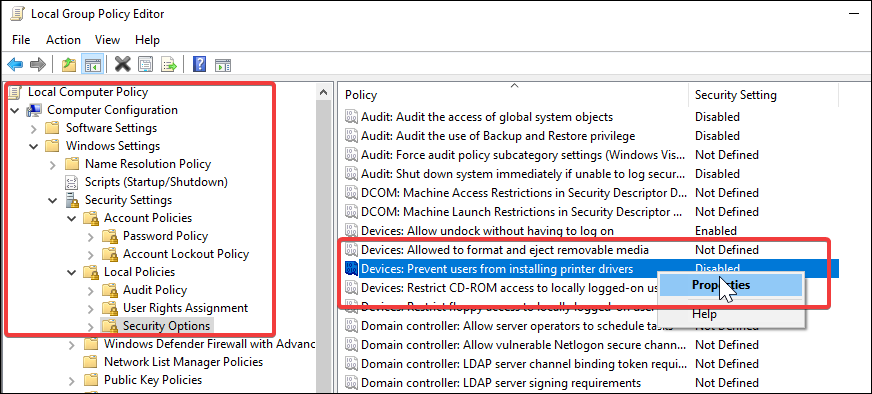
Computer Configuration > Policies > Windows Settings > Security Settings > Local Policies > Security Options - Next, in the right-pane, look for Device: Prevent users from installing printer drivers option. By enabling or disabling this policy, you can control whether to allow or reject non-administrator printer driver installs.
- Select and right-click on the option and choose Properties.

- In the Properties window, choose the Disabled option.
- Click OK and Apply to save the changes.

- Next, navigate to the following location:
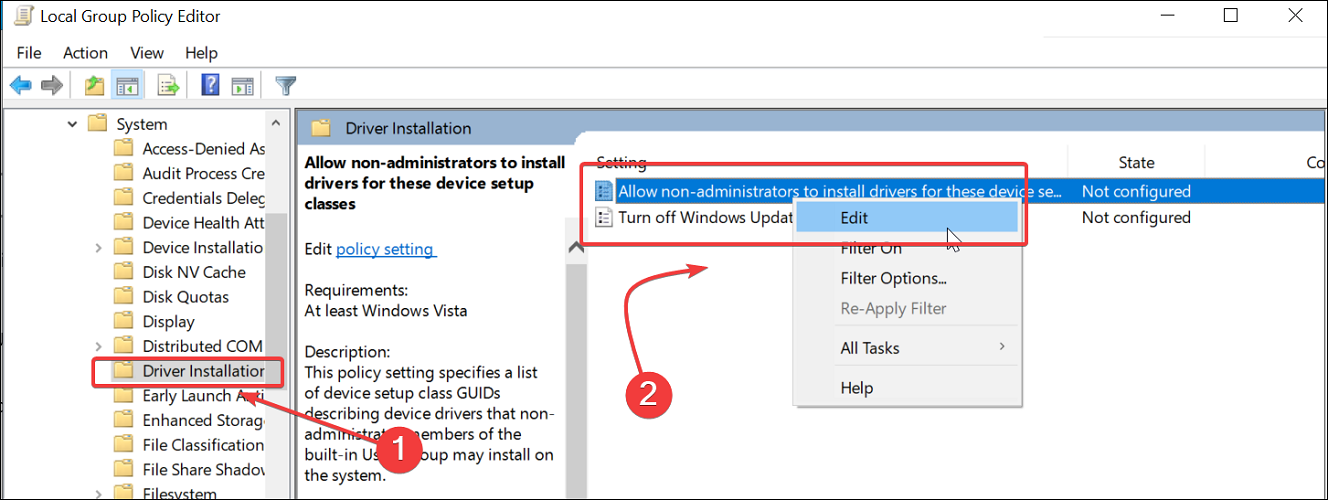
Computer Configuration > Policies > Administrative Templates > System > Driver Installation - Make sure you have selected the Driver Installation folder. In the right pane, locate the following policy: Allow non-administrators to install drivers for these device setup classes.

- Right-click on the policy and choose edit. Set it to Enabled.

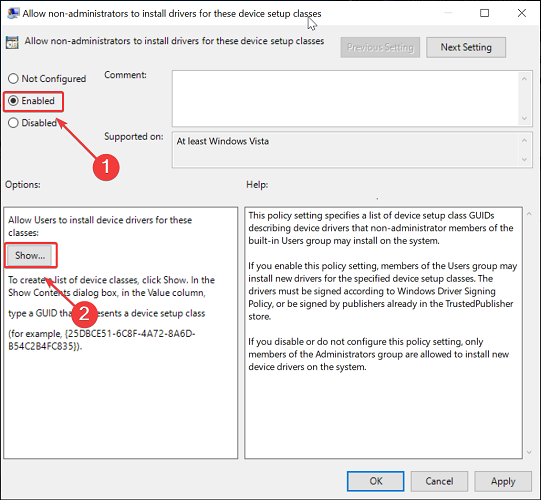
- In the same policy, you need to specify the device class GUIDs corresponding to printers. So, click the Show button under the Options section.
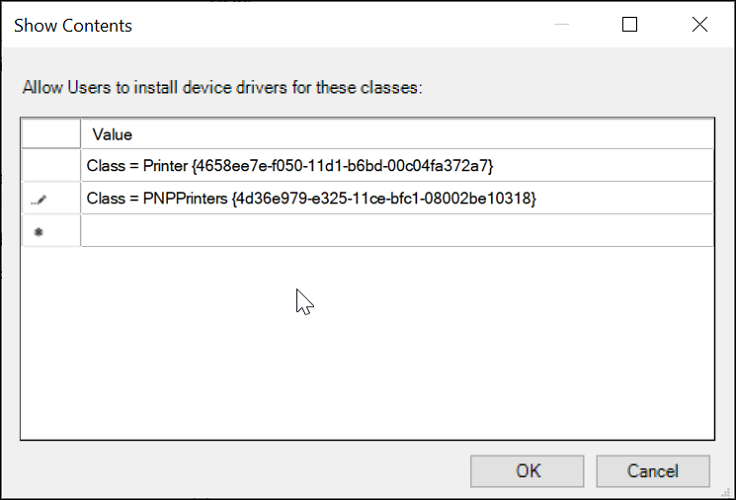
- In the Show Contents window, enter the following GUIDs one by one:
Class = Printer {4658ee7e-f050-11d1-b6bd-00c04fa372a7}
Class = PNPPrinters {4d36e979-e325-11ce-bfc1-08002be10318} - Click OK and Apply to save the changes.
- Close Group Policy Editor and restart your computer.
By disabling the Devices: Prevent users from installing printer drivers policy, you have allowed non-administrators to install printer drivers when connecting a shared network printer.
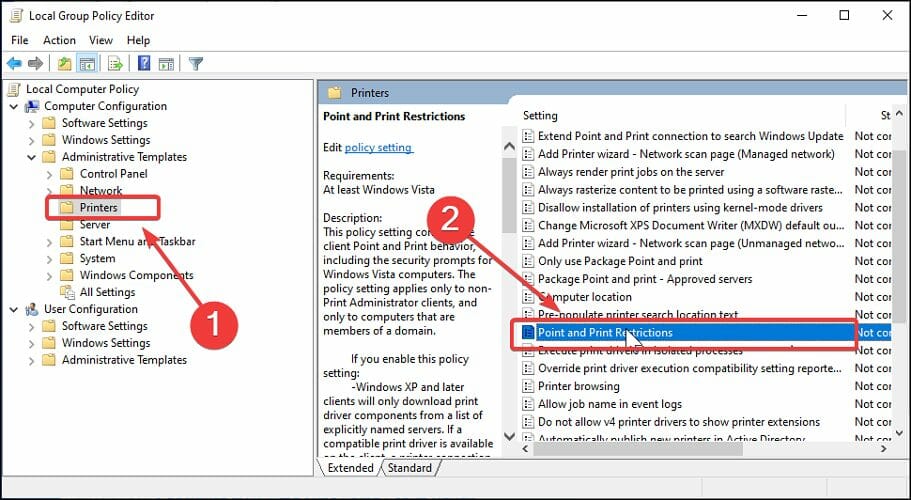
2. Disable Point and Print Restrictions
- Launch Group Policy Editor by pressing the Windows key + R, type gpedit.msc and click OK.
- In Group Policy Editor, navigate to the following location:
Computer Configuration > Policies > Administrative Templates > Printers - In the right-pane, right-click on Point and Printer Restrictions, choose Edit.

- Set it to Disabled. Click Apply and OK to save the changes.
- Next, navigate to the following policy path:
User Configuration > Policies > Administrative Templates > Control Panel > Printers - Locate and open the Print and Printer Restrictions policy and set it to Disabled as well.
- Close the Group Policy Editor and try to install the printer without admin rights.
A few users suggested changing the Package Point and Print – Approved Servers policy by following these steps:
- One Group Policy Editor.
- Follow the steps from above, but this time enable Package Point and Print – Approved Servers policy.
- Add the
 FQDN of your print server and save changes.
This is how you can use Group Policy to install printer driver without admin rights.
However, this prevention feature can become annoying when installing a printer driver on a work computer without admin rights. The driver download may fail. To fix the problem, try using the driver software updater to install the printer without admin rights.
If that does not work, take the bit complicated way of disabling a few group policies using the GP Editor. And you won’t face issues downloading Dymo printer drivers without permission.
To learn how to install the Dymo printer driver on Windows 10, read this guide for step-by-step instructions.
We also have a guide on how to install the Canon LBP2900B driver, so don’t miss it for more information.
This is how you can install Canon, HP or any other printer driver without admin rights, so be sure to give these solutions a try.
Read our disclosure page to find out how can you help Windows Report sustain the editorial team. Read more


Improve this guide


User forum
0 messages