How to Fix Install VMware Tools Greyed Out / Disabled
Key notes
- VMware allows you to run several virtual machines in a sandbox environment.
- You can install VMware Tools manually or add an optical drive if the installation option is grayed out.

On VMware, if the Install VMware Tools option is grayed out, you won’t be able to perform simple operations.
Some of these operations include copying and pasting data between guest and host machines.
Asides the copying function, the VMware Control Panel also features other useful utilities that improve your VMware experience.
Virtualization is crucial for testing applications and operating systems in a sandbox without altering or interfering with the host computer.
However, an absence of VMware tools defeats the purpose and ruins your experience using VMware.
Thankfully, this issue is not a complicated one. You can fix it easily with the solutions we’ll provide here.
Scroll down to find out why the Install VMware Tools option is unavailable, and some more useful information about the VMware toolset.
Why is install VMware tools disabled?
The Install VMware tools option grays out when you start installing it on a guest system with the function already mounted. It also happens when the guest machine doesn’t have a virtual optical drive.
VMware tools can even grey out if you select the option during the VMware installation and the log confirms the download. In the section that follows, you will learn how to install VMware tools if grated out.
What is the latest version of VMware tools?
When you use VMware, you need VMware Tools to effectively share folders between the guest and host operating systems.
With VMware Tools, you can copy and paste files directly between the connected systems.
Here are the most useful tools that come included in the VMware toolkit.
- VMware OS Optimization Tool – a useful tool for VMware Horizon. It expands your usability of guest systems by tweaking features and services.
- VMware Workstation for Windows – a robust virtualization tool that helps you run several operating systems on one host system.
- VMware Fusion – a computer utility that lets you install and use virtual machines on a host operating system
How to install VMWare tools when the option is grayed out?
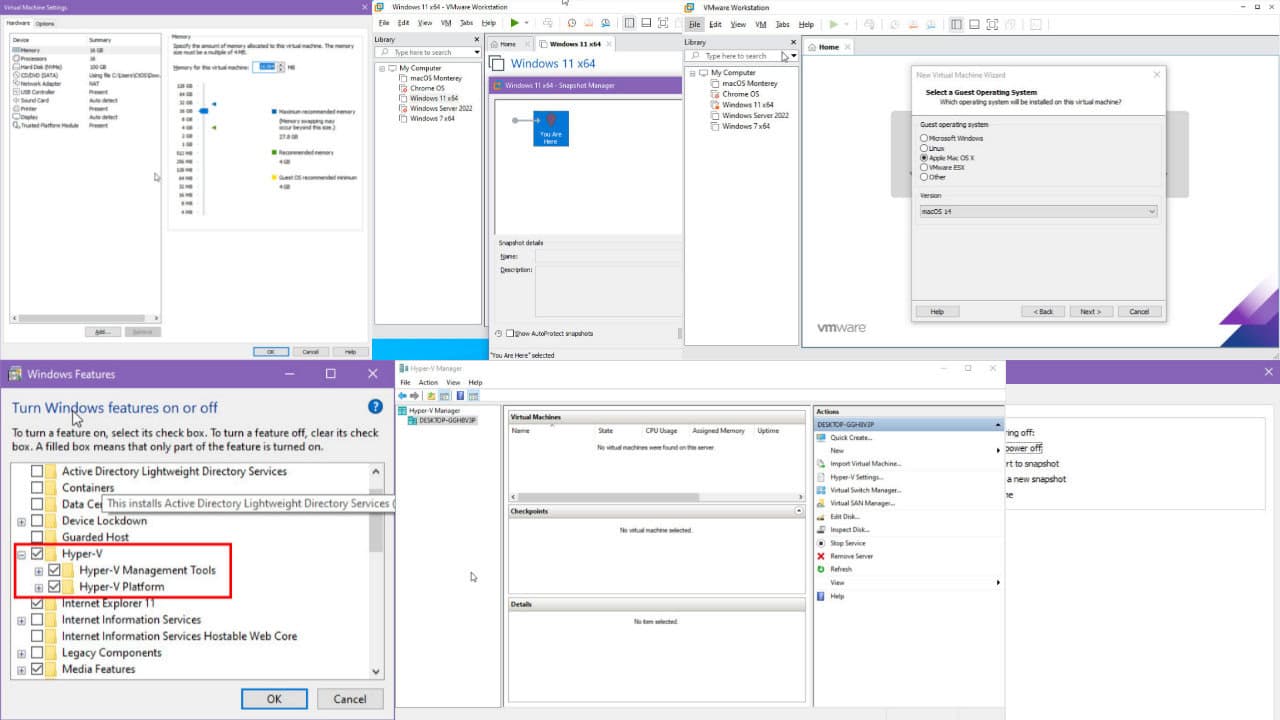
1. Add an optical drive and install VMware tools

- Power off your virtual machine.
- Launch VMware Workstation Player and right-click on the virtual machine.
- Go to Settings and modify the hardware settings.
- Navigate to the Hardware tab on the left-hand sidebar, select the CD or DVD drive, and click on Remove.
- On the Hardware tab, remove the Floppy Drive the same way you did for the CD/DVD drive.
- Click on Add, choose CD/DVD, and then hit Finish.
- Click OK to exit the window and begin to use the virtual machine.
- Wait for the VM to load up as normal. On completion of the booting process, go to the menu at the top left-hand area.
- Navigate to Player, then click Manage, and select the Install VMware Tool option.
After completing the steps above, then the install VMware Tools grayed out option will now be available.
2. Install the missing component manually

Set up your VM
- Download the latest version of VMware Tools.
- Turn on the virtual machine.
- Configure the CD/DVD drive to detect your hard drive automatically (if you’re using an ISO image file).
- Log in as an Administrator.
- Select the Menu command and mount the VMware virtual disk on the guest machine.
- Choose Interactive Tools Upgrade or Interactive Tools Installation and hit the OK button.
- Click on OK if this is the first time installing VMware Tools.
Launch the installation wizard manually
- Open the Run dialog box by pressing the Windows key + R combination.
- Enter D:setup.exe (replace D with the letter for your first virtual CD-ROM drive).
- Follow the on-screen guide to complete the manual installation of VMware.
This method doesn’t only work on Windows 10 virtual machines but also on macOS, Linux, as well as older Windows editions.
We hope that you found this guide useful and that you managed to sort out your VMware virtual machines.
If you want to share your experience with us, don’t hesitate to leave a comment in the section found below this guide.
[wl_navigator]
Read our disclosure page to find out how can you help Windows Report sustain the editorial team. Read more


Improve this guide


User forum
4 messages