Intel WiFi 6 AX201 Not Working? How to Fix It in 7 steps
Run the Internet connection troubleshooter to know the problem
Key notes
- The WiFi driver not working could be missing system files, misconfigured settings, or an outdated WiFi driver.
- This guide will help you with all the available fixes to resolve the problem.

A high-speed and reliable WiFi connection is essential for work, education, and daily life. However, issues like Intel WiFi 6 AX201 driver not working can prevent you from accessing the internet or connecting to other devices.
In this guide, we will discuss some expert-recommended fixes to resolve the issue right after discussing the potential causes.
What causes the Intel WiFi 6 AX201 not working issue?
The Intel WiFi 6 AX201 not working issue can stem from various factors; some of the common ones are:
- Incompatible drivers – If the drivers for the Intel WiFi 6 AX201 are outdated or incompatible, the device may not work correctly, hence the error.
- Interference from other devices – If other devices in the area use the same frequency band as the Intel WiFi 6 AX201, it could cause conflict and prevent the device from working correctly.
- Software conflicts – If your computer has conflicting software programs or settings, you might face issues with Intel WiFi 6 AX201.
- Network configuration issues – Sometimes, there may be issues with network configuration, including misconfigured SSID, & passwords, which can prevent the WiFi 6 AX201 Fi 6 AX201 from working correctly.
- Hardware issues – If you have a faulty antenna, or damaged component, you might face the problem.
What can I do if Intel WiFi 6 AX201 not working?
Before moving to the advanced troubleshooting, you need to go through the preliminary checks:
1. Repair the network drivers
1.1 Repair network drivers manually
- Press Windows + R to open the Run dialog box.

- Type devmgmt.msc and click OK to open Device Manager.
- Go to the Network adapters, right-click Intel(R) WiFi AX201 160MHz, and select Update driver.

- Click Search automatically for drivers.

- Follow onscreen instructions to complete the process.
- Restart the computer and check if the issue persists; proceed with the below-mentioned steps.
- Right-click on the network adapter driver and select Uninstall driver.

- Go to Action and click Scan for hardware changes.

- Restart your computer to let the changes take effect.
1.2 Use a third-party driver updater
Keeping drivers up to date is essential to ensure your computer runs smoothly. However, updating the drivers manually can be time-consuming and tricky.
Therefore it is suggested to use third-party software to update drivers. These tools can download the latest drivers on your computer in a few clicks.
2. Tweak the wireless settings
- Press the Windows + R to open the Run window.
- Type devmgmt.msc and press Enter.
- Locate and double-click the Network adapters to expand.
- Right-click the network driver and select Properties.

- Go to the Advanced tab. Under Property, select Wireless Mode, and then for Value, select any option.

- Now go to the Power Management tab, and remove the checkmark next to Allow the computer to turn off this device to save power.

- Click OK to save the changes.
3. Use the Windows troubleshooter
- Press Windows + I to open the Settings app.
- Go to System, and select Troubleshoot.

- Now click Other Troubleshooters.

- Go to the Internet connection and click Run.

- Follow the onscreen instructions to complete the process.
- If the issue persists, go to Network Adapter and click Run to run the troubleshooter.

- Follow the onscreen prompts to complete the process.
4. Reset the network
- Press Windows + I to open Settings.
- Go to Network & Internet, and click Advanced network settings.

- Click Network Reset.

- Now click Reset now and follow the onscreen instructions.

5. Use the Command Prompt to reset network settings
- Press the Windows key, type CMD, and click Run as administrator.
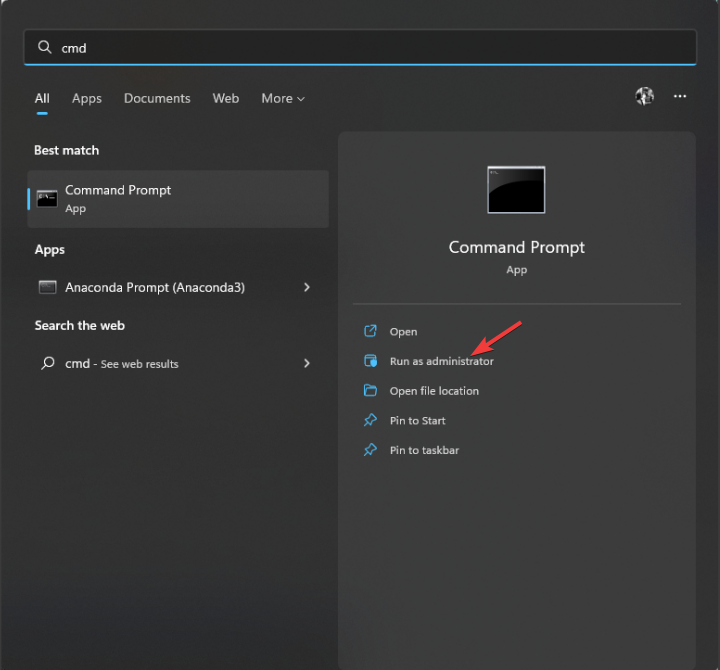
- Copy and paste the following commands one by one and press Enter after every command:
netsh int ip resetnetsh advfirewall resetnetsh winsock resetipconfig /flushdnsipconfig /releaseipconfig /renew - Now restart your computer to let the changes take effect.
6. Run your computer in a clean boot environment
- Press Windows + R to open the Run dialog box.

- Type msconfig and click OK to open System Configuration.
- Go to the Services tab, put a checkmark beside Hide all the Microsoft Services, and click Disable all.

- Go to the Startup tab, and click Open Task Manager.

- Select and right-click all the Enabled items one by one and choose Disable.

- Close the Task Manager. Click Apply and OK to save the changes.

- It will prompt you to restart your computer; click Restart to initiate. If your computer runs fine, you might have to check the freshly installed third-party software to eliminate the problem.

7. Reset your PC
- Press Windows + I to open the Settings app.
- Go to System, then click Recovery.

- Now next to Reset this PC, click Reset PC.

- From the Choose an option, select Keep my files.

- On the next screen, select Cloud download.
- Now on the Additional settings screen, click Next.

- On the Ready to reset this PC, click Reset and wait for the process to complete.

So, these methods fix the Intel WiFi 6 AX201 not working issue and help you regain your internet connection and resume online activities without interruption.
Please let us know in the comments section below if you have any questions or concerns about the topic.
Read our disclosure page to find out how can you help Windows Report sustain the editorial team. Read more


Improve this guide


User forum
0 messages