How to Fix Microsoft Security Essentials OOBE Errors

Microsoft Security Essentials (MSE) is an antivirus utility primarily for Windows 7. However, an MSE OOBE error arises for some users. The error message’s Event Viewer log states, Microsoft Security Essentials OOBE stopped due to the following error: 0xC000000D. That can even be a BSOD error for some users. These are a few resolutions that can fix the OOBE error.
What can I do to fix the Microsoft Security Essentials OOBE error?
1. Run a System File Checker Scan
- The OOBE error might be due to corrupted system files, which the System File Checker utility can fix. To run an SFC scan, open the Command Prompt with Run by pressing the Windows key + R hotkey.
- Enter ‘cmd’ in the Open text box, then press the Ctrl + Shift + Enter hotkey.
- Enter ‘DISM.exe /Online /Cleanup-image /Restorehealth’ in the Command Prompt, and press the Return key.
- Then input ‘sfc /scannow’ and press Enter to initiate a System File Checker scan that might take about half an hour.
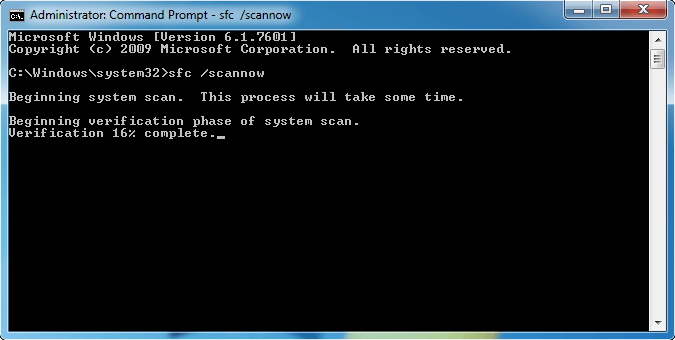
- The Command Prompt might tell you that Windows Resource Protection fixed system files when the scan is finished. Restart Windows if that’s the case.
If you want to try an automatic alternative, I recommend a specialized repair tool that can detect all malfunctioning system files and find the new files as replacements.
2. Erase the EppOObe.etl File
Some users have fixed the OOBE error by deleting MSE’s EppOObe.el file. So, erasing the EppOObe.el file might be one of the best resolutions for the OOBE error. Follow the guidelines below to delete that file.
- Press the Windows key + E hotkey to open File (or Windows) Explorer.
- First, users need to select the Show hidden files, folders, and drives option. To select that setting in Windows 7, click the Organize button in Explorer and select Folder and search options.
- Then click the View tab.
- Select the Show hidden files, folders, and drives option on the View tab.

- Press the Apply > OK buttons.
- Users can select the same option in Windows 10 by clicking the Hidden items check box on Explorer’s View tab.
- Next, open this folder path in Explorer: C:ProgramDataMicrosoftMicrosoft Security ClientSupport.
- Select the EppOove.etl file, and press the Delete button.
- Restart the desktop or laptop.
3. Turn Off the Program Compatibility Assistant Service
The OOBE error can also be caused by incompatibility with the Program Compatibility Assistant Service. Turning that service off might fix the OOBE error. This is how users can disable the Program Compatibility Assistant.
- Open Run in Windows.
- Input ‘services.msc’ and click OK to open the window shown directly below.

- Double-click Program Compatibility Assistant Service to open the window below.

- Press the Stop button if the service is running.
- Then select Disabled on the Startup type drop-down menu.
- Press the Apply button to confirm the new settings.
- Click OK to close the window.
4. Turn Off the OOBE
OOBE item settings can also be responsible for the OOBE error. So disabling the OOBE (Out-of-box experience) for Microsoft Security Essentials can also fix the issue. Follow the guidelines below to turn off the OOBE.
- Enter ‘compmgmt.msc’ in Run, and select the OK option.

- Then click System Tools > Performance > Data Collector Sets > Startup Event Traces Session on the left of the Computer Management window.

- Right-click Microsoft Security Client OOBE and select Properties.
- Select the Trace Session tab on the window that opens.
- Deselect the Enabled check box.
- Press the Apply button to save the settings.
- Then select the OK option.
- Restart Windows after adjusting the Enabled OOBE setting.
5. Uninstall Microsoft Security Essentials
Microsoft stopped supporting MSE when Windows 7 reached its end-of-support date in January 2020. So, the antivirus utility wasn’t very good after Microsoft stopped supporting Windows 7.
As such, now might be a good time to uninstall MSE and replace it with a third-party antivirus utility still supported on Windows 7. Thoroughly removing MSE will also probably resolve the OOBE error. Follow the guidelines below to uninstall Microsoft Security Essentials thoroughly.
- Open the Run accessory.
- Input ‘appwiz.cpl’ in Run’s text box and click OK to open the uninstaller window shown below.
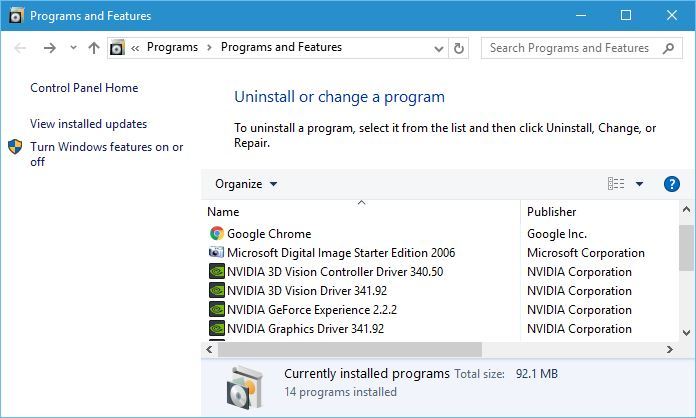
- Select Microsoft Security Essentials on the program list.
- Click Uninstall > Yes to remove the software.
- Thereafter, restart the laptop or desktop.
- Users will then need to erase some leftovers to remove the software thoroughly. Enter this path in Windows Explorer: C:ProgramDataMicrosoftMicrosoft Security ClientSupport.
- Erase any files and folders remaining at the path by selecting them and clicking the Delete button.
- Users will also need to erase MSE’s leftover registry entries with a registry cleaner utility. Click Download on CCleaner’s website to download the freeware version of that utility.
- Then open the software’s installer to add the freeware CCleaner to Windows.
- Click Registry on CCleaner’s window.
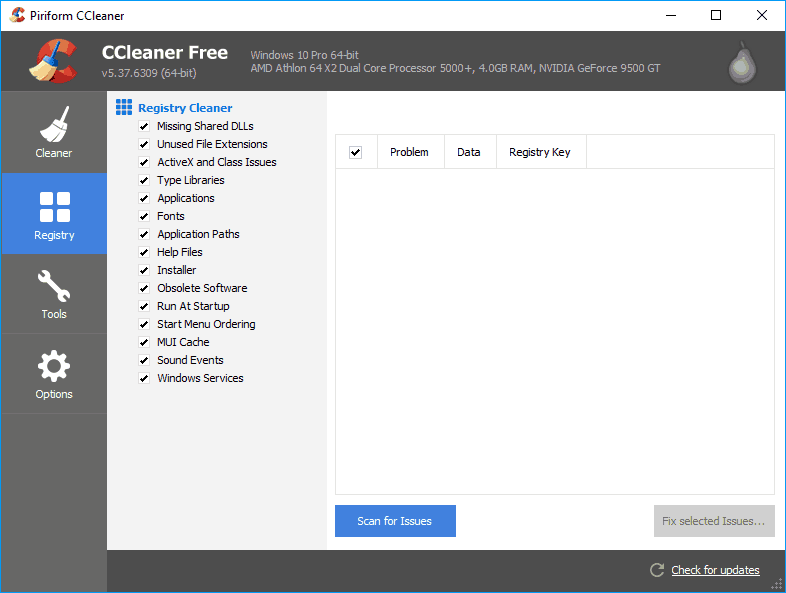
- Then select all the registry check boxes, and press the Scan for Issues button.
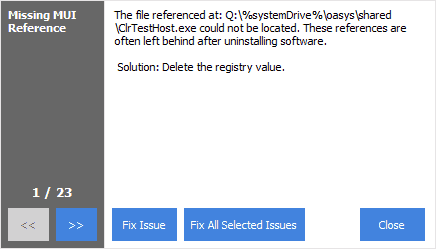
- Select the Fix selected Issues option.
- Click the Yes button to back up the registry if you prefer. Then press the Save button.
- Press the Fix All Selected Issues button to clean the registry.
- Then close CCleaner, and restart the desktop or laptop.
So that’s how users can resolve the Microsoft Security Essentials OOBE error in Windows. With MSE in obsolescence, the best resolution might be to uninstall the utility. This page provides details on how MSE stacks up with the best third-party antivirus software.
You can get rid of the OOBEEULA error on Windows 11 with these expert tips and tricks from our dedicated guide, so don’t hesitate to try it out.
Read our disclosure page to find out how can you help Windows Report sustain the editorial team. Read more


Improve this guide


User forum
0 messages