MOVAVI Video Editing Range of Products [Review]
We reviewed Movavi Video Editor Plus and Video Converter
Key notes
- Finding the best editing tools to create multimedia content is crucial.
- We’ve decided to make a review of Movavi’s video editing products.
- We will analyze these software’s features, price plans, trials, and more.

With the outgrowing number of content creators, online courses, and remote jobs, the demand for adequate software that helps interaction and learning has also increased.
Specialized software is required to create a video showcasing something, a tutorial meant to teach people, or even entertaining content for platforms such as Vimeo, YouTube, and many others.
There are many video editing software out there, some of them good, some of them bad. It is really important to choose software that suits your needs.
In other words, the quality of the programs you use to create, edit and finish your video will be reflected in your line of work.
That being said, today we are going to review some of Movavi‘s video editing software. Let’s see what these interesting tools have in store for us.
Movavi Video Editor
Movavi Video Editor is a comprehensive, easy-to-use desktop software that lets you dive into your creativity and develop crazy ideas into awesome videos.
Telling your story and inspiring others has never been easier, thanks to Movavi! The newly refined user interface has all the software’s tools at your fingertips.
Movavi Video Editor comes with two modes:
- Quick Video: for creating movies automatically
- Manual mode: for creating movies manually
Quick Video
This mode will automatically create movies based on videos and photos you upload. The process takes only 5 steps:
- Upload your files (either photos or videos).

- Choose the template that you like: Family, Memories, Love story, Travel, and more.

- The template will define the titles, transitions, and music in your video.
- Additionally, you can choose the No transitions theme and customize it yourself.
- Choose a soundtrack from the built-in collection, or upload your own.

- Preview your video. Insert text in the opening and closing titles, adjust the slide duration, and fill the black bars.

- Export the results. You can save the videos in any format, share them online, or continue editing them in manual mode.

Manual Mode
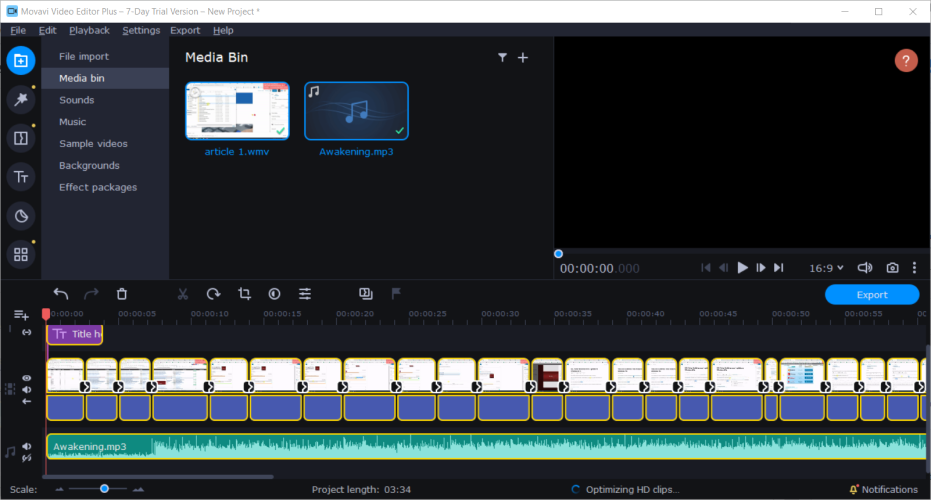
The manual mode gives you full control and editing freedom. You can customize your videos entirely, add your effects and other files, crop, cut, and insert video sections.
The editing space is multitrack, which lets you add up to 99 tracks that you can use in your video, audio, and titles. The handy timelines mark the length of your video.
You can scale it up and down for more precise editing. Thanks to the drag-and-drop style of controls, everything is done easily.
The preview window on the right lets you see the results and adjust the quality of the video for the preview. Keep in mind that higher resolutions will take up more system resources.
Additionally, the preview windows allow you to change the aspect ratio, enable guidelines for placing objects, and take screenshots.
The manual mode contains a series of useful editing-related tabs. Let’s take a look at them, shall we:
Import

In the Import tab, you can upload files from your computer, and record yourself with the webcam or microphone. You can add your files directly to the multitrack, or you can store them in the Media Bin for later use.
Additionally, you will find built-in content such as sounds, music, videos, backgrounds, and effect packs.
Filters

This tab contains a broad range of image and audio filters, including artistic effects, color filters, blur effects, 3D objects that you can insert into the video.
If you’re a fan of old movies, you can use one of the retro filters to give your work an old-school feel. You’ll find options such as sepia, vignette, grayscale, and much more.
Moreover, the tab also includes a Favourites section where you can find selected filters of your choice. To favorite a filter, all you need to do is click the heart icon.
Transitions

The Transitions tab contains a plethora of different effects, and even more available on the Movavi Effects Store. Join your clips together with elegant fades to make your video feel smoother.
Choose from parallax, artistic, zoom, circle, blocks, geometric, and many more quality transitions and give your video the uniqueness it deserves.
Titles

Next, we have the Titles tab, which contains different fonts to add to your videos. You can find more awesome fonts on the Movavi Effects store.
You can use an animated template to create opening or closing credits, subtitles, or captions, and you can also create your own intro video and save it as a sample.
Stickers
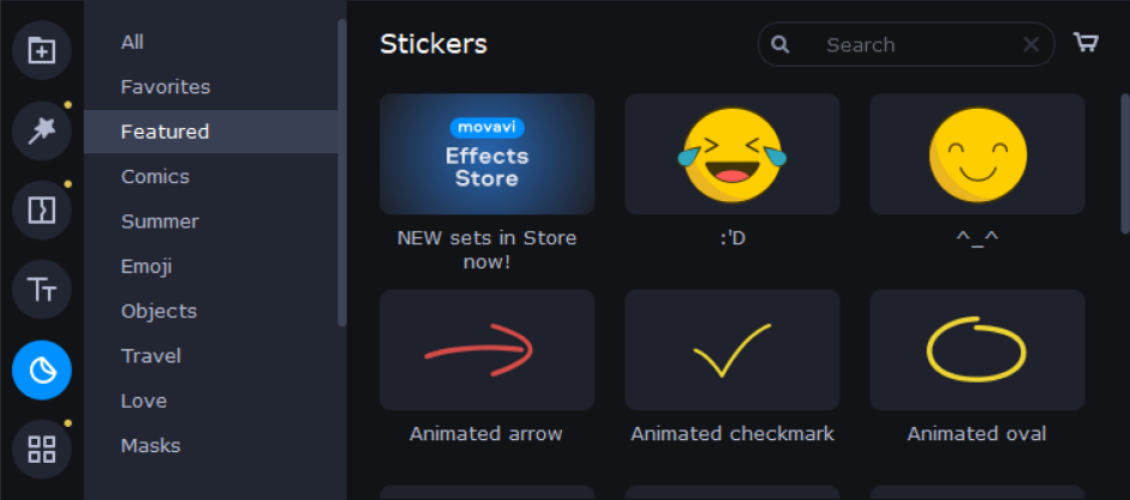
Another awesome and comical tab that lets you give your videos a heartwarming and cozy feel is called Stickers.
This collection of stickers contains various clip-art objects, arrows, headlights, emojis, and many more cool additions you can find in the store.
Tools

The Tools tab has enhancements and special effects for video and audio editing.
Video Editing:
● Color adjustments: easy (automatic filters and LUTs) and advanced (manual settings)
● Crop and rotate
● Overlay
● Pan and zoom
● Stabilization
● Animation
● Highlight and conceal
● Chroma Key
● Scene detection
● Logo
● Slow-motion
Audio Editing:
● Synchronization (similar tracks from different devices)
● Equalizer
● Noise removal
● Audio effects
● Beat detection
Export
Save your results in any file format available, including MP4, MOV, AVI, GIF, MP3, and even more by clicking the export button.
Moreover, you can also upload your video to YouTube, Vimeo, or Google Drive directly from the inside of the program, or optimize the output for your device.
Besides choosing the file format, you can also choose the aspect ratio, resolution, and video quality, and you will get information about the audio, and the file size before you finish exporting.
Pricing
Before mentioning the prices, you must know that Movavi Video Editor has a 7-day trial period which you can test out before you upgrade to one of its two price plans.
However, the trial version has some limitations:
- Lasts for 7 days
- All videos will have a watermark on them
- When saving a project as an audio file, only half of the audio is saved
One year subscription
- $39.95 renewed yearly
- Benefit from all features
- No watermark
- No cut audio when saving in the audio format
Lifetime purchase
- $59.95 for a lifetime purchase
- Benefit from all features
- No watermark
- No cut audio when saving in the audio format

Movavi Video Editor
Create awesome content and customize it with a variety of effects by using Movavi Video Editor!Movavi Video Converter

Being a content creator requires more than video editing software. It implies lots of research hours, searching for the perfect thumbnails or other multimedia you will include in the final product.
Thankfully, the company developed another tool that will help you during your research and content planning, respectively, Movavi Video Converter.
What is Movavi Video Converter, exactly? Simply put, it is a fast desktop multimedia conversion software that supports video formats but audio and graphic files as well.
The tool has a detailed UI, filled with useful information and options, yet it manages to keep everything simple, therefore, it is easy to use, requiring only 3 steps:
- Upload your files.

- Choose the output format or device.

- Click Convert and you’re good to go.
 NOTE
NOTE
Overview
Besides converting the files on your PC, Movavi Video Converter can identify any connected tablet or phone and will suggest optimal conversion changes.
You will also benefit from some additional settings for advanced file conversion:
● manually adjust bitrate type, bitrate size, and file size to see how it affects
the output quality
● convert a sample to make sure you like the results
● select audio tracks and remove the ones you don’t need
● change the frame size, frame rate, resize quality, and method
The built-in editor allows you to enhance your files if needed:
- stabilize shaky footage
- adjust colors manually or automatically
- overlay effects: fill edges, fish-eye, sharpen
- add color filters
- crop videos
- normalize volume
- remove background noise
- rotate and trim videos without conversion
- add a text or image watermark
Movavi Video Converter has a whole range of tools for working with subtitles:
- upload a file from your computer
- search online from within the program’s interface
- change fonts, colors, and position
- synchronize subtitles with audio and video
- remove unnecessary language tracks
Hardware acceleration
Movavi Video Converter supports hardware acceleration for NVIDIA NVENC, NVDEC, Intel HD Graphics, and AMD.
What is hardware acceleration? It’s a process that uses certain hardware to its full potential, thus making the conversion process faster.
Additionally, the converter is also optimized for multi-core processors, which dominate the market nowadays, using them most efficiently not to overload the CPU.
Learn everything about the software’s hardware acceleration, how it works, and its impact on its speed in Movavi’s official article.
SuperSpeed mode
Since we’re talking about speed and fast computing power, we need to mention Movavi’s Video Converter SuperSpeed conversion mode.
This mode is available only for specific formats and lets you convert files with the same codecs, but you cannot change the file’s properties.
It is based on the remultiplexing method that doesn’t require decoding and reencoding, thus keeping the file quality while taking only a few seconds to convert it to another format.
Obviously, you will have all the information and spicy details regarding the way this mode works and how impactful it is on their official site.
Pricing
Movavi Video Converter follows their price plan model, having a limited trial version as well as premium paid versions.
The trial version:
- Watermarks the output videos
- Has a 7-day trial period
- When converting the audio files, only half of their length is converted
- When using the SuperSpeed mode, only half the length of the video file is converted
One year subscription
- $39.95 renewed yearly
- Benefit from all features
- No watermark
Lifetime purchase
- $49.95 for a lifetime purchase
- Benefit from all features
- No watermark
Closing thoughts
We messed around with both programs for a while, and we were pretty pleased with what they are capable of.
We were never confused by the features because most of them have tutorials explaining what they do and how to use them, and the interface was easy to follow.
However, even if the free trial includes all the cool tools these programs have, it is still limited to 7 days. That shouldn’t be a problem, however, since upgrading to premium is totally worth it.
Movavi Video Converter and Video Editor are definitely on our top list of video editors, especially if you’re a beginner just starting on content creation.
Read our disclosure page to find out how can you help Windows Report sustain the editorial team. Read more


Improve this guide

User forum
0 messages