How to Fix the NVIDIA Driver Timeout Error
Installing the right GPU driver is the best way to troubleshoot this issue
4 min. read
Published on
Read our disclosure page to find out how can you help Windows Report sustain the editorial team. Read more

Dealing with Nvidia driver timeouts can be incredibly frustrating, especially when you’re in the middle of an important task or an intense gaming session. If you just installed a new Nvidia graphics card, check if your power supply delivers enough wattage for your GPU.
How do I fix the Nvidia driver timeout issue?
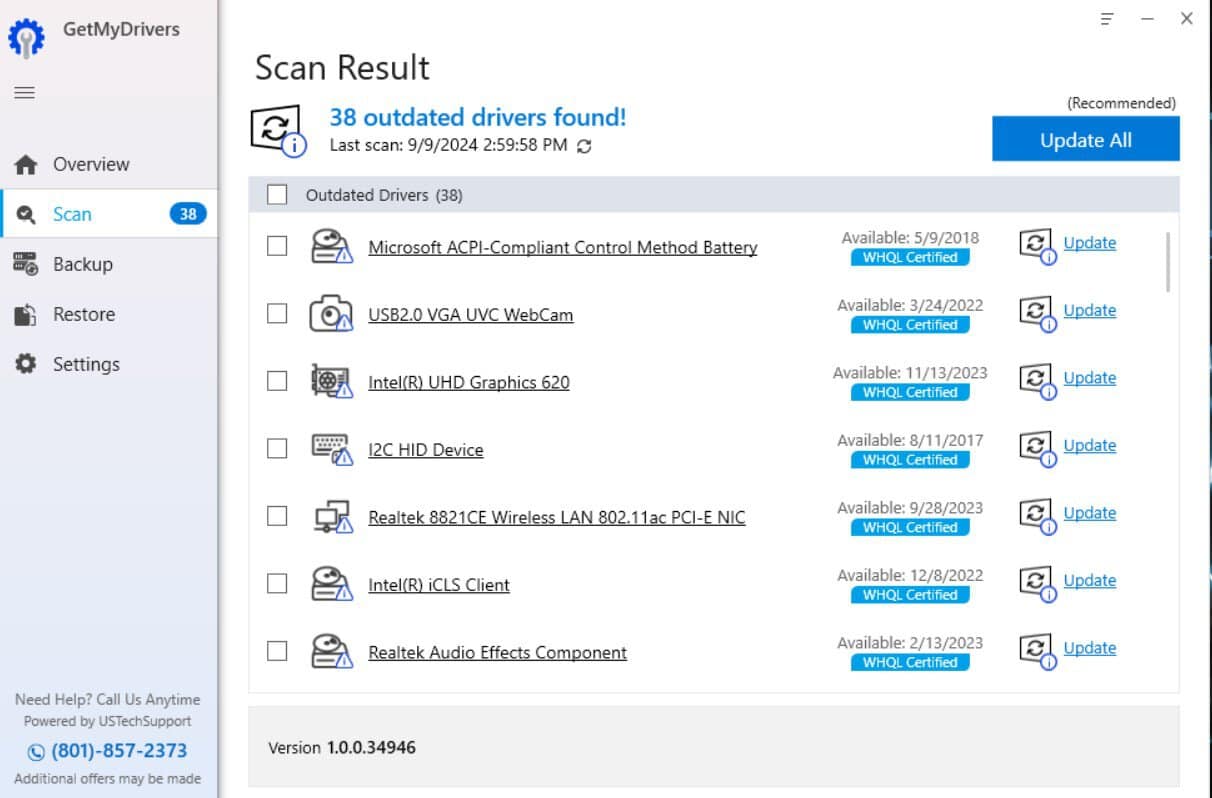
1. Use the GetMyDrivers free app
- Open a browser, go to the GetMyDrivers official page and click on Download for Free.
- After you install it, GetMyDrivers will automatically run a complete scan of your system to identify any problematic or missing drivers, including the Nvidia graphics.
- It will only take a couple of seconds but after that, you will get a full status. Just find the Nvidia driver within the list and click Update from its right.
- Restart the PC after the driver is installed.
Using a driver updater tool such as GetMyDrivers is the quickest way to get around this issue, and it’s free. Nevertheless, this tool will fix a lot of other driver problems you didn’t even know about. If you pay for the full version, you will be able to update all the drivers at once with a single click.
Another important thing to mention is that GetMyDrivers is savind the configuration before performing the updates, so you will be able to restore your system if anything goes south.
2. Increase Timeout Detection and Recovery (TDR) Delay
- Press Win + R, type regedit, and hit Enter.
- Go to the following key:
HKEY_LOCAL_MACHINE > System > CurrentControlSet > Control > GraphicsDrivers - Right-click on the blank area in the right pane, hover over New, and select DWORD (32-bit) Value. Name it TdrDelay.
- Double-click TdrDelay, set its value to 10 (or more depending on your needs), and click OK.
Increasing the TDR delay allows your graphics card more time to complete tasks, which can prevent it from being reset by the operating system.
3. Disable Multiplane Overlay (MPO)
- Press Win + R, type regedit, and hit Enter.
- Navigate to the following key:
HKEY_LOCAL_MACHINE > SOFTWARE > Microsoft > Windows > Dwm - Right-click on the blank area in the right pane, hover over New, and select DWORD (32-bit) Value. Name it OverlayTestMode.
- Double-click OverlayTestMode, set its value to 5, and click OK.
This disables Multiplane Overlay, which can cause stability issues in certain GPU driver configurations, particularly with AMD cards. Disabling it might stop driver timeouts.
4. Update and clean install Graphics Drivers
- Go to the official DDU website and download the latest version of Display Driver Uninstaller.
- Boot your PC into Safe Mode (Press F8/Shift + Restart during boot). Run DDU and completely uninstall your current graphics drivers.
- Download the latest stable drivers from NVIDIA official website.
- Run the installer as Administrator by right-clicking and selecting Run as Administrator.
Updating your drivers ensures you have the latest fixes and compatibility improvements. Running the installer as an administrator can prevent any permissions issues during installation.
5. Verify the game files and reinstall the game
- Open your game client (Steam/Epic Games/etc.).
- Right-click on the game experiencing issues and select Properties.
- In the properties window, find and click on Local Files and then Verify Integrity of Game Files.
- If verification fails, uninstall the game via the game client and reinstall it.
Verifying game files ensures that all game data is correct and not corrupted, which can solve crashes due to bad data. Reinstalling the game is a broader measure to fix persistent issues.
6. Set a custom tuning profile in the GPU software
- Open the NVIDIA Control Panel.
- Go to Manage 3D Settings > Program Settings.
- Adjust the Power Management Mode to Prefer Maximum Performance.
Reducing the maximum frequency for your GPU can stabilize it if it’s overclocking itself too aggressively. Setting the power management mode to prefer maximum performance keeps the GPU running at a stable performance level.
By following these steps, you can significantly reduce the chances of encountering Nvidia driver timeouts. Always keep your system updated and regularly check for driver updates to maintain optimal performance.
If the Nvidia graphics card is not detected, follow the highlighted link for a step-by-step guide to fix it. We also have a guide to fix the issue with the mouse not working on Nvidia Overlay.
Did you manage to fix the Nvidia driver timeout issue by using our solutions? Let us know in the comments below.



User forum
0 messages