OneNote app does not sync on Windows 10
8 min. read
Updated on
Read our disclosure page to find out how can you help Windows Report sustain the editorial team Read more
Key notes
- OneNote is an Office app that helps you to store notes, synchronize, and share them with others.
- In this article, we will present you simple solution on how to troubleshoot sync issues with OneNote.
- For any other issues with and Office app, you can check our Microsoft Office Troubleshooting hub.
- If you are interested to learn more about the latest Microsoft OS, visit our Window 10 section.
Microsoft OneNote is a great app for taking notes, compiling data, and organizing information. The best part is, it syncs with the cloud, meaning you can access your notes everywhere.
It is multi-platform, meaning it is available on Android, iOS, macOS, and the Web, besides being available on Windows 10 devices. But this cross-platform design comes with a problem.
Desktop users may frequently face problems when trying to sync data to and from the cloud. This is quite a common problem with the desktop version of OneNote on Windows 10.
In this guide, we look into some of the most common sync errors (notebook/particular section won’t sync, sync conflicts arise, storage issues show up, etc.) and how they can be resolved.
How do I fix OneNote that won’t sync
1. Install the latest updates
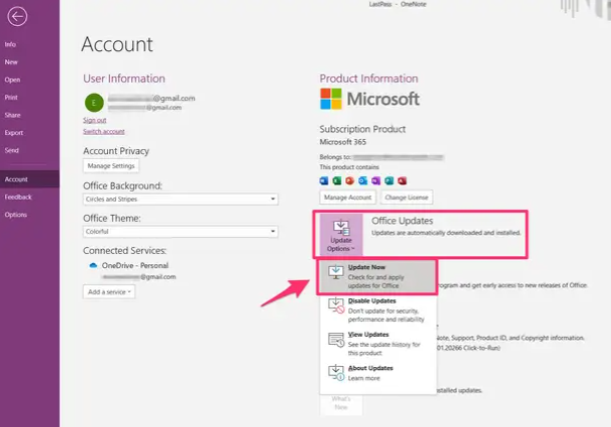
Firstly, it is worth noting that whatever problem you may be facing could be a result of an issue with the OneNote application itself. This is why you need to make sure that you have the latest updates installed. Updates will often contain fixes for bugs that may be causing your problems. To check for updates go to File > Account. Click on Office Options then click on Update Now.
2. Check your Internet connection
Also, a no-brainer, make sure you are actually connected to the Internet before you attempt to troubleshoot OneNote. More often than not, sync issues are a result of bad Internet connections.
You can check your internet connection by looking on the right-down corner, where you should see a Wi-Fi icon or the Ethernet icon. You can also just open an internet page and see if it loads.
If there are any issues, troubleshoot the problem with the help of your Internet Provider.
3. Manually sync the particular section
- Go to File then click on Info.
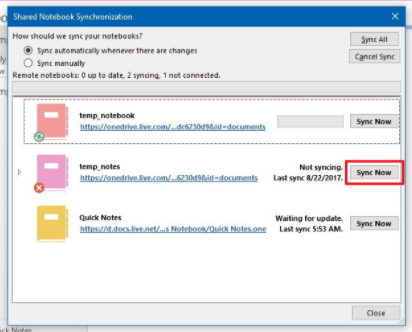
- Click View Sync Status, or right-click on the Notebook you want to sync and click on Notebook Sync Status.
- Under Shared Notebook Synchronization, you will find the Sync now button, click on it.
Note: This is a OneNote built-in solution to the problem of a particular section not syncing.
4. Copy the pages to a new section
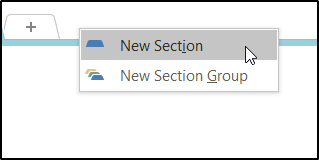
- Select the + tab or Right-click on the navigation bar, and select New Section.
- Name the new section.
- Go to section with the sync problem, right-click on each of its pages and click on Move or Copy.
- Select the new section as the destination, and click Copy.
Note: Once you’ve followed through these steps, you can now use the manual sync method described above to sync the new section. Once you’ve synced the section, right-click on the old section and select Delete.
5. Empty the OneNote Recycle Bin
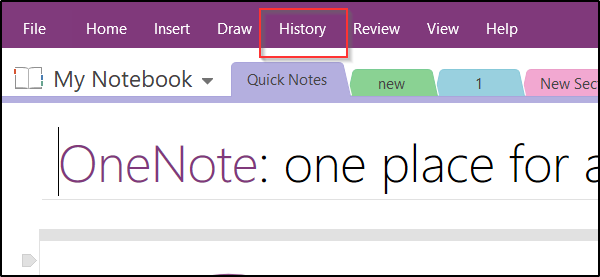
- Select the History tab.
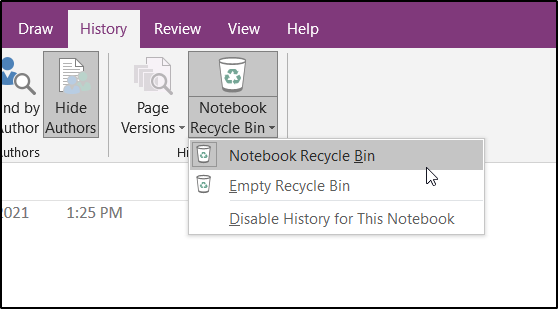
- Select the Notebook Recycle Bin button.
- Right-click on the old section and click on Delete.
- You can also select Empty Recycle Bin and delete everything.
Note: The section you’re about the delete may contain important pages. Make sure you copy them before you permanently remove the section from the recycle bin.
Sometimes, when you remove a particular section that isn’t working or that you don’t need anymore, it may end up causing sync problems. For this reason, you need to remove them from the OneNote Recycle Bin.
6. Fix misplaced sections on OneNote
A section of your notebook could get misplaced when you’re trying to share it with other users. This happens when OneNote tries to sync the changes made to the section but cannot find the section file.
When this happens the notebook gets marked with an icon in the Notebooks list. There are two solutions to this problem, move the misplaced section to another notebook, or delete that section.
Move the misplaced section
OneNote lets you manually resolve the problem of a misplaced section by letting you move the particular section.
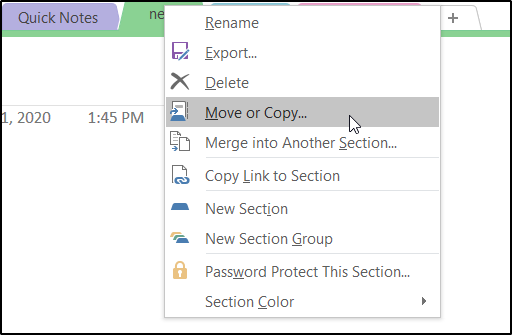
- Right-click on the tab for the misplaced section.
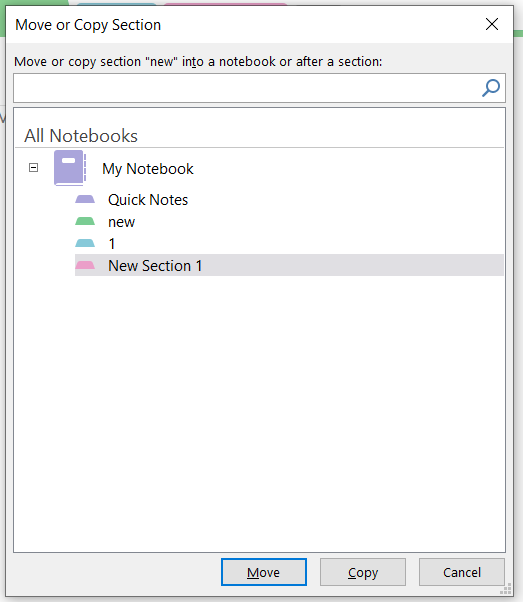
- Select Move or Copy.
- Select the target notebook as the destination.
- Click on Move or Copy depending on what you would like to do.
Delete the misplaced section
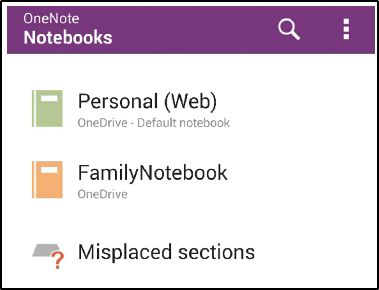
If you’re sure that you do not need the section that has been misplaced, you could simply delete it to resolve the issue. Follow these steps:
- Under the Notebooks list, select Misplaced Sections.
- Right-click on the misplaced section you would like to remove and click on Delete.
7. Check if the notebook is accessible on the web
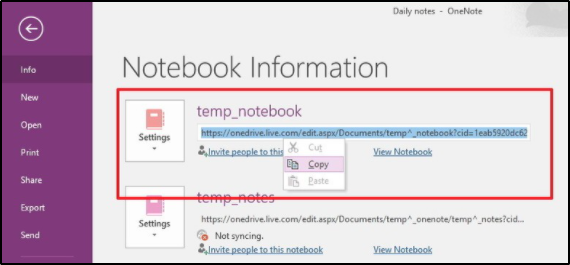
- Go to File then Info.
- You should find the link right below the notebook. Select the link then right-click on it and click Copy.
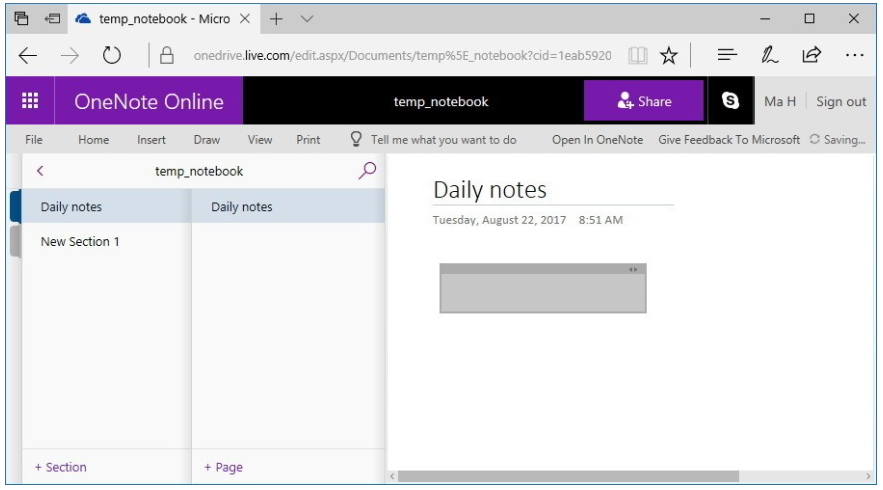
- On the web browser of your choice, enter the link you just copied and hit enter to open the notebook.
Note: If your notebook is accessible via the web browser then this confirms that there is a problem with the desktop app. If not, it could be a service error.
If the problem is with your desktop app, one of the simplest solutions to get your notebook to start syncing again is to close and reopen it. This should reset the connection, and get your notebook to start syncing again.
8. Check the sync status
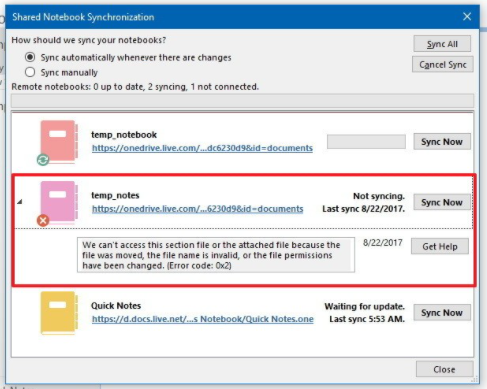
If you were able to access the notebook online, but the changes you recently made weren’t added to it, you should check the sync status of the notebook to confirm whether or not it was synced.
To check the status, go to File then Info, and from the right side select View Sync Status. In the new windows, you will see an error message below the notebook with the issue.
If possible, click on the Get Help button in order to access more troubleshooting steps. If that’s not available, note the error message and do a quick online research.
10. Check the service status
If you were not able to access the notebook online via a web browser, there could be a problem with the OneDrive service itself. To confirm this, open a web browser of your choice and proceed to the Office portal.
If the services are up and running, you should see a green screen with a tick mark, and the message In case there is nothing wrong with the services, you should contact Microsoft for further assistance on your issue.
Make sure that you keep OneNote open and signed in during the troubleshooting process. You could potentially lose your data otherwise.
11. Fix content sync conflict on OneNote
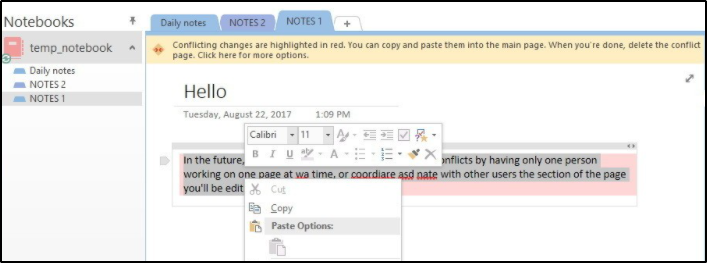
When two or more people try and edit the same piece of text simultaneously, this will result in synchronization conflicts. These conflicts are automatically detected by OneNote which then proceeds to create multiple copies of the same page. This will be indicated via a yellow message that appears on the top of the page.
To prevent this issue from showing up in the future, make sure only one user is editing a page at a time. Or you could coordinate who edits which section.
To resolve this issue, you will need to copy the edited content to the main page and then proceed to delete the other page. To do this, click on the yellow message, copy the content from the temporary page, and paste it onto the primary page.
12. Fix storage sync conflicts on OneNote
You may occasionally run across error code 0xE00015E0. What this means is, either your file is too big to sync, or that your local device is low on space. Usually, it’s because OneNote has a lot of backups stored.
Here’s how you can resolve these issues.
Remove unnecessary backups
- Press the Windows key + R to open the Run dialogue.
- Paste the following and hit enter: %localappdata%.
- Double click on the Microsoft folder, then OneNote.
- Here click on the folder with a name corresponding to the version of your application (16.0 for OneNote 2016, for instance),
- Open the Backup folder.
- Delete all the backup files that you no longer need.
Optimize files and reduce automatic backups
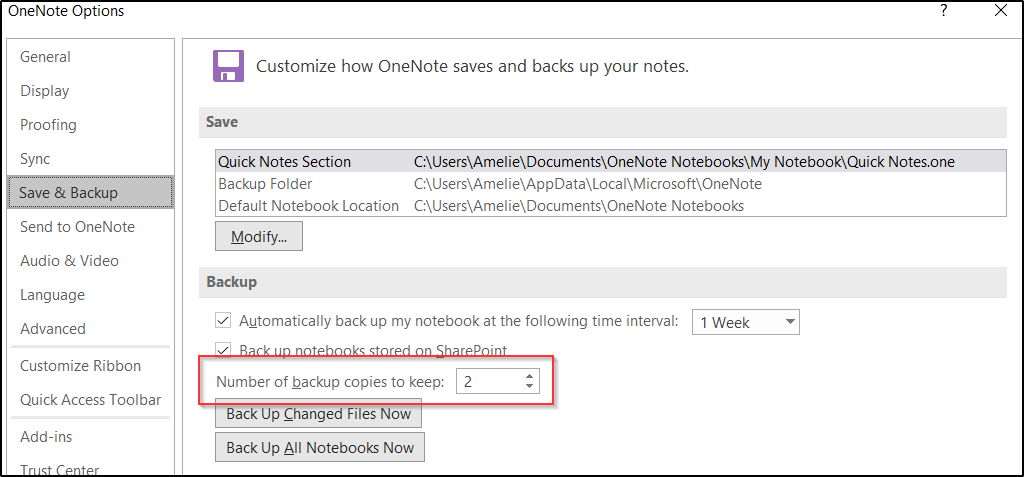
- Go to File then Options.
- Select Save & Backup.
- Under Optimizing files, select Optimize All Files Now.
- Under Backup, reduce the number of backup copies to keep.
All of the above steps should help you out when OneNote is giving you trouble with synchronization.
If you are looking for a great alternative solution to OneNote, we recommend you Evernote. It will help you to store everything from personal moments to business projects, safe, always secure, and ready whenever you need them.
You can use it on multiple devices so your important notes are with you wherever you go. Read more about this excellent software in our Evernote guide.


