How to Fix a PC Stuck on Motherboard Boot Screen
In most cases, your BIOS settings are causing this issue

If your PC gets stuck on the motherboard screen, it means the startup process is freezing right at the start. That logo or splash screen is a quick hardware check before Windows loads. If it hangs there, it usually signals a hardware or firmware issue. Follow the step-by-step instructions below to get it fixed fast.
What can I do when PC is stuck on the boot screen?
Table of contents
Sometimes a quick restart fixes this problem, but if that doesn’t work, keep reading.
1. Boot in Safe Mode
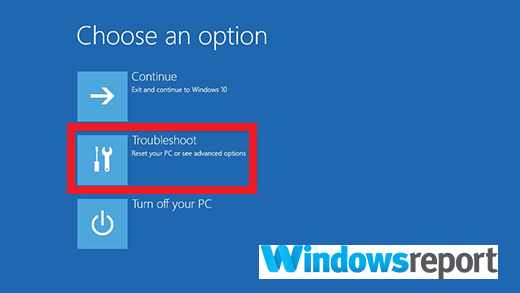
- Manually shut down (forcibly) your PC around three times consecutively. The Choose an option screen. Click troubleshoot.
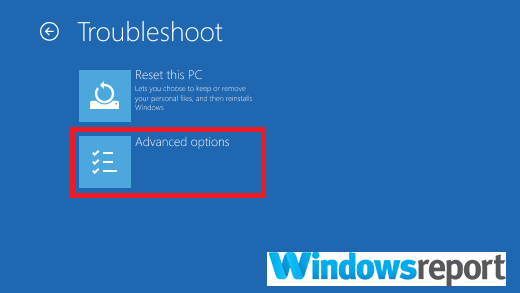
- Select Advanced options.
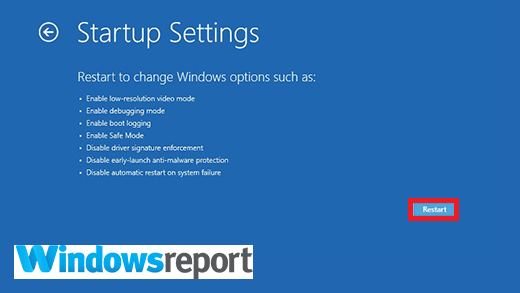
- From there, choose Startup Settings

- Hit Restart.
- After your PC has restarted, you’ll see a host of choices. Select 4/F4 to start it in safe mode.
- If it boots, run the system restore to take back your computer settings to a previously working state.
2. Check your Boot order
- Start your PC and Get in its BIOS (press the right key at startup e.g. ESC, F9, F2 etc.).
- Locate the boot order area and make sure that your hard drive is set to be the first booting device.
- Restart your PC.

You will also experience the same problem if you have an external gadget such as an iPod plugged in. So also ensure that you don’t have external storage devices such as a USB hard drive connected.
3. Check the RAM
- Open your system unit.
- Locate the RAMs and:
- Remove the RAMs one by one(where applicable).
- You then reinsert the RAMs (again one by one) while trying to boot each time. If the machine starts without one (or more) of the RAMs, know that the issue is with the memories. Needless to say, you’ll need to replace the suspect RAM module(s).
4. Clear the CMOS (BIOS)
 NOTE
NOTE
- Turn off every peripheral device attached to the computer.
- Disconnect the system power cord from its AC power source.
- Remove the computer case cover.
- Find the CMOS battery on the motherboard. The battery is typically in either a horizontal/vertical battery holder although it can also be connected to an installed onboard header using a wire.
- Remove the CMOS battery. Notice the + and – orientation if the CMOS battery is within a holder. Finally, gently pry your battery free from the connector. For batteries connected with a wire to the onboard header, simply disconnect the wire.
- Wait for between 1–5 minutes.
- Reinsert the battery.
- Plug all the devices back in plus the computer.
- Power on the computer.
5. Perform a fresh install
In extreme cases, like the requested system device cannot be found, the only way out is to reinstall the suspect configurations. You may have to reinstall Windows, a brand new hard disk or even a new motherboard.
To see how to do that, check our guide on how to reinstall Windows 11 for detailed instructions.
This isn’t the only issue, and many reported no boot screen on Windows. Many users also reported that Windows is stuck in boot loop after reset, but we tackled that issue in a different guide.
If you want to customize your system, we also have a whole article that shows you how to change the boot logo on Windows 11, so feel free to visit it.
We hope you managed to fix the problem on your PC and get back to using it normally. Let us know how it went in the comments section below.
Read our disclosure page to find out how can you help Windows Report sustain the editorial team. Read more


Improve this guide


User forum
8 messages