Personalized Settings Not Responding? 5 Ways to Fix it
Make personalized settings work again in no time
Key notes
- Sometimes, you may come across an error, personalized settings not responding that prevents you to customize your desktop.
- While this mostly occurs after a Windows Update, the issue could also be related to corrupted system files or outdated graphics drivers.
- Sometimes, you may also see a black screen on your desktop with the error message on the top, however, this can be fixed.
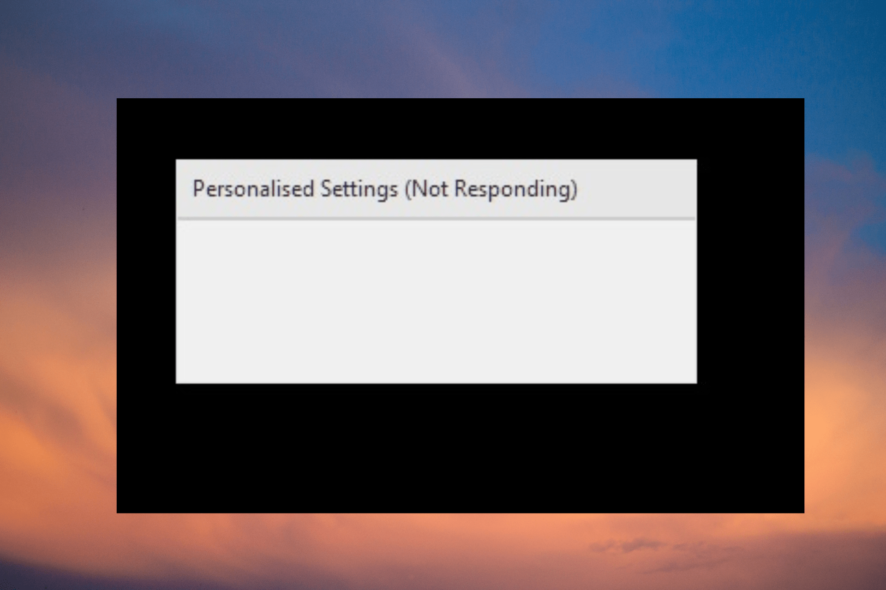
When trying to access the personalization settings in Windows 11, you may often encounter the personalized settings not responding error.
You may want to choose a different Windows 11 theme, screen color, fonts, or lock screen to personalize your Windows appearance, however, this error can be annoying.
Why does Windows 11 Personalize not work?
If you are trying to access the Personalized Settings on your PC to change icons, themes, etc., but are unable to, there could be quite a few reasons for this issue:
- Windows Explorer fails to start – When Windows Explorer continues to run in the background but cannot be opened normally.
- System files – Most often, a Windows error may arise due to corrupted system files.
- Faulty Windows update – Chances are that the recent Windows update came with bugs that may be causing the issue.
- File Explorer did not start correctly – Sometimes, the File Explorer may crash, leading to the personalized settings not responding issue.
- Outdated graphics drivers – You may not be able to access the personalized settings due to the graphics drivers that have not been updated, so it’s time to take action.
Fortunately, we have some solutions that will have you get rid of the personalized settings not responding black screen issue and help you continue making the changes.
How do I fix personalized settings not responding?
Try the preliminary checks below to see if they help fix the issue:
- Reboot your PC.
- Disconnect your devices.
- Try to disable the network connection before rebooting or shutting down after an update.
- Switch the network connection.
- Reset the GPU.
- Try using your password instead of your PIN.
- Uninstall previous Windows updates.
If the above steps fail, you can proceed with the main troubleshooting methods below.
1. Restart the Windows Explorer
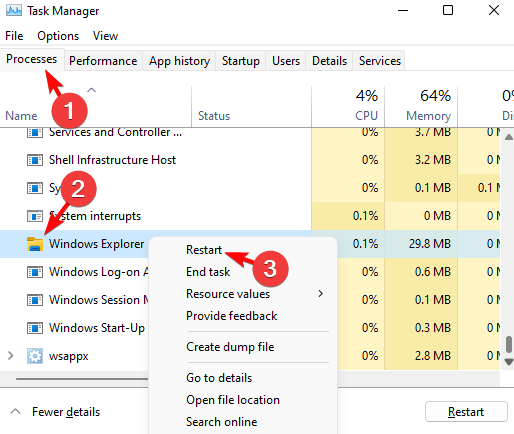
- Right-click the Start button and select Task Manager to open the Task Manager window.
- Next, go to the Processes tab and under Windows Processes, look for Windows Explorer.
- Now, right-click on Windows Explorer, and select Restart.
2. Update the graphics driver
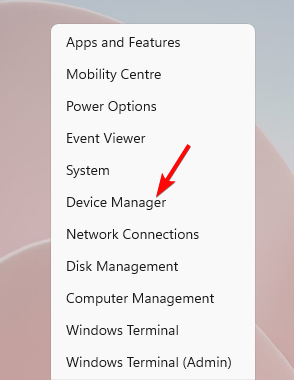
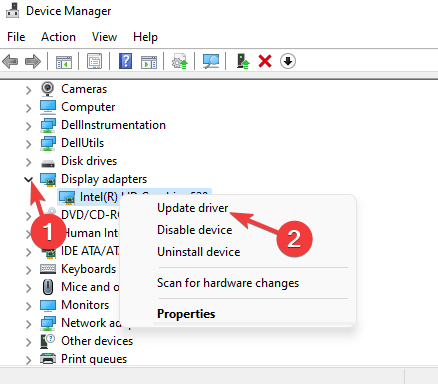
- Go to the Windows icon on the taskbar, right-click the Start button, and select Device Manager to open the Device Manager window.
- Navigate to Display adapters, right-click on the device, and select Update driver.
- Next, in the Update Drivers window, click on Search automatically for drivers.
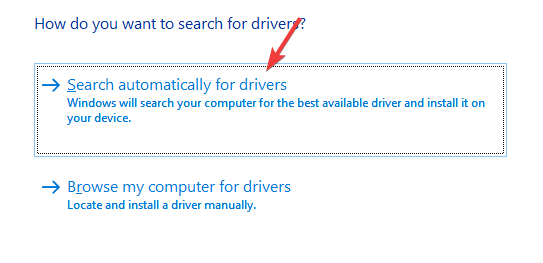
- Now, Windows will start looking for the latest drivers, and if any are available, it will apply the updates automatically.
Alternatively, you can also install the drivers manually by following three quick methods in this post.
Now, close Device Manager, restart your PC, and check if you still encounter the personalized settings not responding issue.
To make sure that your driver updates are safely we recommend using Outbyte Driver Updater, a specialized tool that finds and automatically keeps all outdated drivers up to date.
You can prevent these problems by using an automatic tool that will search and install the correct drivers on your computer with just a few clicks. That's why we recommend you use Outbyte Driver Updater. Here's how to do it:
- Download and install the Outbyte Driver Updater app.
- Launch the software.
- Wait for the app to detect all incompatible drivers.

- Afterward, it will show you a list of the drivers found to select the ones to Update or Ignore.
- Click on Update & Apply Selected to download and install the newest versions.
- Restart your PC to ensure the applied changes.

Outbyte Driver Updater
Use this software and solve all driver-related issues from your PC.3. Repair system files using the SFC command
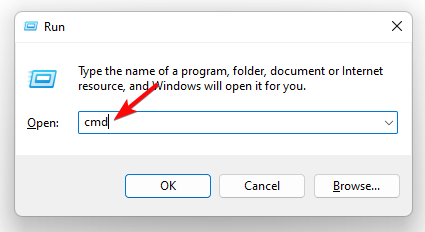
- Press the Win + R keys together to open the Run console.
- Type cmd in the search bar, and press the Ctrl +Shift + Enter shortcut keys to launch the elevated Command Prompt window.
- Run the below command in the Command Prompt (Admin) window and hit Enter:
sfc / scannow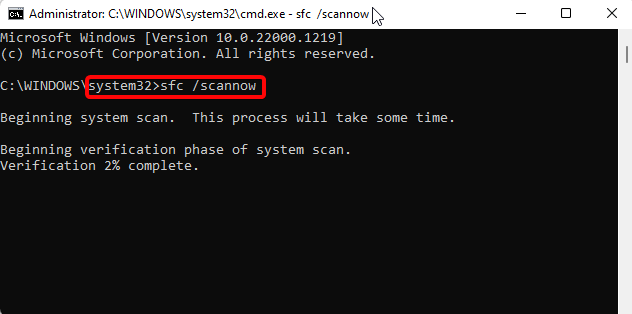
- The system checker utility will now start checking for any corrupted files and if any are found, will repair them automatically.
Once you see the success message, close Command Prompt, reboot your PC, and check if you can access the Personalized Settings now.
4. Delete an installed update in the registry editor
 NOTE
NOTE
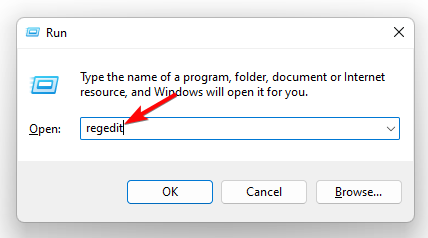
- Press the Win + R keys simultaneously to launch the Run console.
- Type regedit in the search box and hit Enter to open the Registry Editor.
- Next, navigate to the below path to find the installed update:
HKEY_LOCAL_MACHINE\SOFTWARE\Microsoft\Active Setup\Installed Components - Here, on the left side, under Installed Components, right-click on the last key and select Export to create a backup of the folder.
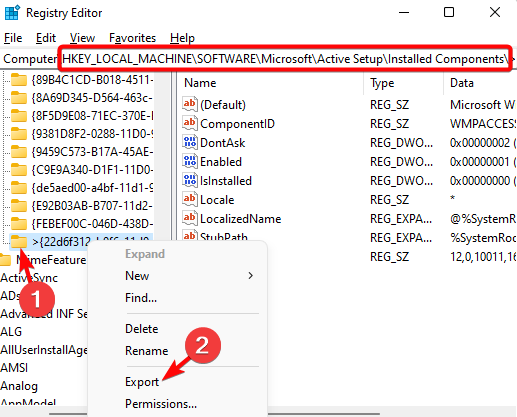
- Now, right-click again and select Delete.

This will help you uninstall the last update. Restart your PC and check if you still encounter the error while trying to access Personalized Settings.
Alternatively, you can also uninstall the previous Windows update on Windows 11 using Advanced Startup.
5. Open File Explorer using Task Manager
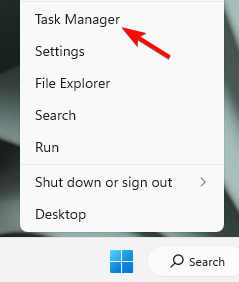
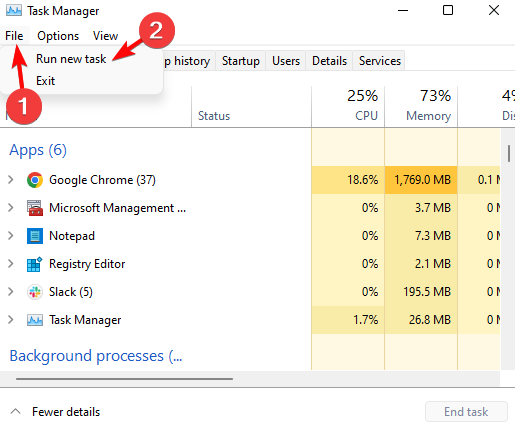
- Go to Start, right-click and select Task Manager.

- Click on the File tab on the top left and select Run new task.
- Type explorer in the Create new task search box and hit Enter.
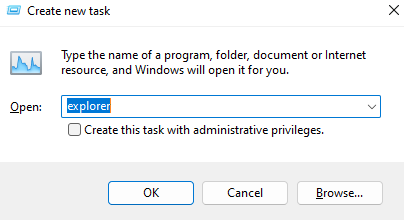
This will open File Explorer instantly. Once done, check if you can access Personalized settings or if it’s still not responding.
How do I reset my Personalization on Windows 11?
To reset all your Personalization settings to default, you can follow the below instructions:
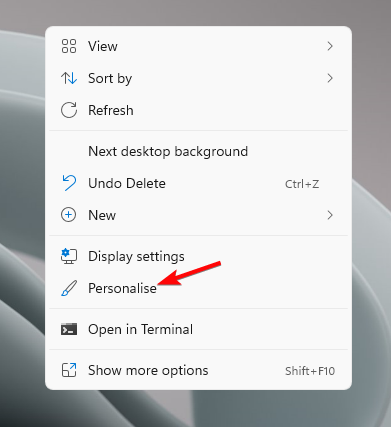
- Right-click on the Desktop and click on Personalize to open the Personalization settings window.
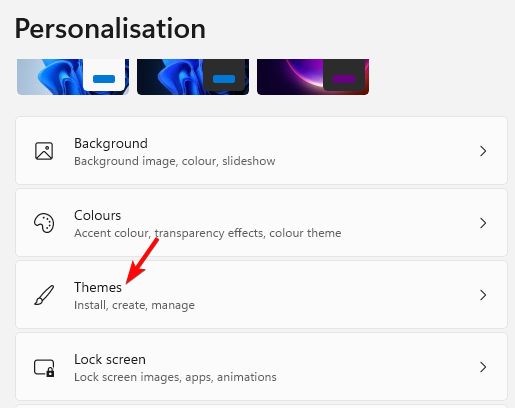
- Here, on the right, click on Themes.
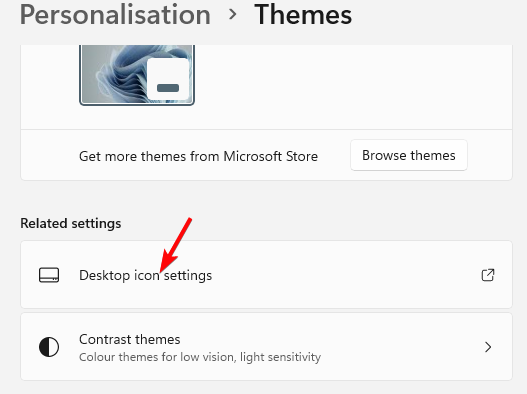
- On the next screen, scroll down and click on Desktop icon settings.
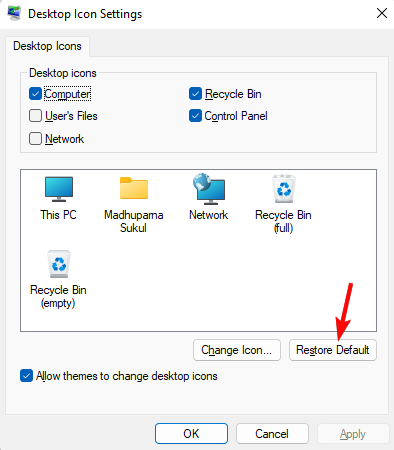
- In the Desktop Icon Settings dialog, click on Restore Default.
- Now, return to the Personalization settings window and you can select Start, Taskbar, etc., one by one and change enable or disable the options to default settings.
- You may change the other settings like color, background, fonts, etc. to default.
How long does it take to set up personalized settings for Microsoft Edge?
Given the plethora of customizations available in Microsoft Edge, it may take anywhere between 5-20 minutes to get the personalized settings set up.
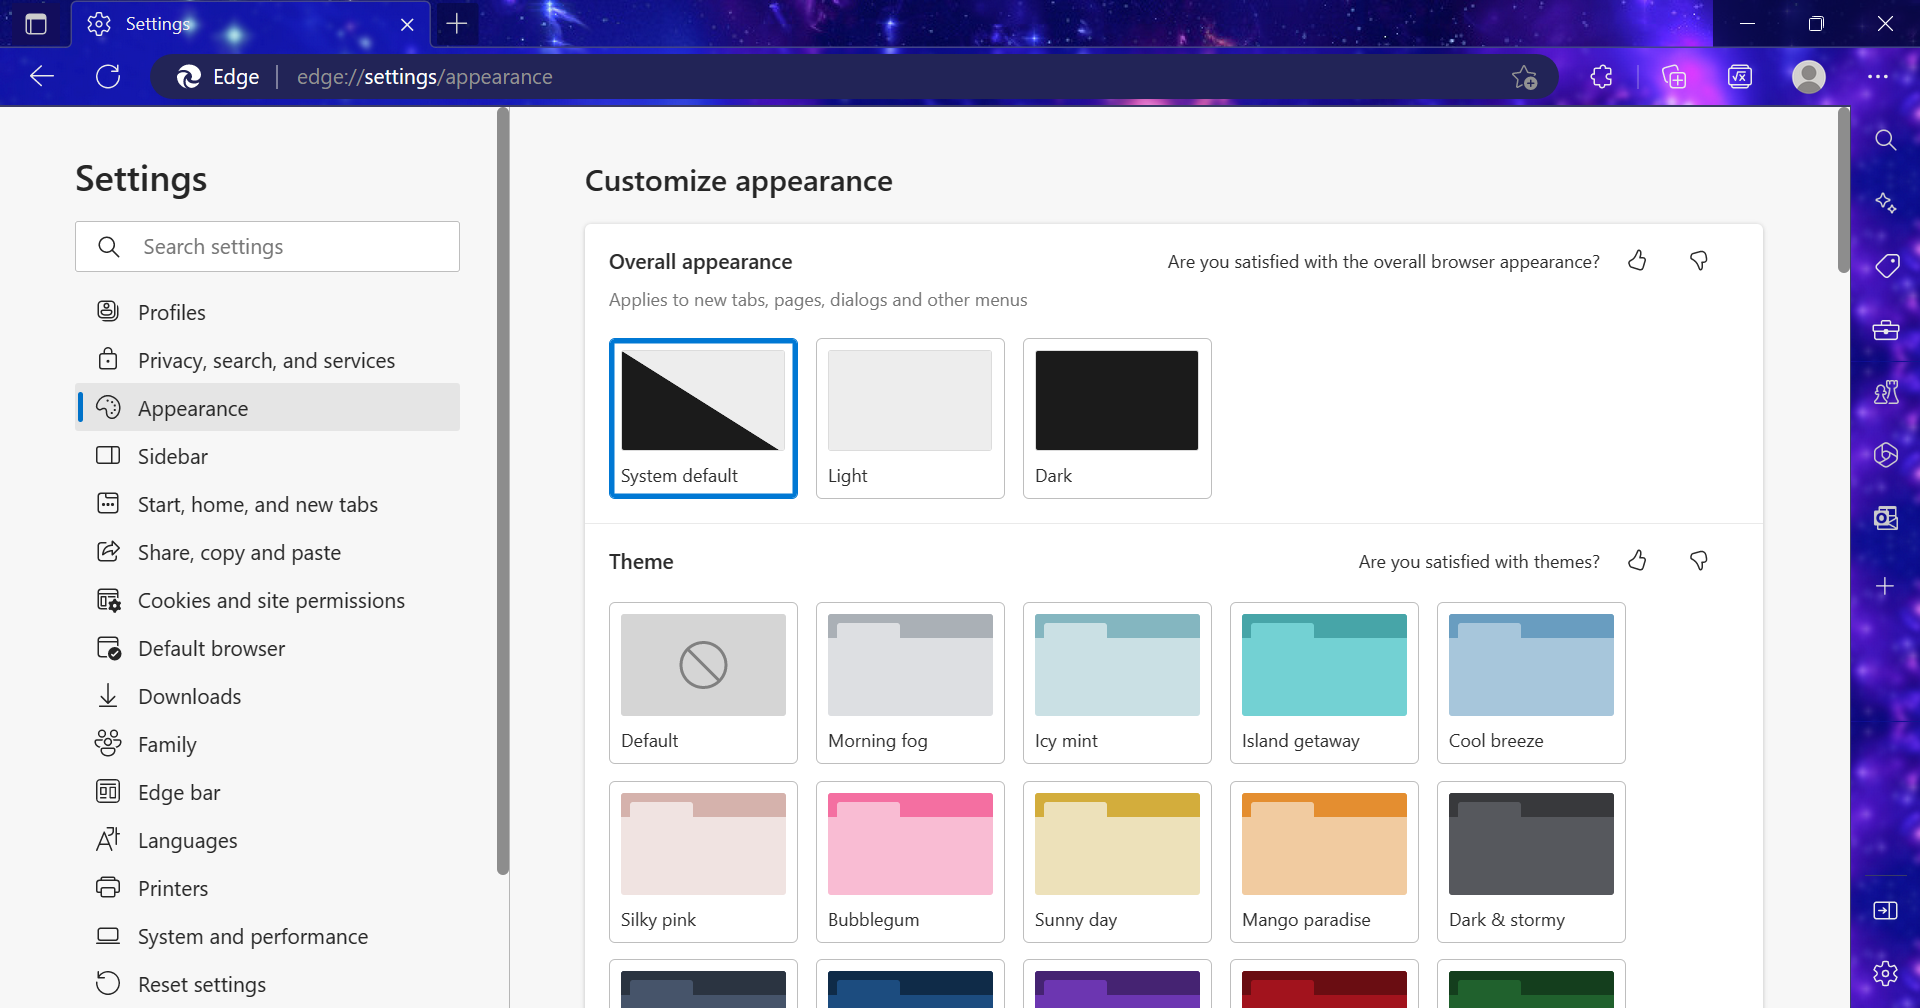
But for those intending to modify only a few personalized settings, say, change the Edge theme or reconfigure specific actions, it shouldn’t take more than a few minutes.
If you see a black screen and a popup window with the error, refer to our detailed post on troubleshooting the Windows 11 black screen issue.
However, if none of the above methods work, use a restore point you created earlier on Windows 11.
For any other queries related to personalized settings, leave a message in the comments box below.
Read our disclosure page to find out how can you help Windows Report sustain the editorial team. Read more


Improve this guide


User forum
0 messages