Solved: Please Insert The External Storage Media and Press OK
Ensure the external storage device is not corrupted
Key notes
- To fix please insert the external storage media and press ok, reinsert the SD card or perform Startup Repair.
- Continue reading to learn the detailed steps.

If you have encountered the Please insert the external storage media and press OK message while reinstalling or updating Windows, this guide can help!
What causes the Please insert the external storage media and press OK error? It could occur due to insufficient space on your hard drive or if your computer can’t access the SD card after it restarts itself.
How can I fix Please insert the external storage media and press OK?
Before proceeding with any steps to fix the problem, go through the following preliminary checks:
- Disconnect all the external devices apart from the USB drive with Windows updates, mouse and keyboard.
- Update your BIOS to the latest version.
1. Reconnect your external media device
If you are using an SD card to store Windows update files, follow these steps:
- Remove the SD card from your computer.
- Plug in a USB card reader into a free USB port, then insert the SD card with updated files into the card reader.
- Wait for a pop-up to ensure the card is connected, then try the reinstallation process again.
In case you don’t have a USB card reader, you can copy the files from an SD card to a flash drive and insert it into your computer.
If you are using any other external storage device, you can try removing it, then connecting it again, then press OK on the error and try to install updates. Also, check if the SD card or external storage device you are using is not corrupted.
2. Perform the system restore
First, you need to create a Windows 11 bootable USB on a different computer. Once done, follow these steps to change the boot order:
- Insert the USB drive into the affected computer.
- Restart your computer, then press any of the keys, F10, F2, F12, F1, or DEL, according to your device’s manufacturer, to get into the BIOS settings.
- Go to the Boot tab, and use the arrow keys on your keyboard to select the USB drive as a priority.
- Once done, press F10 or go to the Exit tab, select Save And Exit, and then press Enter.
If your Windows computer is ignoring the boot order, then check if the disk is bootable or ensure it is not corrupted; read this guide to learn more.
Now, follow these steps to repair your computer to fix the issue:
- On the blue screen, select your Language, Time and currency format & Keyboard or input method.
- Click the Repair your computer link from the next screen.
- From the Choose an option screen, select Troubleshoot.

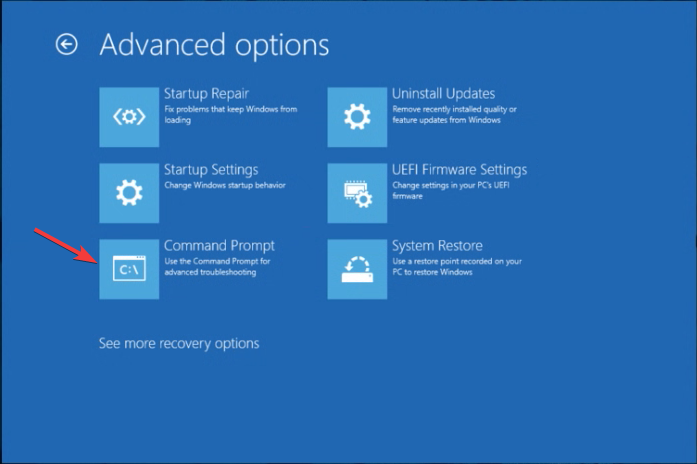
- Choose Advanced options from the next page.

- On the Advanced options screen, select the Command Prompt option.
- Type notepad and press Enter on the command prompt window.
- Once Notepad is open, go to File, then choose Open, and select All Files from dropdown.
- You will get the File Explorer here, plug in another external USB drive and copy all important files. Once done, close the Command Prompt window. You can skip Steps 5 to 8 if you don’t want to save any files.
- Next, follow the same steps from 1 to 4 to access Advanced options and then select Startup Repair from the Advanced options screen.

- Once the repair process is complete, reboot the computer.
In case Startup Repair is not working for you, it could be due to broken or corrupted system files; you can try the methods mentioned in this guide.
If nothing has worked for you, you need to back up your data and reinstall your Windows operating system to fix the issue once and for all.
In conclusion, to avoid such Update errors, you must always clean your disk and ensure there is sufficient space on your computer before installing updates.
Did we miss a step that helped you resolve this problem? Don’t hesitate to mention it in the comments section below. We will happily add it to the list.
Read our disclosure page to find out how can you help Windows Report sustain the editorial team. Read more


Improve this guide


User forum
0 messages