How to Protect Your Windows 10 Device on Public Wi-Fi
Take a closer look at our quick tips now
Key notes
- Although public Wi-Fi networks can be tempting because they’re free, using them could expose you to various dangers.
- Some of the most common risks of using public Wi-Fi networks are traffic monitoring and data stealing. However, you can prevent all that if you follow a few easy steps.
Public Wi-Fi networks are usually great, as they provide just about everyone with free access to the Internet.
However, public Wi-Fi networks also have a dark side. Even though free Wi-Fi is great, it’s not always safe.
For instance, you may encounter malicious users on the same public Wi-Fi network you use.
These agents can be hazardous to your safety and privacy since most are out to get your personal data.
But enough chit-chat, you’re here to discover how to keep safe on public Wi-Fi networks, and that’s exactly what we’re going to teach you.
How to keep your PC safe on a public Wi-Fi Network?
1. Use a VPN
- Download and install Private Internet Access.
- Launch it and log in to your account.
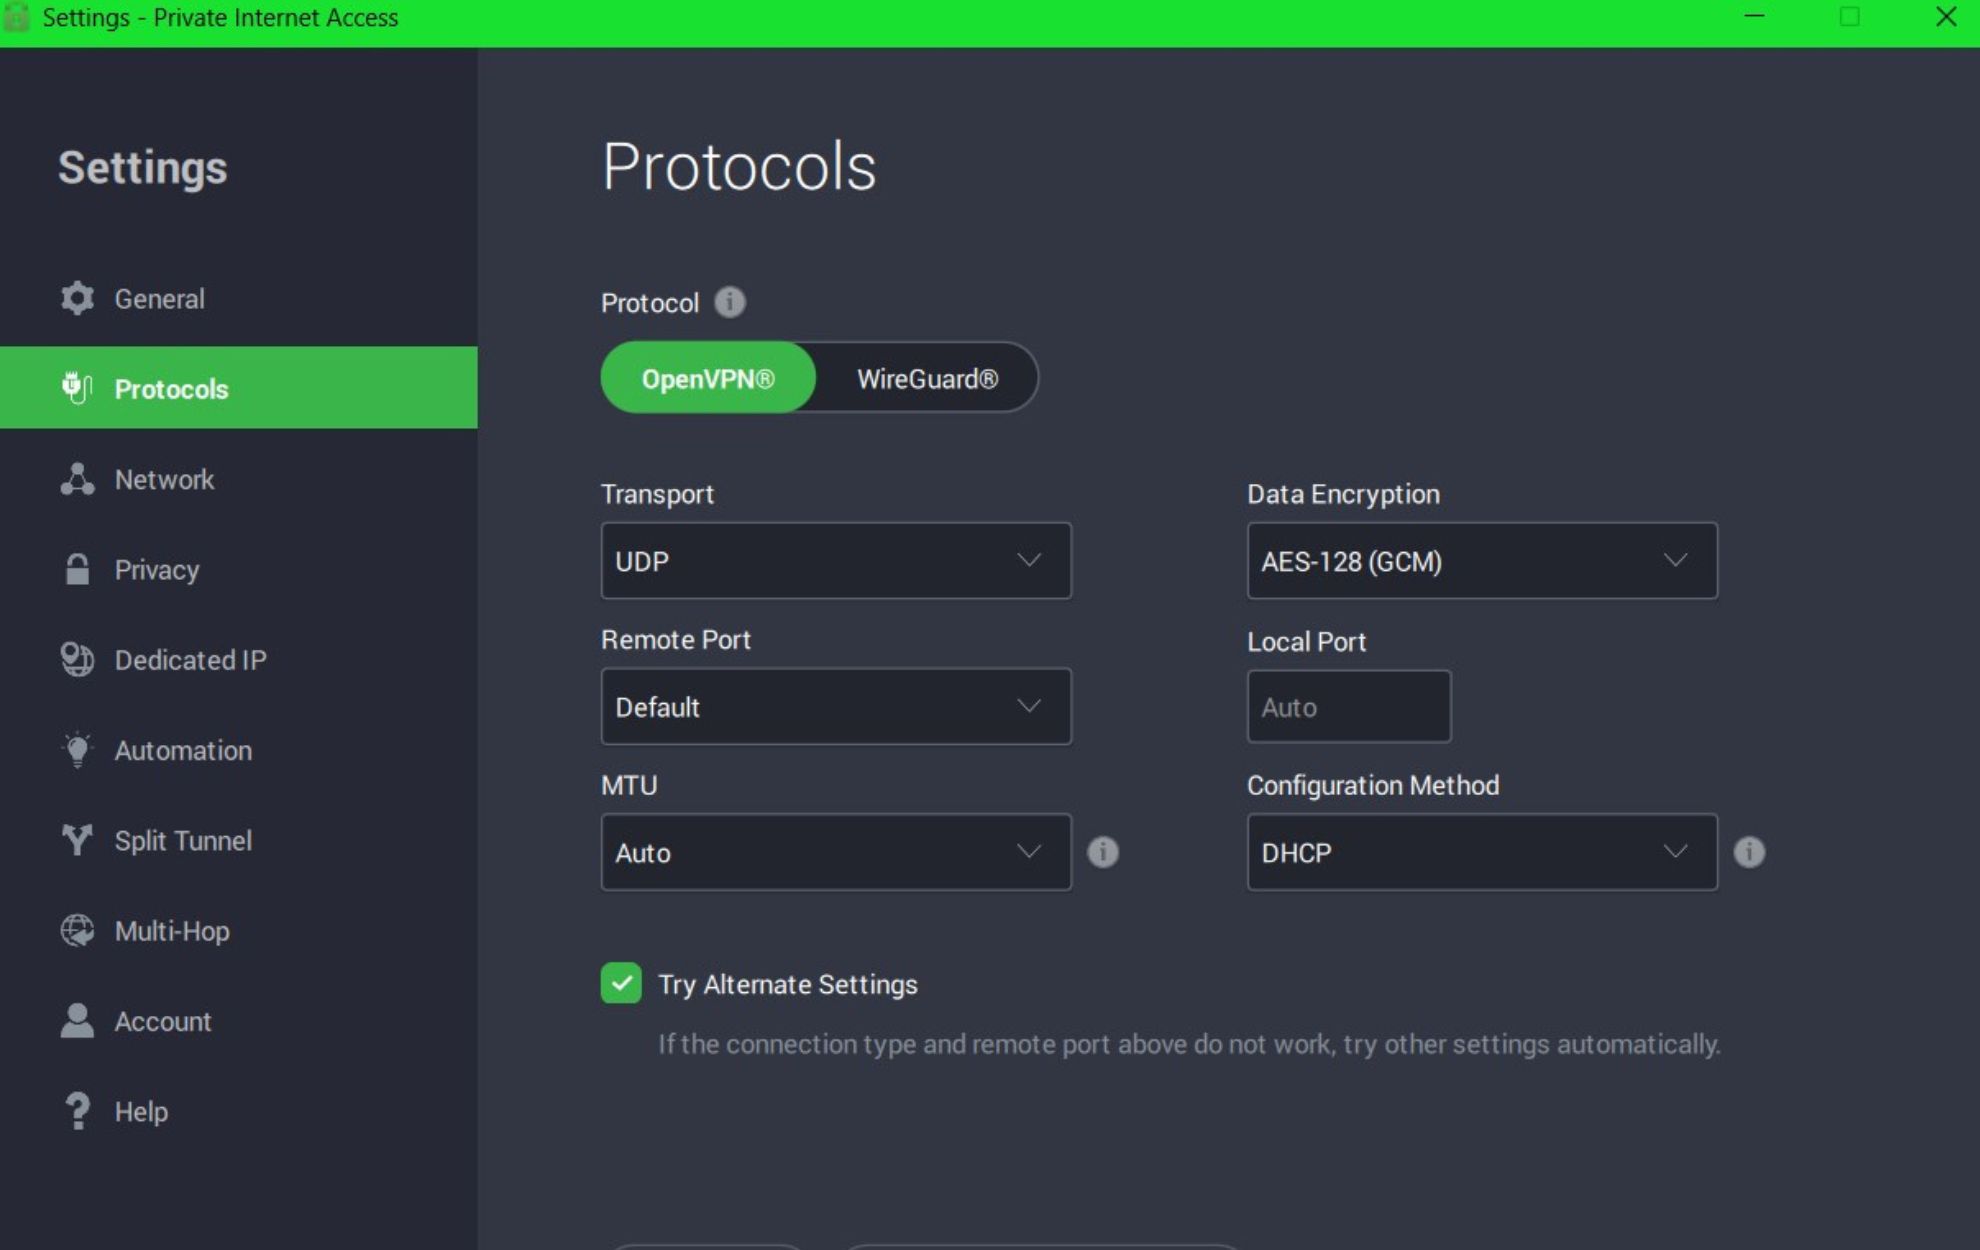
- Connect to any server you want.
- Enjoy private, secure browsing on public Wi-Fi.
A VPN does wonders when it comes to protecting your traffic from various agents who would just love snooping around and through it.
Not only does a VPN such as PIA re-route your traffic through its private servers (secure tunnel), but it also encrypts it.
Thus, even if someone intercepts your traffic from inside the public Wi-Fi network, it would all look like gibberish, thanks to encryption.
Private Internet Access
Looking for a reliable VPN to use on public Wi-Fi networks? Private Internet Access is a great choice.2. Turn off sharing and network discovery
Turning on file sharing and network discovery is not unheard of, especially if you’re on a trusted network.
However, note that this feature should be only used at home/work or wherever you can trust all the users on the network.
With that in mind, we recommend you only use this feature in safe environments and if it’s absolutely necessary.
It goes without saying that you should never ever use it on public Wi-Fi networks. Therefore, we’re going to teach you how to disable it.
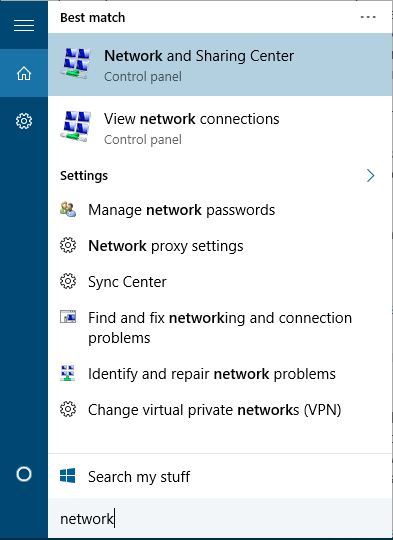
- Press the Win Key on your keyboard
- Type network
- Select Network and Sharing Center
- Click on Change advanced sharing settings.
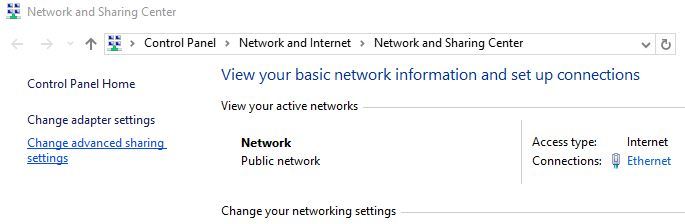
- Locate your current network profile
- While using a public network, you should always select the Guest or Public profiles
- In the Network discovery section select Turn off network discovery
- Select Turn off file and printer sharing in the File and printer sharing section
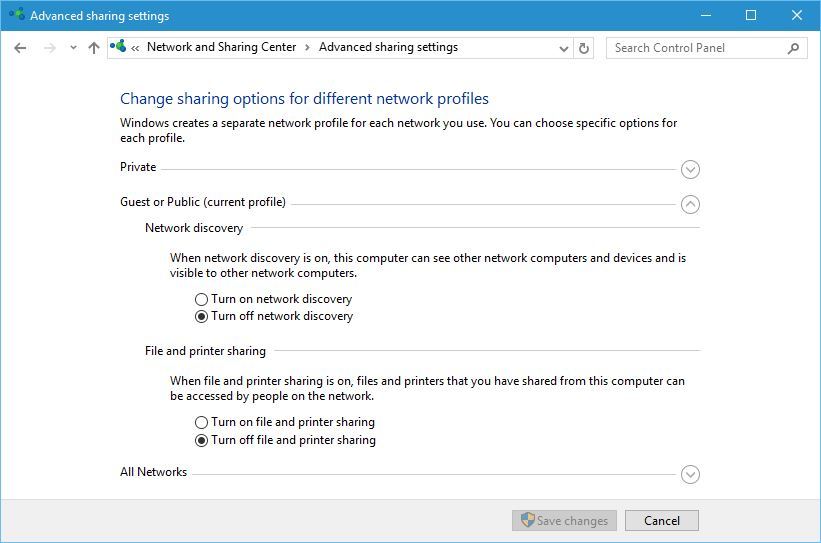
- Click Save changes
It goes without saying that turning off network discovery will make other devices unable to see you on the current network.
3. Enable your firewall
Windows 10 has a built-in firewall, so if you’re not using a third-party solution, you can at least make sure that your Windows one is active.
A firewall’s purpose is to regulate the incoming and outcoming network traffic, thus keeping your computer safe from attackers.
This is how you can check if your Windows Firewall is running:
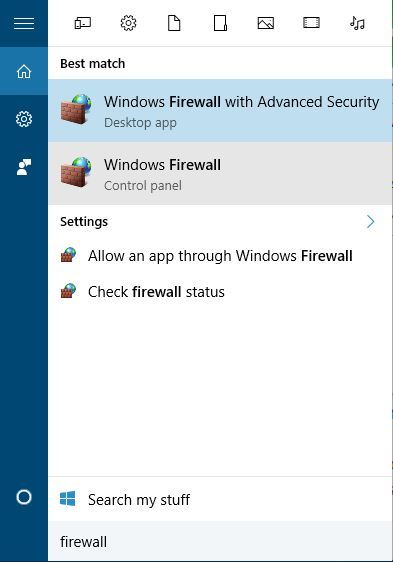
- Press the Win key on your keyboard
- Type firewall
- Choose Windows Defender Firewall from the list
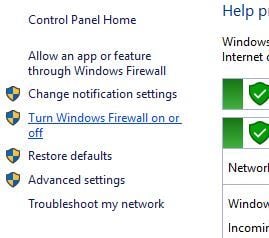
- Click the Turn Windows Firewall on or off button
- Make sure Turn on Windows Firewall is selected in both Private and Public network settings sections
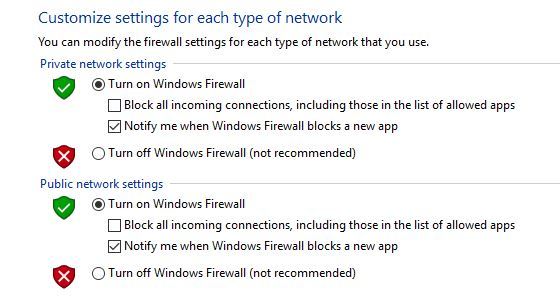
- Click OK to save changes
If you have a third-party firewall installed, Windows Firewall will turn itself off automatically, and there’s no need to enable it.
4. Always use HTTPS
Whenever you interact with your web browser, you’re sending data that malicious users on the same network could intercept.
If you’re not using a VPN to encrypt your whole traffic, you should at least make sure you’re using an encrypted connection in your browser.
It’s really easy to spot an encrypted connection since HTTPS marks it. HTTPS is an extension of HTTP, and it’s used for security purposes.
Of course, this doesn’t apply to apps or any other services where you can’t see what’s going on or whether or not your traffic is encrypted.
However, checking the protocol in your browser is a simple and quite effective thing to do to ensure you’re alright.
Remember, HTTPS – good, HTTP – bad.
5. Turn off your Wi-Fi if you’re not using it
Various apps and services maintain connections and make requests in the background, even if you’re not actively using them.
So, to avoid any accidental data leaks, turning off your Wi-Fi when you’re not actively using it turns out to be a wise decision.
6. Disable automatic Wi-Fi connections
Here’s the thing: over the years, your device got more intelligent and smarter, and all of a sudden it thinks it could decide everything for you.
One example is connecting to any public, unsecured Wi-Fi if the signal is strong enough.
Yeah, that saves you just about 2 precious seconds, but it may also connect to a trick hotspot created by a malicious hotspot.
Those are called Hotspot Honeypots. Do you want to know why? Because they make monitoring traffic of unsuspecting victims look like child’s play.
7. Protect your accounts
There are a lot of reasons why a seasoned hacker or a script kiddie would want to grab your private browsing data.
However, one of the most common reasons is stealing accounts. All of them, if possible: your social media, bank accounts, cloud storage, you name it.
It’s wise to take a step back and consider that these accounts are not fair game. No, they have passwords to protect them.
So, what’s the first step you need to take to protect them? That’s right, choose a strong password that’s generated automatically if possible.
Can’t remember all the mixed characters and symbols? You could use a password manager. But wait, there’s more!
In addition to using strong, uncrackable passwords for your accounts, you could also activate multi-factor authentication.
That way, if the attacker manages to get your password, it will also need an additional confirmation to access your account.
We advise against using your email address as a 2FA for obvious reasons. If the attacker grabs hold of your email address, it has access to everything you linked.
8. Update your security software
You need to keep security software in top shape, whether it’s an antivirus, firewall, anti-malware, anti-ransomware, or all of the above.
They’re responsible for your device’s well-being, after all, especially when you’re connected to a public Wi-Fi network.
Just make sure everything is running smoothly by checking for updates every now and then.
Well, you should do that a lot more often than occasionally, but you get the picture.
Conclusion
All things considered, there are several ways to stay protected while using public Wi-Fi networks.
Without a doubt, using a VPN is just about the best way you can go about it. A VPN will re-route your connection and encrypt your traffic, keeping potential traffic monitoring enthusiasts at bay. The only downside is that you may not be able to bypass captive portals on some networks.
Additionally, you can learn how to deal with rogue Shenzhen devices connected to your network.
However, if you’re not ready to commit to purchasing a VPN plan, there are plenty of other ways you can tackle public Wi-Fi security.
Read our disclosure page to find out how can you help Windows Report sustain the editorial team. Read more


Improve this guide
User forum
3 messages