Pshed.dll Windows 10 BSOD Error: 5 Simple Ways to Fix It
Repairing broken or corrupt system files can fix this issue in no time
Key notes
- Pshed.dll Windows 10 BSOD errors can arise due to failing hardware or corrupted system files.
- You can fix this by scanning your system and repairing the file corruption.
- Updating your drivers manually or automatically with specialized software could solve the problem.

Pshed.dll is a Dynamic Link Library system file that’s sometimes referenced in different Blue Screen of Death issues.
The dump files for those BSOD error messages specify that they’re caused by a Pshed.dll driver. There are various ways you can fix Pshed.dll BSOD errors and today we’ll show you the best methods to use.
What causes Pshed.dll BSOD?
There are a few reasons for the pshed.dll error on Windows 10. Below are the common ones:
- Outdated drivers: The Pshed.dll WHEA Uncorrectable Error is one of the frustrating BSoD issues that can be caused by outdated drivers. Your only way around this is to update your drivers.
- Corrupt system files: Faulty system files are one of the biggest causes of this Blue Screen of Death error. You need to repair and restore these files to get past this Pshed.dll NTOSKRNL.exe BSoD.
- Faulty memory: When your PC memory is faulty, it can also lead to this issue. You can confirm this by running the Memory Diagnostic tool.
How can I fix Pshed.dll blue screen errors?
Before proceeding to the fixes in this guide:
- Try to update your BIOS and see if it solves this issue.
If it does not work, you can explore the solutions below.
1. Repair system files
- Press the Windows key + S, type cmd, and select Run as administrator under Command Prompt.

- Type the command below and press Enter:
sfc /scannow
- Wait for the command to finish, copy and paste the command below, and hit Enter:
DISM.exe /Online /Cleanup-image /Restorehealth
SFC and DISM scans are the two repair tools for fixing system files. They should be able to fix the Pshed.dll issue. Here’s what to do if sfc /scannow isn’t working.
Also, some third-party Windows 10 repair utilities can fix a wide range of BSOD errors. Those system repair packages include scanning options for hardware, security, and stability issues.
After scanning your system, rest assured that you can fix these problems with just a click of a button.
2. Update system drivers
- Press the Windows key + X and choose Device Manager.
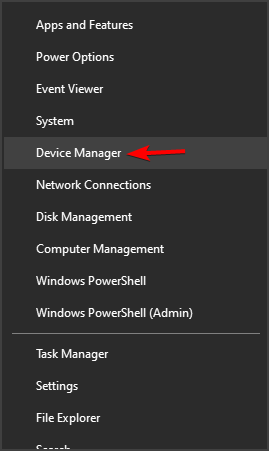
- Click the arrow next to the option to update driver for, right-click the driver there, and choose Update driver.

- Now select Search automatically for drivers and follow the instructions on the screen.

- Repeat these steps for all outdated drivers.
Pshed.dll BSOD errors, and others, can be caused by outdated drivers, so be sure to update them. Updating drivers manually is a tedious task, and this is why it’s better to use a dedicated tool.
3. Stop overclocking
- Press the Windows key + I to open the Settings app and click Update & Security.

- Select Recovery in the left pane and click the Restart now button under Advanced startup.

- When your PC restarts, choose Troubleshoot > Advanced options.

- Then, select UEFI Firmware Settings and the Restart option.
- When your PC restarts within UEFI or BIOS settings, you’ll need to locate and open the Overclocking section.
- Disable all overclocking settings from there.
 NOTE
NOTE
4. Run Windows Memory Diagnostic check
- Press the Windows key + R, type mdsched.exe, and click OK.

- Select Restart now and check for problems (recommended).

- Wait for the diagnosis to complete and follow any given recommendation.
If Windows Memory Diagnostic detected issues, you might need to replace your PC’s RAM module to resolve the Pshed.dll issue.
5. Perform system restore
- Press the Windows key + R, type rstrui.exe, and hit Enter.

- Tick the Choose a different restore point button and click Next.

- Choose a later restore point before you started getting the Pshed.dll error and click Next.

- Finally, click the Finish button to confirm the action.

In a case where you can’t get past the Pshed.dll issue, you might need to restore your PC to a later time to make it work.
The above resolutions could feasibly fix the majority of Pshed.dll Windows 10 BSOD errors for most users. Nevertheless, those who still need more potential fixes should check out the best BSOD repair software.
Did you find a different solution for this problem? Do not hesitate to let us know in the comments section below.
Read our disclosure page to find out how can you help Windows Report sustain the editorial team. Read more


Improve this guide


User forum
0 messages