Skype can't access your sound card? We have the best fixes
Key notes
- Sound cards serve as the ultimate controllers of all audio functions on computer systems.
- Reopen Skype and check if this process effectively resolves the Skype can’t access your sound card error.

Sound cards serve as the ultimate controllers of all audio functions on computer systems.
Hence, every program (system or installed) that hosts an audio (or video) function requires a seamless connection to the sound card, to enable it to function properly. One of such programs is Skype.
Skype is an instant messaging app, which is prominent for its video calling functionality.
This calling function significantly relies on the computer’s in-built sound system, for recording sounds (outgoing calls) and receiving sounds (incoming calls). In this regard, the sound card is a very important component.
However, at times, Skype users often encounter the Skype can’t access your sound card error. In this case, the app is unable to use the computer’s microphone.
What causes Skype error: Can’t access your sound card?
There could be a myriad of reasons for the Skype can’t access your sound card error. The most notorious of these, however, are system updates and Windows upgrades.
These often result in some form of system modifications, which remove Skype’s permission to access the sound card and use the microphone.
Another notable cause of this error is an old and outdated sound card driver. The idea is that, a freshly updated Windows system that operates on outdated drivers is liable to encounter various forms of errors.
As such, outdated sound card drivers running on newly updated computers will most likely result in access error for Skype and other audio-related programs.
Aside the aforementioned causes, a whole lot things could cause the Skype audio error.
However, you don’t have to worry much, as we have compiled comprehensive solutions, to help you resolve this issue. Follow with rapt attention!
How to I fix Skype can’t access your sound card error?
1. Upgrade Windows sound card drivers
- Click Start and type settings in the searchbox.
- Select Settings and click Update and Security.
- Navigate to the Windows Update tab
- Locate and select Check for Updates to search for available updates.

- Download and Install all available updates (if any).
- Open Skype and check if the error is resolved
If the Windows update could not fix the error, try updating the drivers. To update your sound card drivers, follow the steps outlined below.
- Close the Skype window.
- Click on the Start
- Type device manager in the searchbox.
- Locate Device Manager in the pop up options and right-click on it. (For convenience, you can easily press the Windows Key + R to open the Run dialog box. Type in devmgmt.msc in the box and select OK).
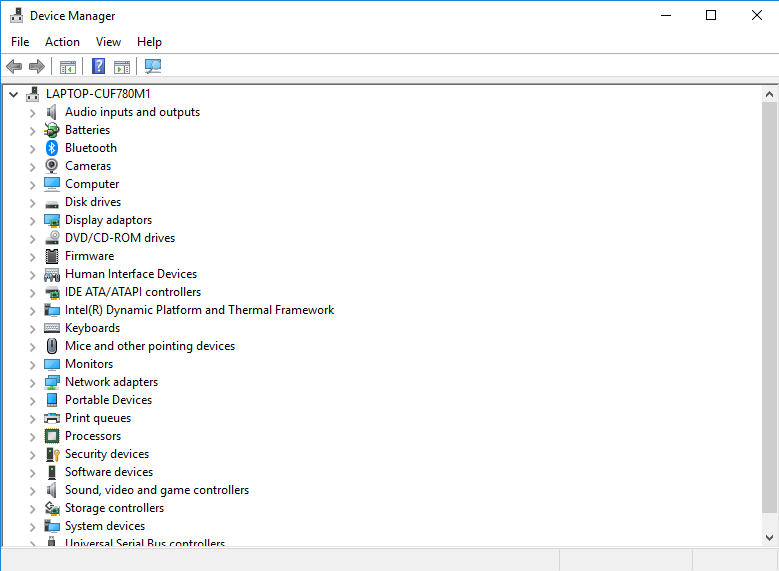
- On the Device Manager window, locate Sound, video and game controllers, and expand it to open up more options. This will reveal options High Definition Audio and Intel(R) Display Audio.

- Update both drivers by right-clicking on each driver and selecting the Update driver
- On the displayed window after an update, click Search automatically for updated driver software. Windows will automatically find the new driver and this should resolve the error.
- Reopen Skype and check if this process effectively resolves the Skype can’t access your sound card error.
Updating drivers manually can be a bit tedious, especially since you need to know the model of each component you’re trying to update.
However, you can use a third-party tool to update all your drivers automatically with just a couple of clicks.
⇒ Get PC HelpSoft Driver Updater
If unsuccessful i.e. the method was ineffective against the sound card error, try the next method.
2. Allow programs to access your computer sound system
For Windows 8 and older versions:
- Close your Skype app.
- Click on the Start button and navigate to Control Panel.
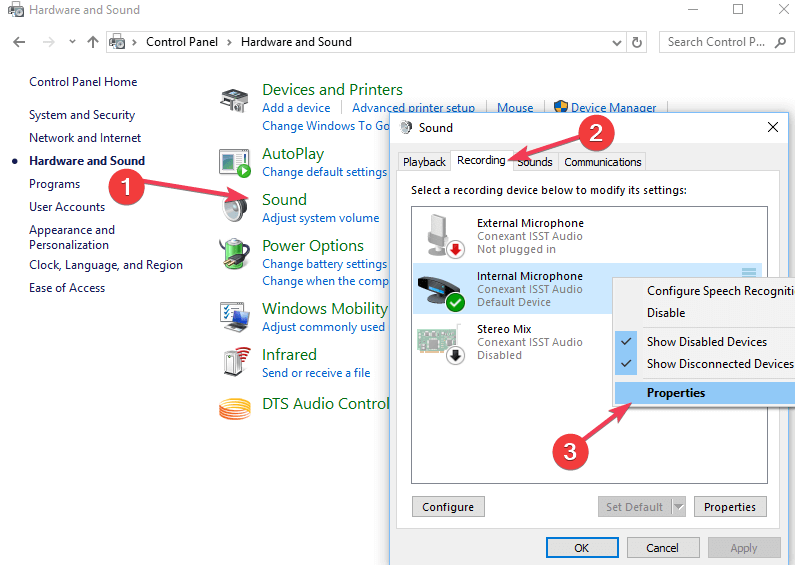
- Change the window’s view to Category and select Hardware and Sound.

- On the displayed options, select Sound.
- Navigate to the Recording tab, located at the top left corner of your screen. This will reveal to you the type of microphone you are using.
- Click on the displayed Microphone and select Properties, which is below the microphone icon, by the right hand side.
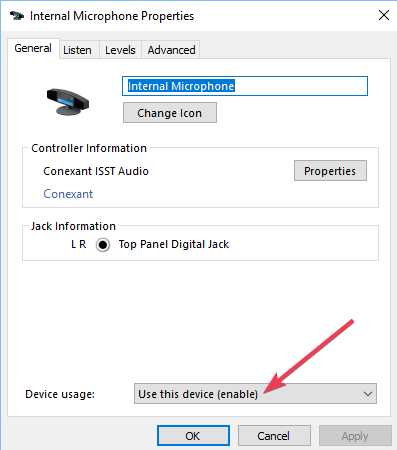
- On the displayed window, navigate to the base of your screen and locate Device usage drop-down menu.
- On the drop-down options, select Use this device (enable).
- Scroll up and navigate to the right hand side to locate the Advanced Click on the tab.
- Locate Exclusive mode.
- Under this mode, locate the Allow applications to take exclusive control of this device checkbox and uncheck the box
- On the same window, locate the Give exclusive mode applications priority checkbox and uncheck the box.
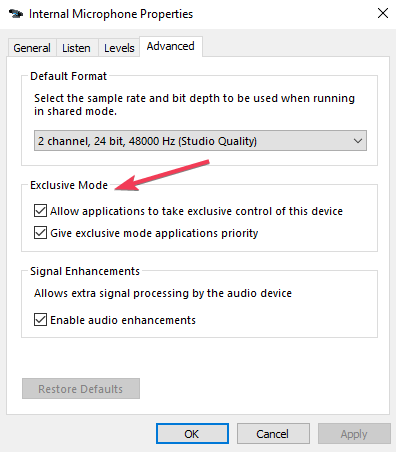
- Click Apply to save changes.
- Repeat the process for Speaker device and close the window.
- Reopen Skype and check if the Skype can’t access your sound card error still persists.
For Windows 10:
- Close Skype.
- Click on the Start
- Type Settings and click on Settings on the pop up options.
- Locate Privacy and click on it.
- Locate App permissions by the left hand section of your screen and click on it.
- Locate Microphone and click on it.
- Check if the Allow access to the microphone on this device pop up option is On. If not, change it to On.
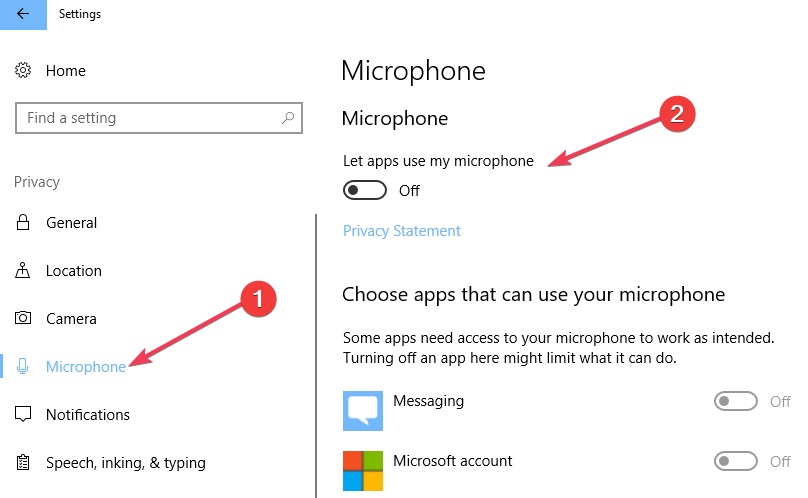
- Locate Allow apps to access your microphone and set it to On.
- Locate Skype under installed apps, set the slider to On, under Skype.
- Relaunch Skype and check if the error is still there.
- READ ALSO: FIX: Skype Won’t Close in Windows 10
By default, Windows computers allow programs to access the microphone.
However, due to some changes, tweaks, scans, repairs or updates, this default setting might be disrupted. Hence, a program like Skype may be denied access to the system’s microphone.
3. Use Windows Media Creation tool
- Navigate to Microsoft site to download the Windows Media Creation tool.
- After successful download, double-click on the tool’s executable file tagged .exe. This with open the file’s setup.
- Click on Accept
- Select Update this PC now and click Next. This action will download some files.
- Scan your computer to check for updates.
- On the displayed windows after the update, select Accept, to agree to terms & conditions.
- After agreeing to the terms, a Ready to install window will pop up, with the options Install Windows and Keep personal files and apps.
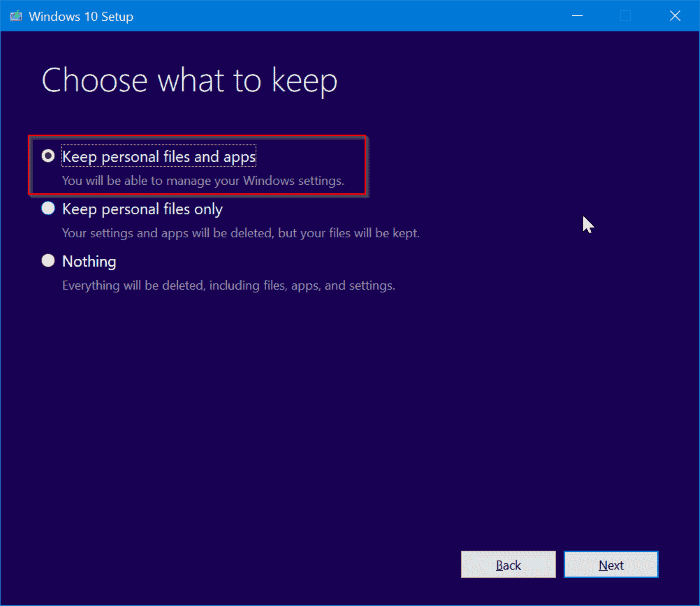
- Proceed with the installation.
- Relaunch the Skype program and check if the problem still persists.
In case the Skype error still persists, proceed and try the next method.
4. Clean install Skype
- Click the Start button
- Type Settings in the box and click on it in the displayed options.
- Select Apps > Apps & Features.
- Locate Skype on the displayed window and click on it.

- Click the Uninstall
- Finish uninstallation by clicking the pop up Uninstall
After successful uninstallation, the next step is to clear every associated file from the system. To do this:
- Press Windows Key + R.
- Input %appdata% in the Run dialog box and press OK
- Right-click on Skype and select Delete
The next step involves clearing Skype’s registry entries. To do this:
- Press Windows Key + R.
- In the dialog box, type regedit.
- Click Ctrl + F (Find) and input Skype in the provided box.
- Select Find next.
- Delete any found registry entry (key).
- Repeat the process to delete the next registry key.
Note: Some keys might require special permissions to successfully clear them. In this case, you can get the necessary permission under your user account settings.
Lastly, after removing every file associated with the uninstalled Skype, you can then proceed to download the app and reinstall it. This should effectively eliminate the Skype can’t access your sound card error.
This is like the last resort to resolving the Skype can’t access sound card error. It entails removing every file and program related to Skype from your computer and then downloading and reinstalling a new, bug-free, app.
Note: You can backup your Skype chats on your computer by moving it to another file location on your system.
To do this, search for %appdata%/Skype in the Run dialog box to locate the My Skype Received Files. Press Ctrl + C on the folder and paste it under a new folder on your system.
Conclusion
Skype, a prominent instant messaging/calling app, is one of the common programs that use sound card on computer systems.
However, for various reasons, Skype might not be able to connect to a computer’s sound card — hence, the emergence of Skype can’t access your sound card error message.
To solve this problem, one of the above solutions will definitely work for you.
Read our disclosure page to find out how can you help Windows Report sustain the editorial team. Read more


Improve this guide


User forum
0 messages