Slack Workflow Builder: Everything You Need to Know
Slack's Workflow Builder is great for automation
![]() 5 min. read
5 min. read
![]() Published on
Published on
Share this article
Improve this guide
Read our disclosure page to find out how can you help Windows Report sustain the editorial team. Read more
If you’re looking to streamline and automate your tasks within Slack, the Workflow Builder is a powerful tool that can help you achieve just that. It simplifies repetitive tasks, collects information, and triggers alerts, ensuring that your team stays on top of their responsibilities.
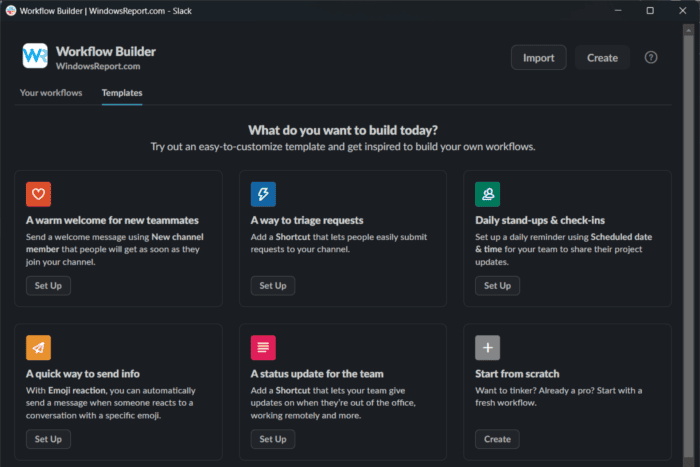
What is Slack Workflow Builder and what can it do?
Workflow Builder allows you to create automated tasks to streamline your processes directly within Slack. It can handle repetitive tasks, collect information, and trigger alerts to ensure tasks are completed in a timely manner.
You can open it in Slack by going to the Tools section from the workspace drop-down menu. Here are the main features of Slack Workflow Builder and how to use it.
1. Using Slack Workflow Builder to automate welcome messages
- Open Slack and click on your workspace name in the top left corner.
- From the dropdown menu, select Tools and then click on Workflow Builder.
- Click the Create button to start a new workflow.
- Name your workflow (e.g., Channel Welcome Message) and click Next.
- Choose New Channel Member as the trigger.
- Select Person who joined channel as the recipient.
- Write your welcome message, personalizing it with variables like their username.
- Click Publish to activate the workflow.
This solution easily automates the process of welcoming new members to your Slack channels, ensuring everyone gets the information they need right when they join.
2. Collect information using Custom Forms
- Open Slack and go to your workspace name in the top left corner.
- Select Tools and then click on Workflow Builder.
- Click the Create button and give your workflow a descriptive name.
- Choose Shortcut as the trigger.
- Add a new step and select Send a form.
- Create your form by adding fields for the information you need (e.g., name, email, request details).
- Set the form to send responses to a specific channel or user.
- Click Publish to activate your workflow.
Creating custom forms helps you capture all necessary information in a structured way, making it quick and efficient to handle requests.
3. Automate daily reminders
- Open Slack, click on your workspace name, and go to Tools > Workflow Builder.
- Click the Create button and name your workflow (e.g., Daily Standup Reminder).
- Choose Scheduled date & time as the trigger.
- Set the schedule for your reminders (e.g., every weekday at 9:00 AM).
- Add a new step and select Send a message.
- Write the reminder message and choose the channel where it should be posted.
- Click Publish.
Automating daily reminders ensures that important tasks and updates are never missed, keeping your team on track and organized.
4. Manage the approval processes
- Open Slack and navigate to Workflow Builder via Tools.
- Click Create and name your workflow (e.g., Approval Request).
- Choose Shortcut as the trigger to manually start the workflow.
- Add a new step and select Send a form to collect necessary details.
- Create the form with fields like request type, description, and urgency.
- Set the form to send responses to an appropriate channel or user.
- Add another step to post a message notifying the approver about the new request.
- Click Publish.
Managing approval processes through workflows helps to streamline decision-making, ensuring that requests are handled promptly and efficiently.
5. Integrate external services with Workflow Builder
- Open Slack and access Workflow Builder from Tools.
- Click Create, name your workflow, and choose a trigger that suits your needs (e.g., New Channel Member or Scheduled date & time).
- Add a new step and select Add connector step.
- Choose the external service you need to connect (e.g., Google Sheets, Asana).
- Follow the prompts to authenticate your account with the third-party service.
- Configure the actions that the connector should take (e.g., add a row to a spreadsheet, create a task).
- Click Publish.
Integrating external services automates tasks across different platforms, saving time and reducing manual work, so you can stay focused on more critical activities.
6. Using Workflow Builder for incident reporting
- Open Slack and go to Workflow Builder under Tools.
- Click Create and name your workflow (e.g., Incident Report).
- Choose Shortcut as the trigger.
- Add a new step and select Send a form.
- Create the form with fields like incident type, description, and priority.
- Set the form to send responses to a specific channel for incident triage.
- Add another step to notify relevant teams or individuals about the new incident.
- Click Publish.
Using Workflow Builder for incident reporting ensures that issues are promptly logged and communicated to the right people, facilitating quick resolution.
7. Advanced custom workflows with Task Assignment
- Open Slack and head to Workflow Builder under Tools.
- Click Create, name your workflow, and set a trigger (e.g., Shortcut or New Channel Member).
- Add a new step and select Send a form to gather initial information.
- Set the form to send responses to a specific channel or user.
- Use Wrangle or another third-party app to add a task list step after the form submission.
- Assign tasks to specific team members and set deadlines.
- Click Publish when you’re done.
Advanced workflows allow for detailed task management, ensuring that responsibilities are clear and that all steps in a process are completed efficiently.
How much do I pay for Slack Workflow Builder?
To get unlimited workflows, you need to pay at least for the Slack Pro plan which starts at $8.75 / month, but if you pay for at least 3 months, you get a 50% discount that will get you to $4.38 / month.
By leveraging these features of Slack’s Workflow Builder, you can significantly enhance productivity and ensure smoother communication within your team. Always remember to review and update your workflows periodically to adapt to your team’s evolving needs.
If you’re working with this tool, you might be interested in how to convert DMs to private channels, or how to set up a shared channel in Slack.
We hope that our article provided you with all information needed to use Workflow Builder in Slack. If you have any questions, don’t hesitate to ask in the comments below.


User forum
0 messages