Snipping Tool Shortcut not Working: Troubleshoot & Fix Easily
If Windows + Shift + S won't comply, try resetting or reinstalling the app
5 min. read
Updated on
Read our disclosure page to find out how can you help Windows Report sustain the editorial team Read more
Key notes
- The Snipping Tool is a Windows' dedicated screenshot tool that also allows minor image editing.
- However, users have been reporting issues such as Snipping tool shortcut not working or not opening properly.
- So, why won't the Snipping tool work? Like any other app, it can become corrupted, so repairing or resetting it can help.
- Don't overlook Clipboard and Notification settings while you're at it and make sure your OS is up to date!

Snipping Tool in Windows OS is a handy little utility. So, is there a snipping tool shortcut as well? For sure. Unfortunately, many users complained that the snipping tool shortcut is not working as intended occasionally.
If you were wondering what’s the shortcut key for the snipping tool, it couldn’t be easier. You can access it by pressing the Windows + Shift + S shortcut key on your keyboard.
It allows the users to take snapshots of their screens and save or print them directly from the interface. However, some users have reported a snipping tool shortcut not working issue in Microsoft Community Forums.
After upgrading to Windows 10 the screenshot shortcut (Windows key + Prt Scr) stopped working.
I’ve tried to look for a setting but I haven’t found anything related.
In comes the big question. Why won’t the snipping tool work? We shall try to answer that as follows.
Why is my snipping tool shortcut not working?
As you can probably guess, disruptive updates are a potential culprit. So, if you start noticing suspicious behavior after having installed recent updates, you might want to revert them. The lack of updates can have the same effect, so balance is key.
Corruption is usually responsible for Windows glitches, so you might want to repair any corrupted sys files sooner rather than later.
Obviously, wrong or conflictual settings are not to be excluded, so you might want to take a closer look at notifications, among others to solve this frustrating issue.
And speaking about issues here’s what other users dealing with similar scenarios reported:
- Windows 10 snipping tool shortcut not working
- Snipping tool hotkey not working
- Windows 11 snipping tool shortcut not working
- Windows + Shift + S not working
- Snipping tool shortcut not working Windows 7
- Lenovo snipping tool shortcut not working
- OneNote snipping tool shortcut not working
How do I fix snipping tool shortcut?
Before we dig in, here are some useful steps you might want to try:
➡️ First, Run Store Apps Troubleshooter.
To do that, Open Settings and select Update & Security, then Troubleshoot. Expand the list and locate Other troubleshooters. Finally, press Run next to the Windows Store Apps option.
➡️ Update Windows, respectively update the Snipping tool via the Microsoft Store app.
For the latter, simply open the Microsoft Store and click the 3-dot menu. Select Download and Updates, then push Get Updates.
➡️ Disable the Focus Assist from the Action Center
If neither works, read on, we have more useful fixes for you.
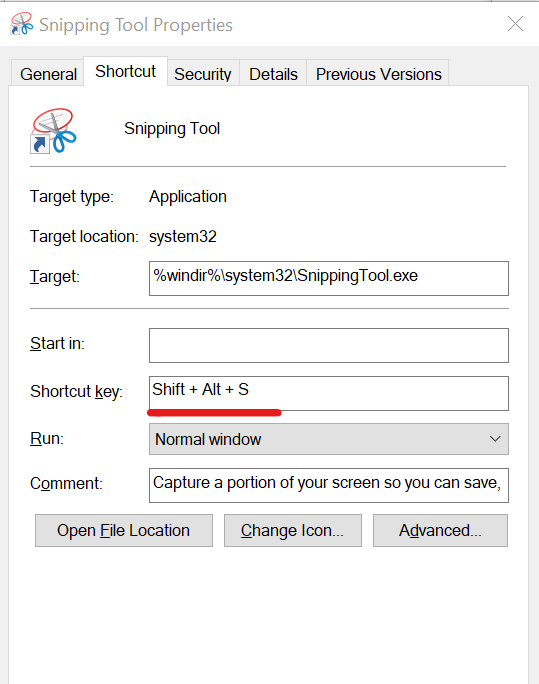
1. Check Shortcut Key Properties
- From the desktop, right-click on the Snipping Tool icon and select Properties.
- If you don’t have the shortcut on the desktop, type snipping tool in the search bar.
- Right-click on Snipping Tool Icon and select Open File Location.
- Right-click on Snipping Tool icon and select Properties.
- In the Properties window, click on the Shortcut tab.
- In the Shortcut Key: field, if it shows as None that means you don’t have any shortcut keys set to access the tool.
- Click on None and press any key on your Keyboard.
- Note that you cannot use Windows Key + S combination as it is reserved for something else already.
- Click on Apply and OK to save the changes.
- Close the properties window and press the Shortcut key that you assigned to launch the Snipping tool and you should be able to access the tool without any issues.
2. Enable Clipboard History and try again
- Launch the Start menu and look for Settings.
- Next, open the Settings app and go to System.
- Select Clipboard and make sure you enable this option.
The Snipping Tool is meant to send screenshots to your clipboard by default. If this option is disabled on your PC, it can be a clear indicator of the snipping tool shortcut not working situation.
3. Enable notifications
- Open the Settings app and go to System, just as you did before.
- This time, select Notifications.
- Finally, make sure you set the toggle next to Snipping Tool to ON.
4. Use the New Snip and Sketch Tool or try the Prt Sc Key instead
- Microsoft is trying to replace the Snipping Tool with the new Snip and Sketch app.
- As a result, Microsoft has now dedicated the Shift + Windows Key + S shortcut to the new Snipping Tool.
- Press the Shift + Windows Key + S shortcut key and you should be able to access the new Snip and Sketch tool.
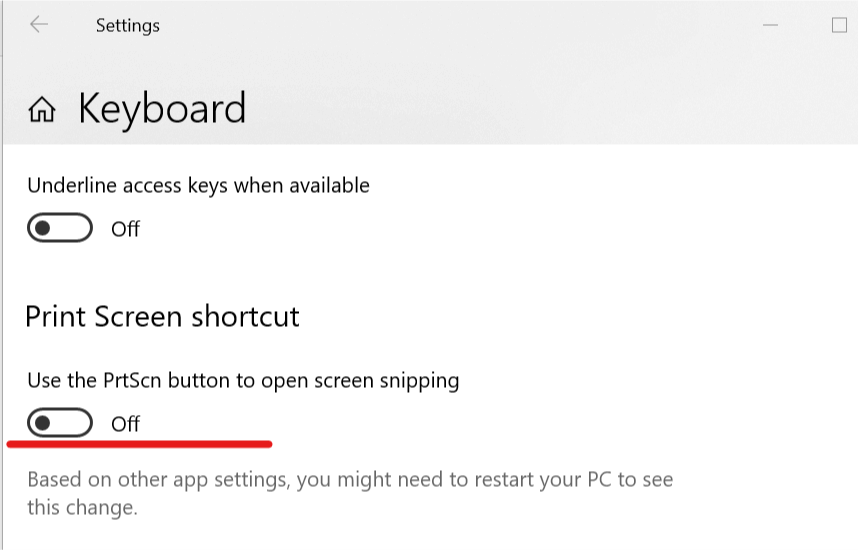
- Alternatively, if you don’t want to use the long Shift + Windows Key + S combination to open the Snip and Sketch tool, you can use the PrtSc (Print Screen) key to do the same.
- That’s it. If you press the PrtSc key on your keyboard, it will open the Snipping Tool.
5. Repair or Reset the Snipping Tool
- Launch the Settings app on your PC and locate and navigate to Apps, then Apps and Features.
- You can choose to Repair, or Reset the app by pushing the corresponding buttons.
- Note that the first one will not delete your app’s data while the second (Reset) will.
 Tip
Tip
6. Run SFC and/or DISM scans
- Press the Windows key to open the Windows Search box and type in CMD.
- Click on Run as Administrator to open an elevated Command Prompt window.
- Input the following command:
sfc /scannow - If you want to go straight for the section option, paste this command instead:
DISM /Online /Cleanup-Image /RestoreHealth - Press Enter to run the command. The repair process will begin.
That’s about it! We hope you were able to solve your Snipping tool shortcut not working issue with the help of our solutions.
Nevertheless, if nothing seems to cut it, you can always use a third-party app for the job. We have prepared a fine selection of the best snipping tools you can try today!

