SSD Not Showing Up: How to Get It Detected
Explore the expert-tested methods to fix the issue
5 min. read
Updated on
Read our disclosure page to find out how can you help Windows Report sustain the editorial team. Read more
Key notes
- The issue could have occurred due to a faulty storage controller driver, the corrupt file system of the drive, or an SSD not initialized.
- This guide will cover all the tested methods to fix the problem, including running the CHKDSK command.

If your SSD is not showing up in BIOS or disk management, this guide can help. This usually happens if your SSD is not initialized or the storage controller driver is outdated. We will cover all the available methods to fix the issue right after discussing the potential causes. Let’s get started!
What causes the SSD not showing up issue?
There could be various reasons why SSD is not recognized on your computer; some of the common ones are:
- Outdated storage controller driver – If the Storage controller driver is outdated or corrupted, your SSD might not show up. To fix this, you need to update the driver.
- The file system is corrupt – If the file system on your computer is corrupt, then your SSD might not get recognized by your computer. You need to format SSD with NTFS.
- SSD initialized incorrectly – If your SSD is not initialized properly, you might face this issue. You need to initialize the SSD again.
- Memory issues – If your SSD has memory issues, it might not show up. To fix this, you must run a memory diagnostic tool on your computer.
- Issues with the operating system – If your OS has problems with SSD, it might not detect your SSD. You need to check if it appears in BIOS.
What can I do if the SSD is not showing up?
Before engaging in advanced troubleshooting steps, you should consider performing the following checks:
- Replace the data cable.
- Remove other drives from your computer.
- Check if the BIOS detects SSD.
1. Run the CHKDSK command
- Press Windows + E to open Windows Explorer.
- Go to the drive, right-click on it, and select Properties.
- Switch to the Tools tab, locate Error checking, and click Check.
- On the next window, select Scan drive.
- Follow the on-screen instructions to complete the process, then restart your computer.
2. Run the Windows Memory diagnostic tool
- Press Windows + R to open the Run console.
- Type mdsched and press Enter to open Windows Memory Diagnostic.
- Click Restart now and check for problems (recommended).
- Your computer will restart, and Windows Memory Diagnostic will perform a test automatically.
3. Configure the SSD settings in BIOS
- Press Windows + I to open the Settings app.
- Go to Update & security.
- Click Recovery, then locate Advanced startup and click Restart now.
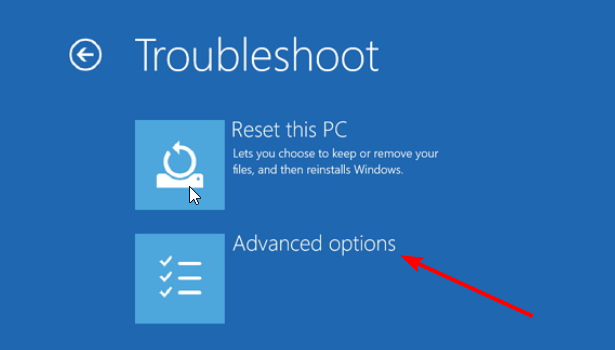
- On Choose an option screen, select Troubleshoot.
- Now on the Troubleshoot screen, click Advanced options.
- On the Advanced options page, click UEFI Firmware Settings.
- Click Restart.
- Now from the next screen, choose the appropriate option to enter BIOS.
- Go to Storage options, select Serial SATA, then choose SATA Configuration.
- Select the IDE Compatibility Mode.
- Click Exit and choose Save & exit or a similar option to save and restart your computer normally.
4. Initialize the SSD drive
4.1 Initialize the SSD
- Press Windows + R to open the Run dialog box.
- Type diskmgmt.msc and press Ctrl + Shift + Enter to open Disk Management with admin rights.
- Locate and right-click the SSD that is not showing up and choose Initialize Disk.
- On the following dialog box, choose the SSD you want to initialize and select the partition style.
- Click OK to start the process.
4.2 Change SSD drive letter
- Open the Disk Management tool
- Right-click on the same disk and choose New Simple Volume.
- On the New Simple Volume wizard, click Next.
- Select the disk size next to Simple volume in MB and click Next.
- For Assign the drive letter, select the drive letter from the dropdown and click Next.
- Change the Volume Label and click Next.
- Click Finish. The drive will format now, don’t close the window until it is done.
5. Update the drivers
- Press Windows + R to open the Run dialog box.
- Type devmgmt.msc and click OK to open Device Manager.
- Locate and expand the Storage controllers.
- Right-click on the storage controller driver and select Update driver.
- On the next window, click Search automatically for drivers.
- Follow the onscreen instructions to install the latest driver.
- Now on the Device Manager, go to Disk drives and expand it.
- Right-click the SSD and select Update driver.
- Now follow the same steps mentioned for the storage controller driver.
You can also keep your drivers up to date with specialized programs, such as Outbyte Driver Updater, created to do this procedure automatically.
Outbyte Driver Updater will scan your device for outdated or faulty drivers and find the latest versions from its database as replacements.
6. Format SSD with NTFS
- Open Disk Management using the steps mentioned in Method 4.
- Select and right-click the problematic SSD drive and choose Format.
- This will delete all the data on the drive.
- Follow the onscreen instructions to format your drive with NTFS.
7. Run the Hardware and Devices troubleshooter
- Press Windows + I to open the Settings app.
- Click Update & Security.
- Go to Troubleshoot and click Additional troubleshooters.
- Choose Hardware and devices and click Run the troubleshooter.
- Follow the onscreen process to complete the troubleshooting process.
So, these are methods that you can use to fix the SSD not working issue on your Windows computer. If you have any questions or concerns about this topic, please let us know in the comments section below.


User forum
0 messages