Windows 10 Backup Not Working/ System Image Fails [FIXED]
Here is how to fix the Windows 10 backup if it's not working
Key notes
- On rare occasions, the Windows 10 backup or system image is unusable exactly when you need it most.
- To avoid this frustrating situation, make sure to check out the prerequisites we list below, as well as the steps to troubleshoot it.
- The comprehensive guide below explains multiple options, including how to format your external hard drive or turn on system protection.

Having a system backup is always useful, especially if your system gets corrupt or damaged.
Although the system Backup tool in Windows 10 is a great feature, it can sometimes fail to work on Windows 10, so let’s see how to fix it.
Why is Windows 10 Backup not working?
There are a lot of reasons why the Windows 10 Backup might not work. Here are some of the most common causes:
- Corrupt system image – If something damaged the backup image, the system will not be able to finish the backup.
- Not enough space on disk – If you’re performing a local backup, you must ensure you have enough space on the designated drive for the backup.
- Older backup files are preventing backup – The WindowsImageBackup folder holds older backup files that are interfering with the new one. Try deleting the folder using one of the solutions below.
- The source drive is not suitable for backup – If you’re using an external drive for backup and it’s a brand new disk, it needs to be formatted before proceeding with the backup.
- Bad connection with the network drive – In case you’re making a backup on a network drive, make sure you have a good connection with it. A poor connection will result in the backup failing.
Our readers have reported other instances of this error including Windows 10 backup error 0x807800c5, Windows 10 backup fails to complete, Windows 10 backup did not complete successfully, Windows 10 backup to network drive fails, and more.
Rest assured that by using the solutions below, you will be able to fix all these problems.
How to fix system backup problems in Windows 10
Before going through the more complex solutions, let’s crosscheck some quick methods to fix this issue:
- Disable third-party disk tools – It was reported that certain disk tools can cause problems with system backup, therefore if you’re using any disk optimizers or disk cleaning tools make sure to disable them before trying to create a system backup.
- Use a USB 3.0 hub – Few users reported that using USB 3.0 external hard drives can cause problems due to USB 3.0 drivers. In order to avoid these issues, it’s advised to use a USB 3.0 hub in order to connect your external drive.
- Set your background to solid color – It might seem unusual, but a few users reported that system backup issues can be caused if your background is set to Slideshow. You can change that setting from the Personalization menu.
If none of the above tweaks worked, start performing the solutions below in this exact order.
1. Delete the WindowsImageBackup folder
- Press the Windows key + E to launch Windows File Explorer.
- Navigate to the following location on your system drive:
C:/System Volume Information - Now, select the folder and delete it.

Sometimes you won’t be able to create system backup due to previous backup files, and in order to fix this problem, you need to delete those files.
To do that, locate and delete WindowsImageBackup folder. If you want to save your previous backups, you can also move them from WindowsImageBackup to a different folder.
Note that by default, you will not have access to this folder. You will need to change the ownership of the folder first.
2. Format your external hard drive
- Open This PC and locate your external hard drive. Right-click it and choose Format.

- When the Format window opens, check Quick Format option and click the Start button. This process might take a minute or two, so be patient.
This is a prerequisite before creating a system backup image on an external hard drive. Also, before formatting your external hard drive make sure to move any files from it to a safe location.
After your external hard drive has been formatted, try creating the system backup on it again.
3. Delete EFI System Partition and Recovery Partition
- Press Windows key + X and select Disk Management from the menu.

- When Disk Management opens, locate the hard drive on which you wish to store your system backup.
- You should see EFI System Partition and Recovery Partition for that hard drive in Disk Manager. Delete them both.
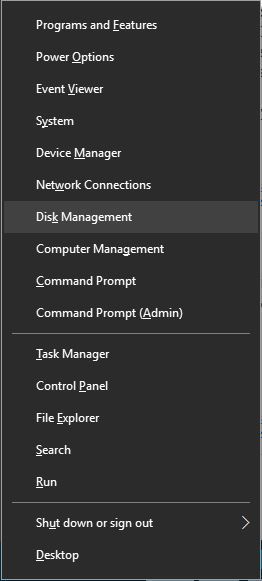
In some cases, when you upgrade to Windows 10 or install it on a new hard drive, certain partitions from previous versions of Windows might still be present on your computer causing System Backup to fail.
In order to fix this, it’s advised that you remove EFI System Partition and Recovery Partition.
After deleting these two partitions, you should be able to successfully create a system backup on that hard drive.
4. Turn on System Protection
- Press Windows key + S and type system restore and choose Create a restore point from the list of options.

- Click the System Protection tab and select Configure below.

- Select Turn on system protection and click Apply and OK to save changes.

We have listed this solution because some users claim that in order to create System Backup, System Protection must be enabled on your PC.
Also, in the Disk Space Usage section move the Max Usage slider to the left to about 10-15%.
A few of our readers reported that Max usage was set to 100% on their computer by default and that was the main culprit for system backup failure.
5. Turn off System Protection and delete restore points
- Press Windows key + S and type system restore and select Create a restore point from the results.
- Click the System Protection tab and select Configure below.
- Make sure to select Disable system protection, then click the Delete button to delete previous restore points.

- Repeat these steps for all your hard drivers.
Some of our readers managed to fix the problem by disabling the System Protection and deleting all the restore points, as shown in the solution above.
After you’ve disabled system protection and deleted previous restore points you should be able to create a system backup.
6. Use chkdsk command
- Press the Start button, type cmd, and select Run as administrator from the results.
- When Command Prompt opens, type the following command where D: is the drive partition (change it accordingly to your own letter) and press Enter to run it: chkdsk /r D:
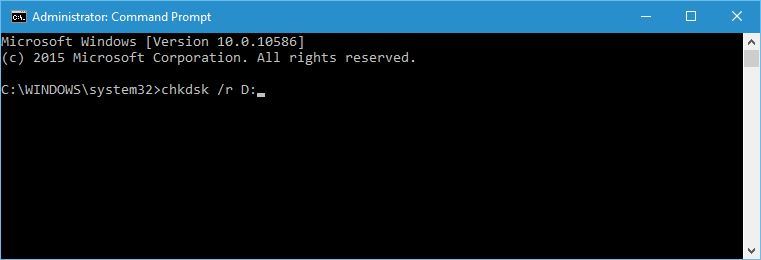
- Wait for the process to complete and repeat the same process for all hard drive partitions.
We have to mention that you might be unable to run chkdsk command on drive C, and you’ll be asked whether you want to scan drive C the next time your system restarts.
Press Y (Yes) and restart your computer in order to scan and check drive C.
If your hard drive contains corrupted files, a system backup will fail. This is why using the chkdsk command should repair them.
7. Use diskpart to remove the EFI partition
 NOTE
NOTE
- Click the Windows button, type cmd, and select Run as administrator from the results.
- When Command Prompt opens, type diskpart and press Enter.
- Type list disk and press Enter. You should see several hard drives available.

- Find your hard drive on the list and type the following command and press Enter (make sure that you use the correct number that matches your hard drive):
select Disk 0
- Now type the following command and press Enter:
list partition
- Locate the system partition and type the following command (make sure that the number matches your EFI partition):
select Partition 1
- At this point, we recommend backing up all files from that partition because they will get deleted.
- Type the following command and press Enter (this will delete the partition and all files on it):
del partition override - Now, you may add the newly created free space to any other disk partition by using the Disk Management tool.
If you install an additional hard drive and install new Windows on it, your previous EFI partition from the old hard disk can remain on your old hard drive and cause you problems with system restore.
Once again, be extremely careful while doing this because you can permanently delete your system files if you’re not careful. Use this solution at your own risk.
System backup is rather important, and if you can’t create a system backup on Windows 10, make sure to try some of our solutions.
We also recommend checking our selection of the best automatic backup tools for Windows 10.
And, if you’ve already tried, do let us know which one worked for you in the comments section below.
Read our disclosure page to find out how can you help Windows Report sustain the editorial team. Read more


Improve this guide


User forum
3 messages