Thumbnails Are Not Showing in Windows 10: 12 Ways to Fix
Get your thumbnails back by adjusting a couple of simple settings
6 min. read
Updated on
Read our disclosure page to find out how can you help Windows Report sustain the editorial team Read more
Key notes
- If thumbnail previews are not showing in Windows 10, it might be due to the wrong File Explorer settings.
- A quick, yet effective fix to this problem is to tweak your File Explorer Options a bit.
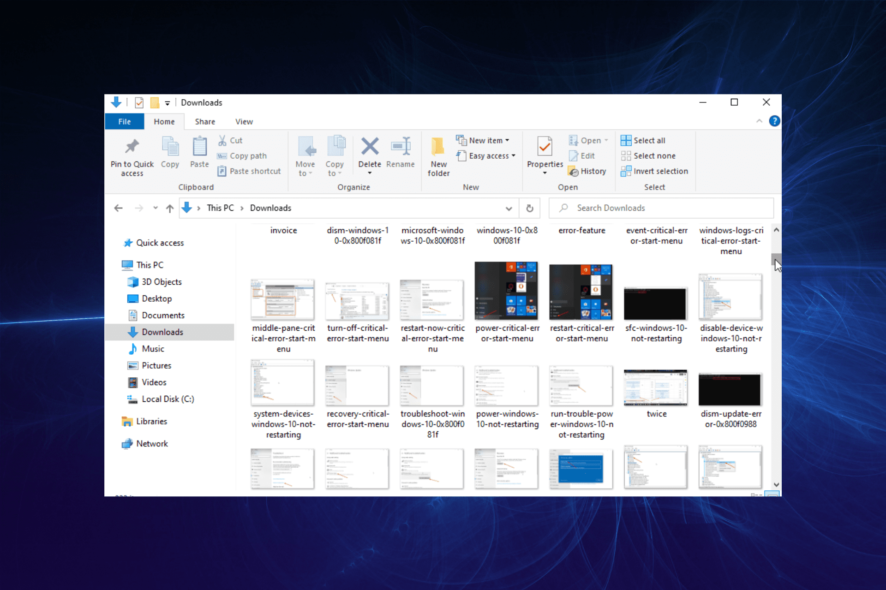
Thumbnails are helpful, but unfortunately, many reported that thumbnail previews are not showing in Windows 10. Many others complained that folder thumbnails are not showing in Windows 11 either. Here, we will show you how to fix this issue permanently on your PC.
Why are my thumbnails not showing the pictures?
Here is why Windows 10 thumbnails are not showing:
- Wrong File Explorer Options settings or bugs within the app
- Broken or corrupt system files, or issues with the folder settings
- If you have disabled your thumbnail preview, they will not show up.
- OneDrive is probably full. Uninstalling OneDrive fixed the problem for some of our readers.
What can I do if Windows 10 thumbnails are not showing?
1. Check File Explorer Options
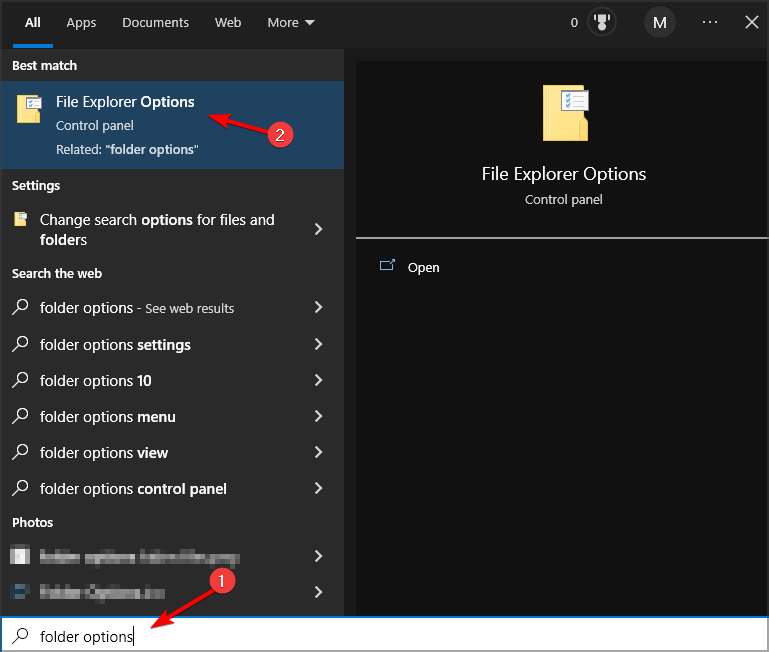
- Press Windows key + S and enter folder options. Select File Explorer Options from the menu.
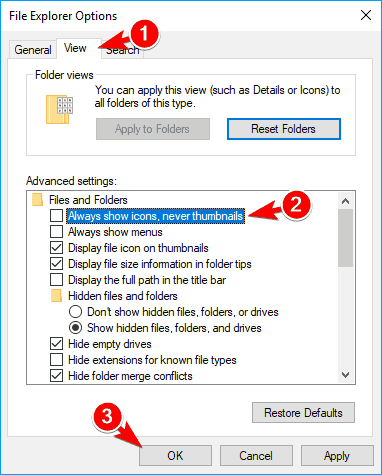
- After the File Explorer Options window opens, go to the View tab. Ensure that the Always show icons, never thumbnails option is unchecked.
- Now, click on Apply and OK to save changes.
2. Restore File Explorer Options to default
- Press Windows key + S and type folder options. Select File Explorer Options.
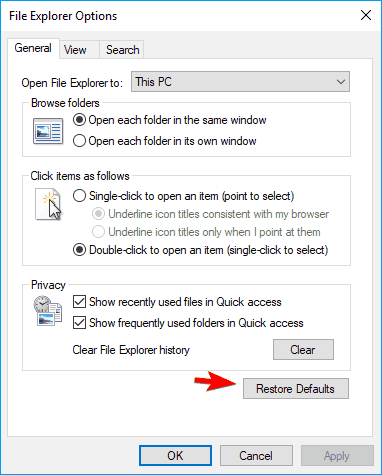
- When the File Explorer Options window opens, click the Restore Defaults button.
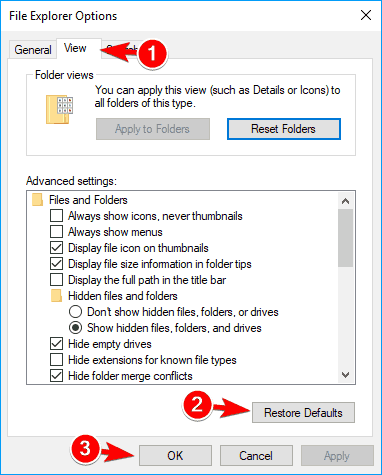
- Navigate to the View tab and click the Restore Defaults button. Next, click on Apply and OK to save changes.
This solution can also help speed up a slow File Explorer, so be sure to try it.
3. Run a quick SFC scan
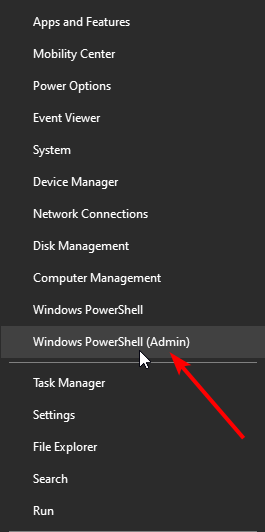
- Press Windows key + X and choose PowerShell (Admin).
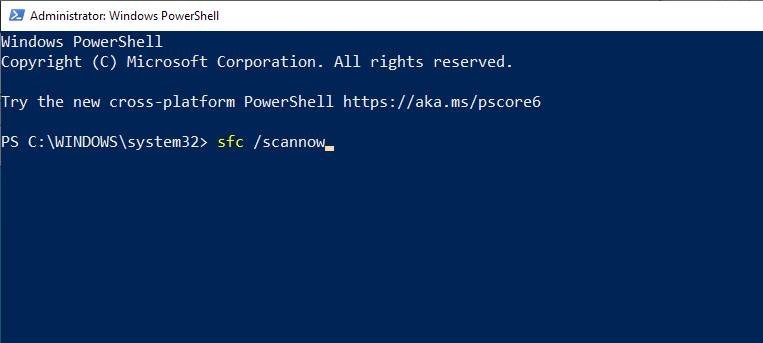
- Type the following command and press Enter:
sfc /scannow - Wait for the scan to complete. Note that this process can take up to 15 minutes, so don’t interrupt it.
4. Use Disk Cleanup to remove your thumbnails
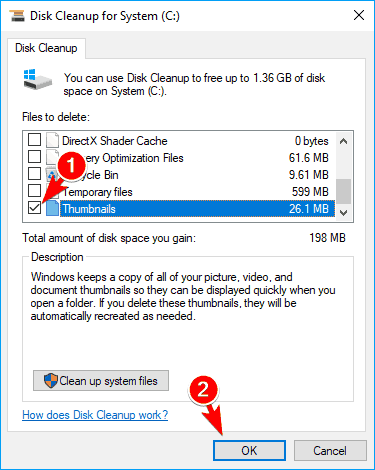
- Press Windows key + S and enter disk cleanup. Select Disk Cleanup from the menu.
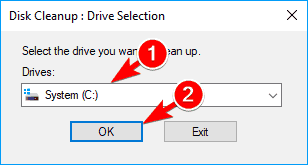
- Once Disk Cleanup starts, you’ll be asked to select the drive you wish to scan. Select your System drive. By default, it should be C, and click on OK.
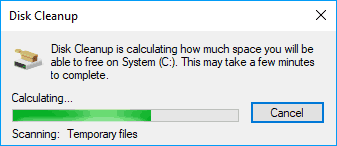
- Wait while Disk Cleanup scans your drive.
- Check the box for Thumbnails from the list and click on OK. A few users are also suggesting selecting Temporary files, so you might want to do that.
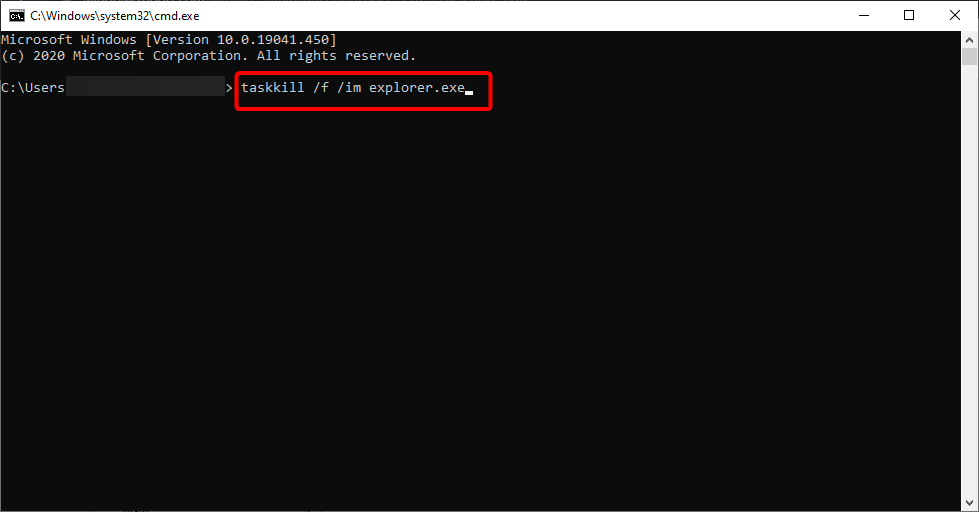
If you’re an advanced user, you can remove the thumbnail cache by using Command Prompt as shown below:
- Now open Command Prompt as administrator.
- Type the command below and press Enter:
taskkill /f /im explorer.exe - Now, type the following commands and press Enter after each:
cd /d %userprofile%\AppData\Local\Microsoft\Windows\Explorer attrib -h thumbcache_.db del thumbcache_.db - After running these commands, restart your PC and check if the problem still appears.
This solution can also be useful to take care of PDF thumbnails that are not showing on Windows PCs. Such issues may affect any type of file and prevent the user from organizing their desktop and local files.
5. Restore default settings for the problematic folder
- Navigate to the problematic folder.
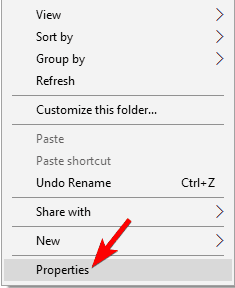
- Right-click the space in it and choose Properties from the menu.
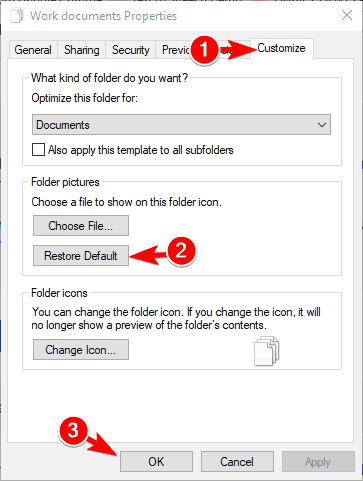
- Navigate to Customize tab and click on the Restore Default button.
- Now, click on Apply and OK to save changes.
6. Check advanced system settings
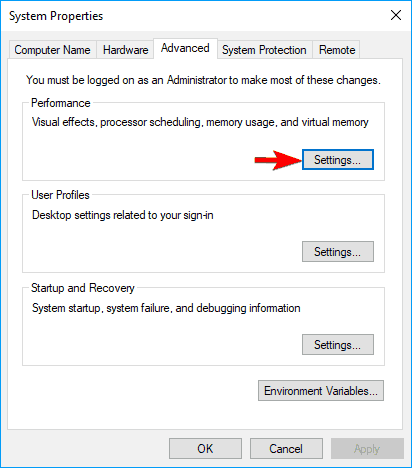
- Press Windows key + S and enter advanced system. Choose View advanced system settings from the menu.
- In the Performance section, click on the Settings button.
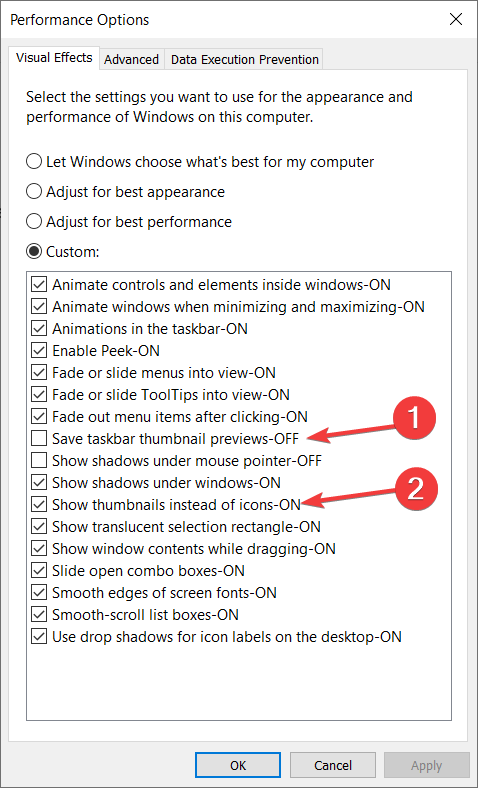
- Uncheck Save taskbar thumbnail previews and check Show thumbnails instead of icons.
- Now, click on Apply and OK to save changes.
7. Use the Group Policy Editor
 NOTE
NOTE
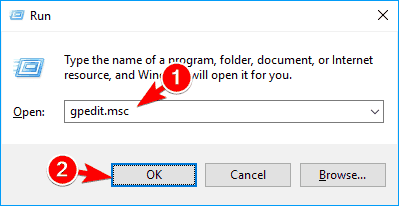
- Press Windows key + R enter gpedit.msc, and click on OK.
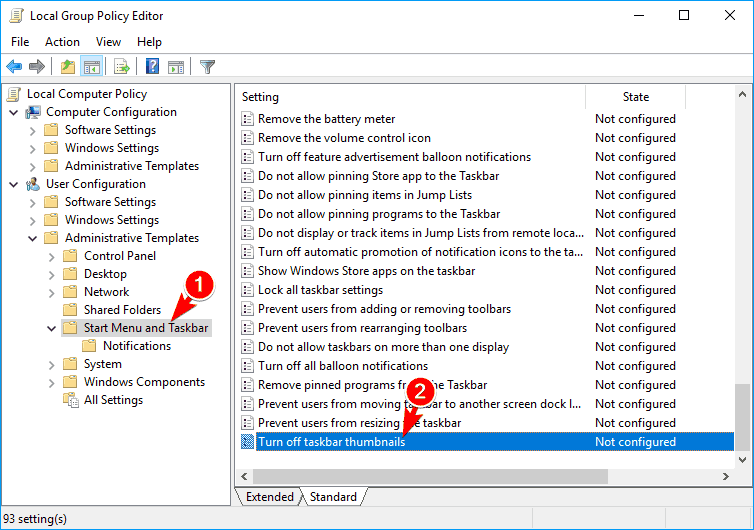
- In the left pane, navigate to User Configuration and then Administrative Templates. Lastly, select Start Menu and Taskbar.
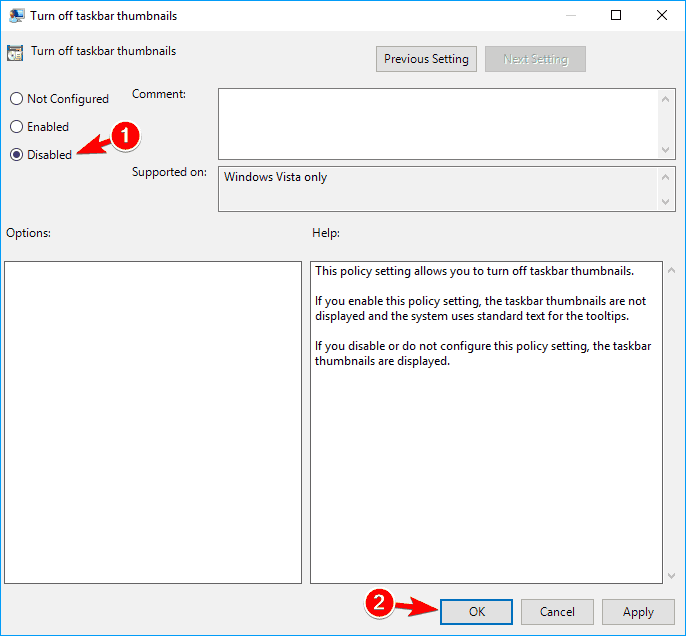
- In the right pane, locate and double-click Turn off taskbar thumbnails.
- Select Disable. Now, click on Apply and OK to save changes.
There’s also another method you can use to fix the missing thumbnails. To do that, follow these simple steps:
- Start Group Policy Editor.
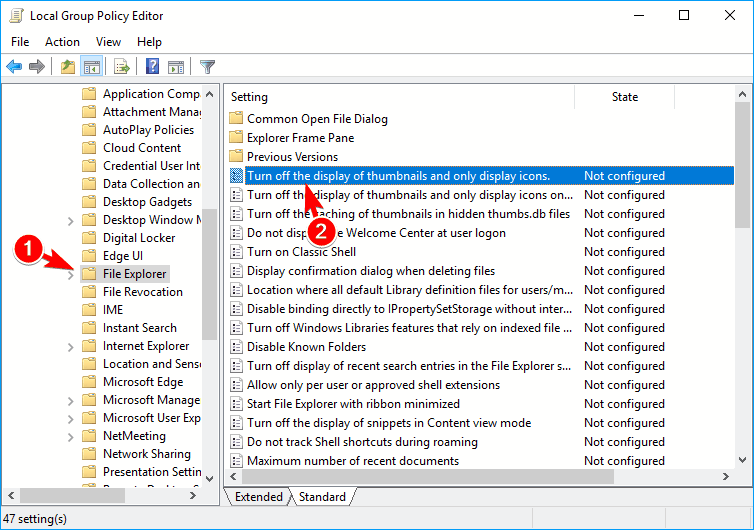
- In the left pane, navigate to User Configuration. Expand Administrative templates and select Windows components. Next, click on File Explorer.
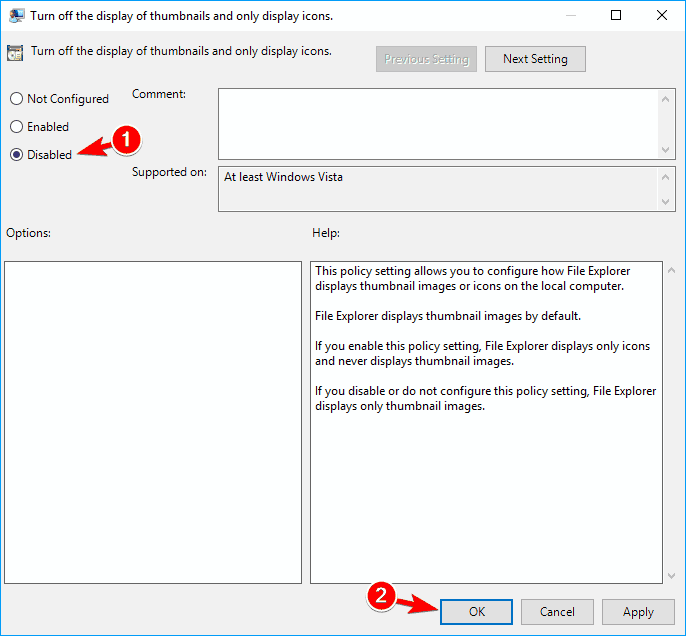
- In the right pane, double click the Turn off the display of thumbnails and only display icons.
- Now, select Not Configured or Disabled. Finally, click on Apply and OK to save changes.
Once you change these settings, check if thumbnail previews not showing in Windows 10 issue is still there.
8. Scan your system for spyware
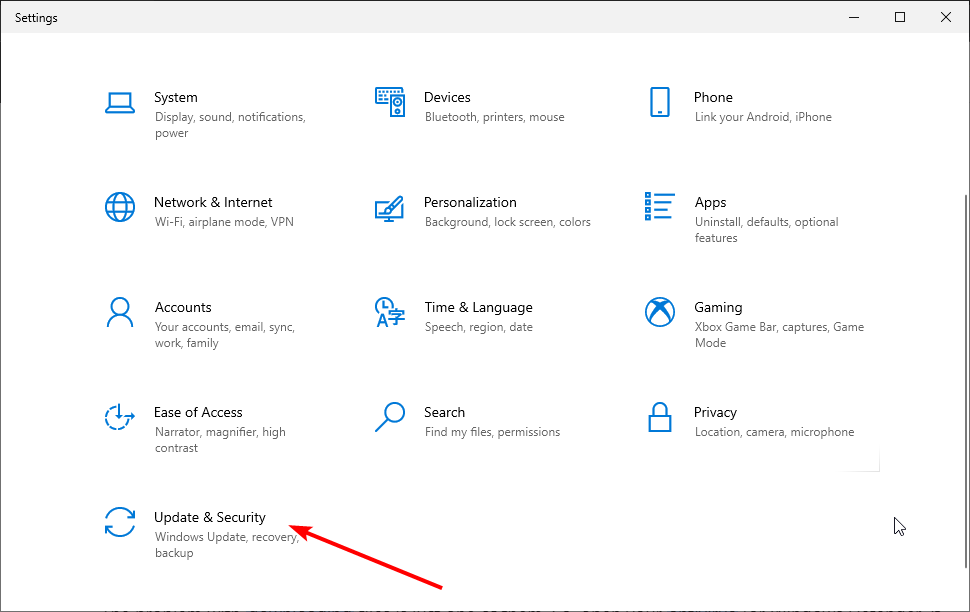
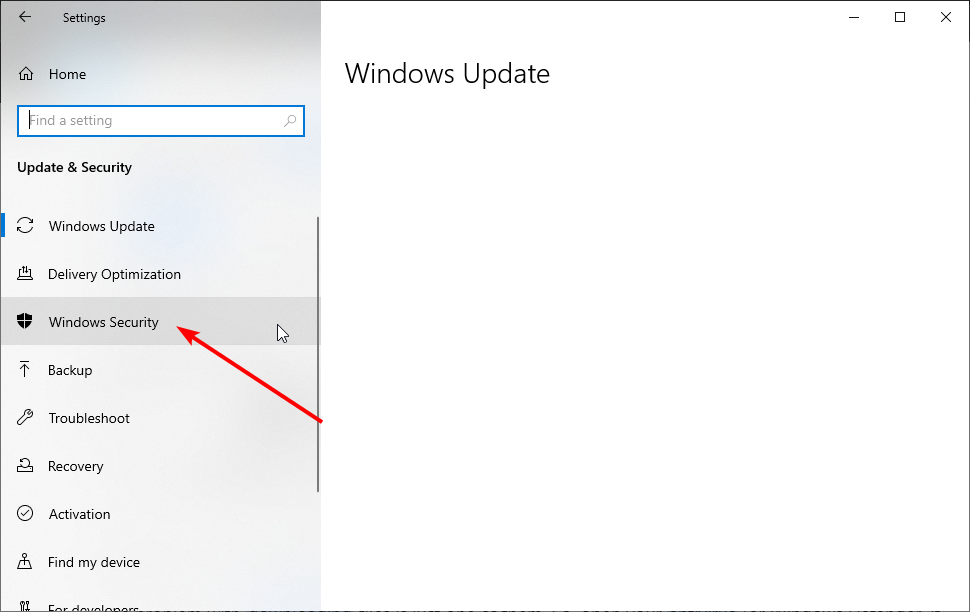
- Press the Windows key + I to open the Settings app. Select the Update & Security option.
- Click Windows Security in the left pane.
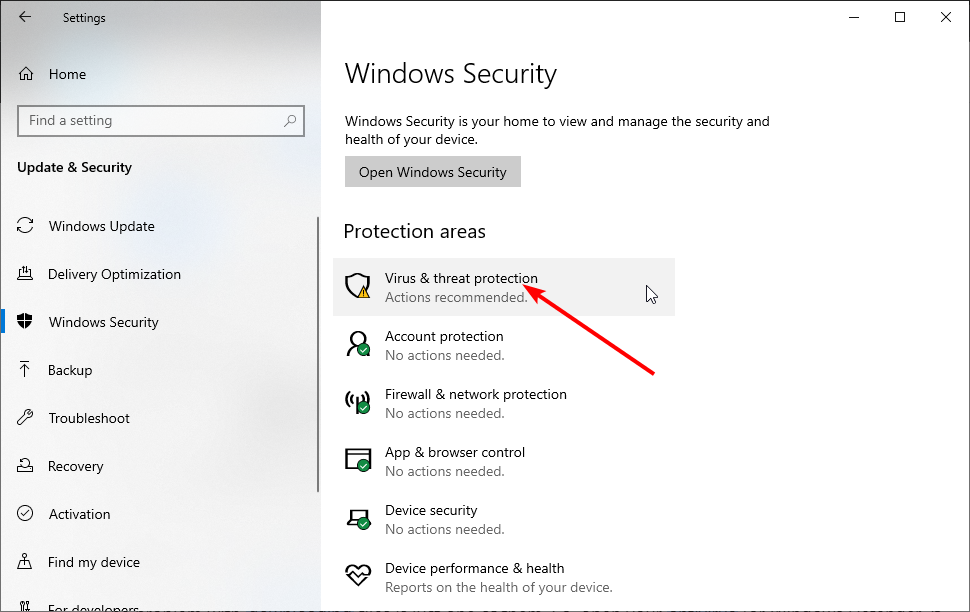
- Choose Virus & threat protection.
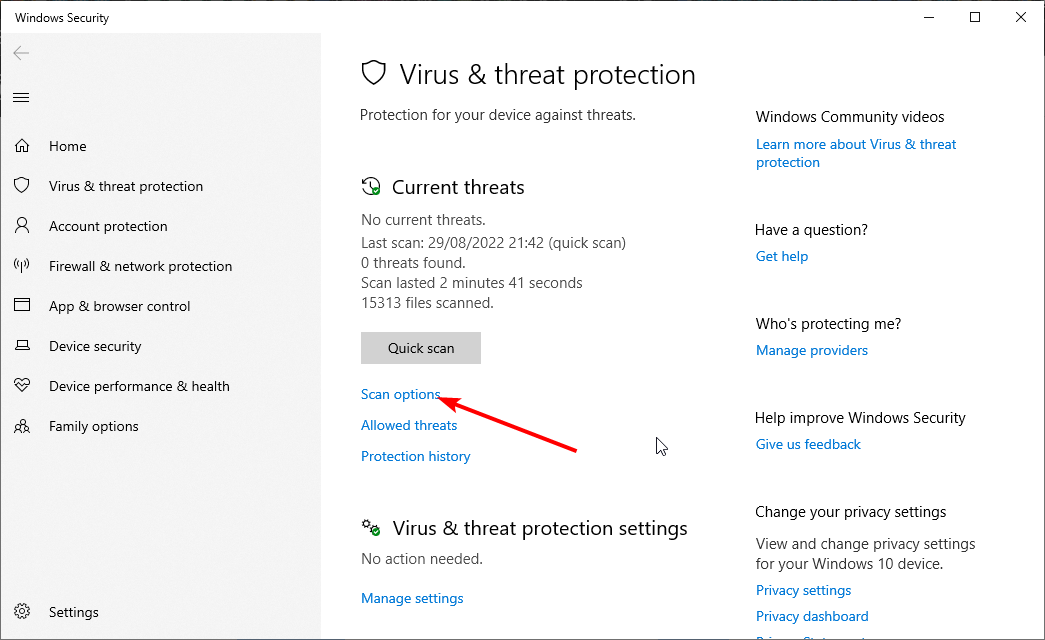
- Now, select Scan options.
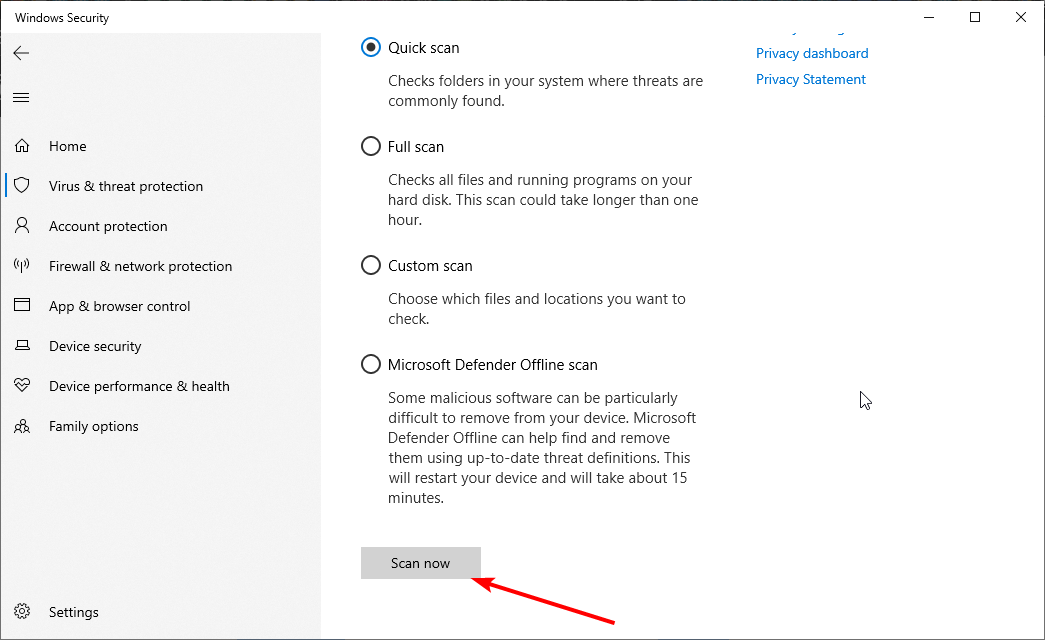
- Finally, click the Scan now button.
To perform a detailed scan, we will recommend using dedicated antivirus software, such as ESET NOD32. This tool uses cutting-edge technology and advanced machine learning to detect and remove the most stubborn malware on your PC.
9. Set a different default application for affected files
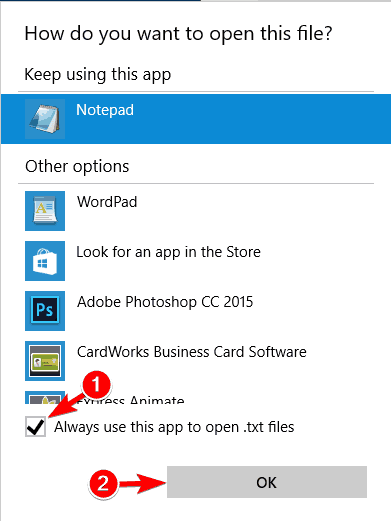
- Right-click the problematic file and choose Open with. Next, select Choose another app from the menu.
- Select the desired application and check Always use this app to open files option.
- Now, click on OK to save changes.
After making these changes, check if the problem is resolved.
10. Modify your registry
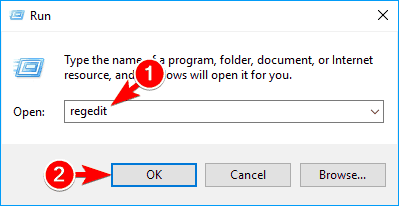
- Press Windows key + R, type regedit, and click OK.
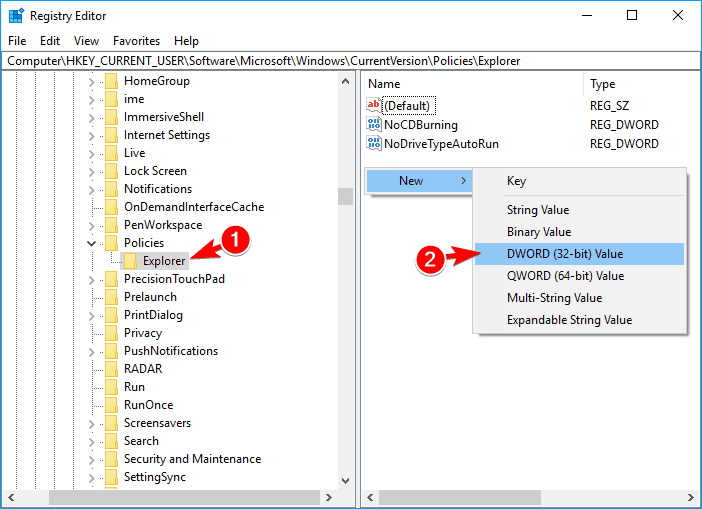
- In the left pane, navigate to the left pane:
HKEY_CURRENT_USER\Software\Microsoft\Windows\CurrentVersion\Policies\Explorer - In the right pane, look for DisableThumbnails DWORD. If the DWORD isn’t available, right-click the space in the right pane and choose New and then select DWORD (32-bit) Value.
- Enter DisableThumbnails as the name of the new DWORD.
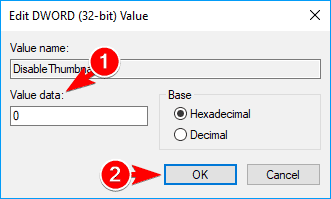
- Double-click the newly created DisableThumbnails DWORD to open its properties.
- Now, set the Value data to 0 and click OK to save changes.
After making these changes, the problem with thumbnail previews not showing in Windows 10 should be gone.
11. Prevent Windows from deleting your thumbnail cache
 NOTE
NOTE
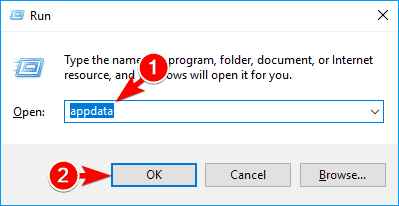
- Press Windows key + R type appdata, and click OK.
- Navigate to the
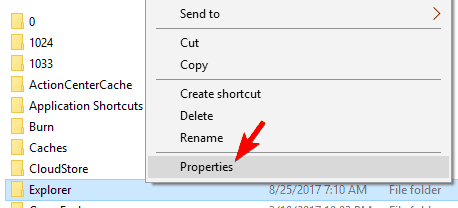
Local\Microsoft\Windows - Locate the Explorer directory, right-click it, and choose Properties from the menu.
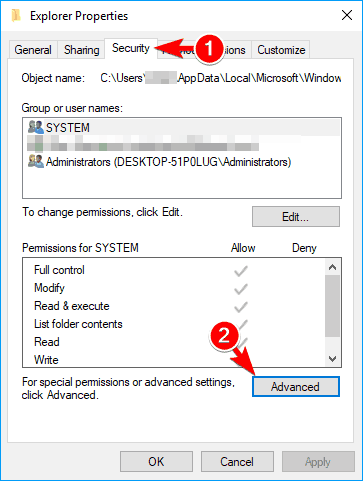
- Navigate to the Security tab and click on Advanced.
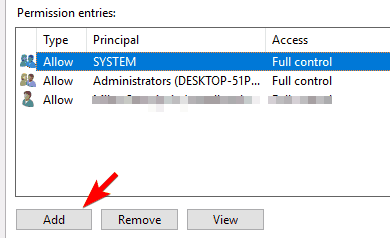
- After Advanced Security Settings opens, click on Add button.
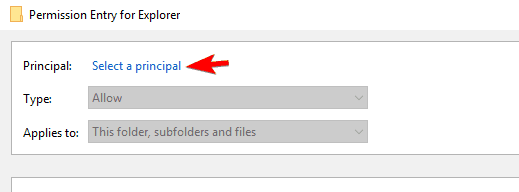
- Now click on Select a principal.
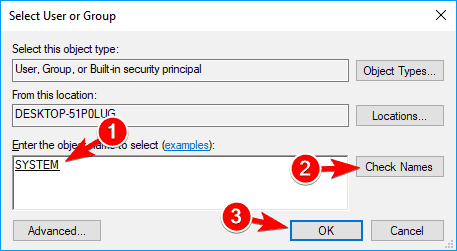
- In the Enter the object name to select field enter SYSTEM.
- Click the Check Names button. If everything is in order, click on OK.
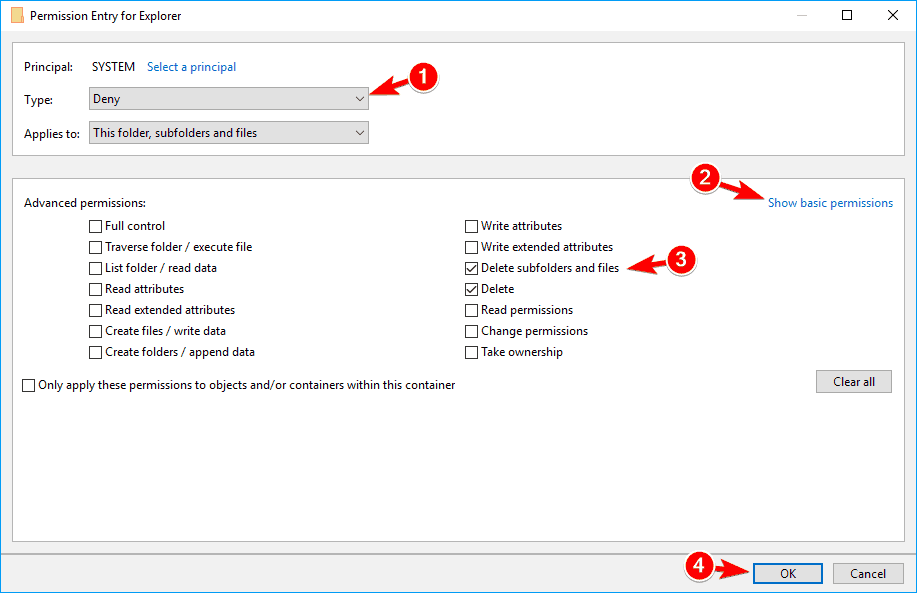
- Set Type to Deny and click on Show basic permissions. Uncheck all options except Delete subfolders and files and Delete. Click OK to save changes.
Thumbnails are pretty helpful, and many users prefer using them over icons. If, for some reason, thumbnail previews aren’t showing, this guide should help you restore thumbnails in Windows 10.
Our Restoring Google Thumbnails: A guide with easy ways article can also help you if you’re having thumbnail issues on Google, so don’t miss it.
Let us know the solution that worked for you in the comments below.

