Time Synchronization Failed on Windows 11: 9 Ways to Fix it
Key notes
- Several users have registered their complaints on multiple forums that their Windows 11 PC, they are facing time synchronization issues.
- Restarting the PC hasn’t helped them and they are looking for effective measures to fix this.
- If you are one of those, then you can check out the listed solutions down below and possibly resolve the time synchronization issues on your Windows 11 PC.

If your PC isn’t set with the correct date and time, then you will face multiple system-related problems.
Notably, several tasks on your PC will be hampered if the time is not synced or if the time isn’t set correctly.
For instance, if you have downloaded or saved a file on your PC, due to an incorrect time, the file information will have adulterated information. Since it is the system clock that your PC uses to add timestamps to your files, keeping the correct time and date is important.
Software or updates also rely on internet-based authorized time, and if there is an incorrect time set on your PC, then your PC may reject those updates or install the software.
Usually, Windows 11 uses the NTP, i.e., Network Time Protocol, to connect your PC with the internet server to synchronize the clock. However, if it fails to do so, then you will experience the time synchronization failed on Windows 11 issue.
If you are also facing a time synchronization issue on Windows 11, and are looking for solutions, then you are in the right place.
Because in this guide, we will give you a list of some effective solutions, that have helped users fix the problem at hand. Let us check each solution out.
How to manually sync time on a Windows 11 PC?
1. From the Settings menu
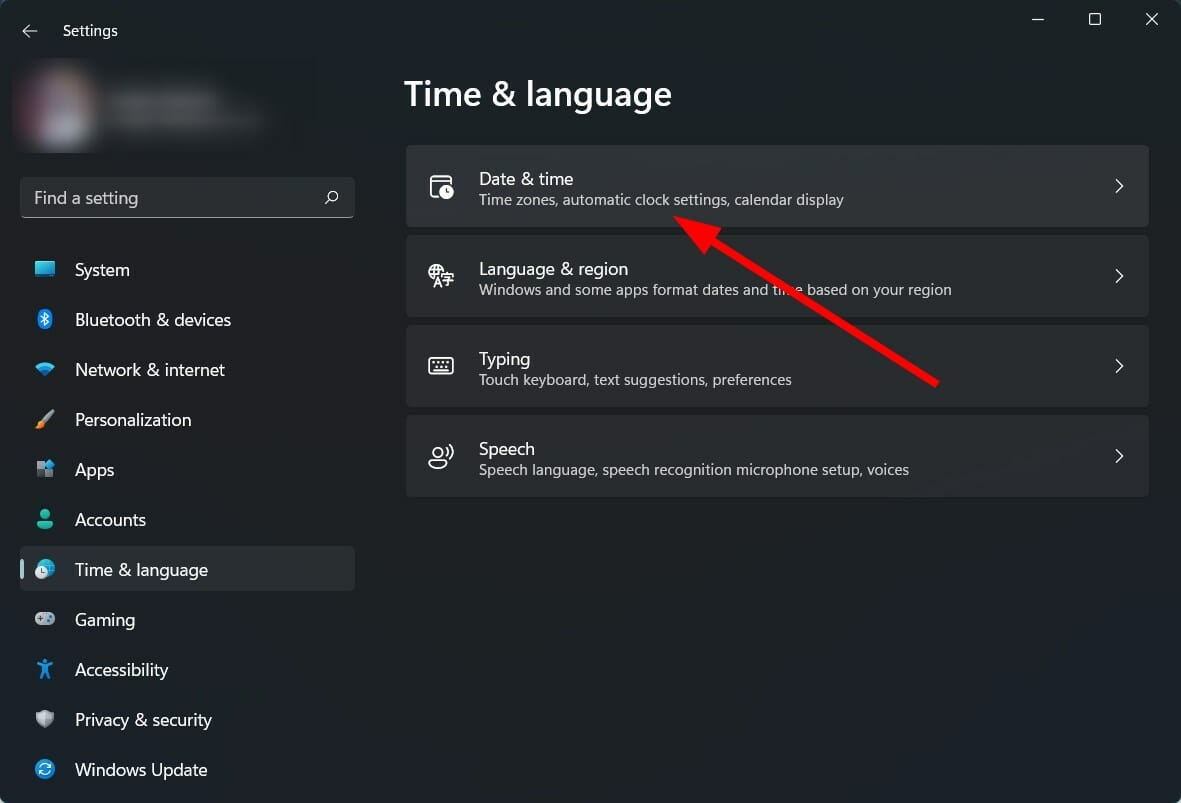
- Press the Win + I buttons to open Settings.
- Click on Time & language.

- Select Date & time.
- Scroll down and under Additional settings, hit the Sync now button.

- The tick will appear confirming that your PC has updated and synced the time.
2. From Control Panel
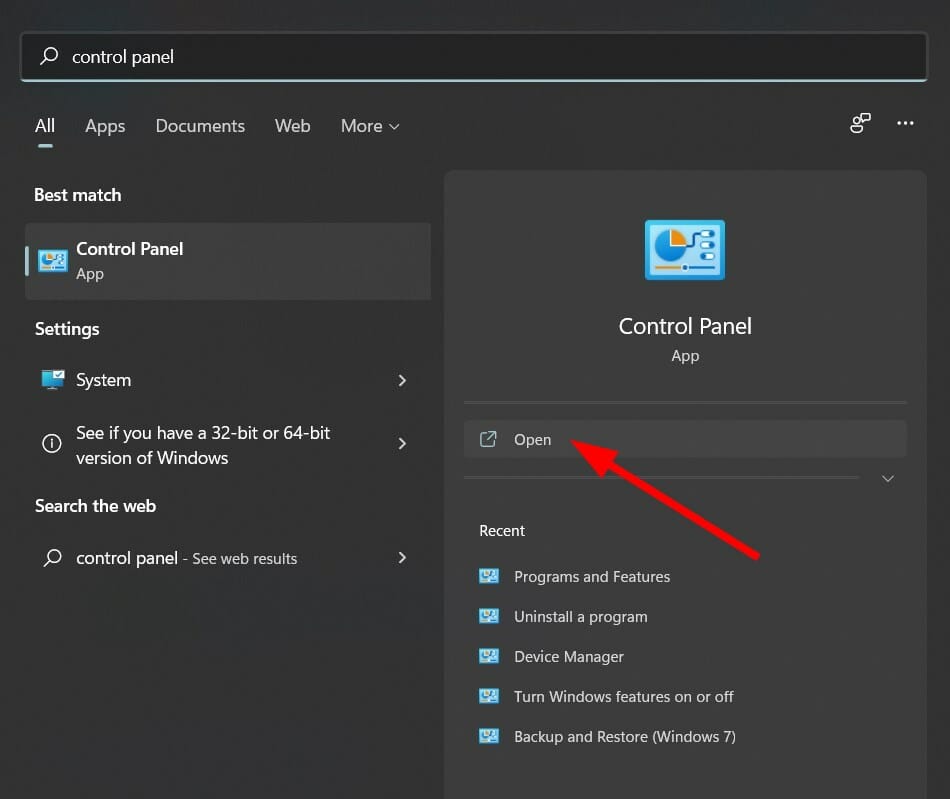
- Open the Start menu.
- Search for Control Panel and open it.
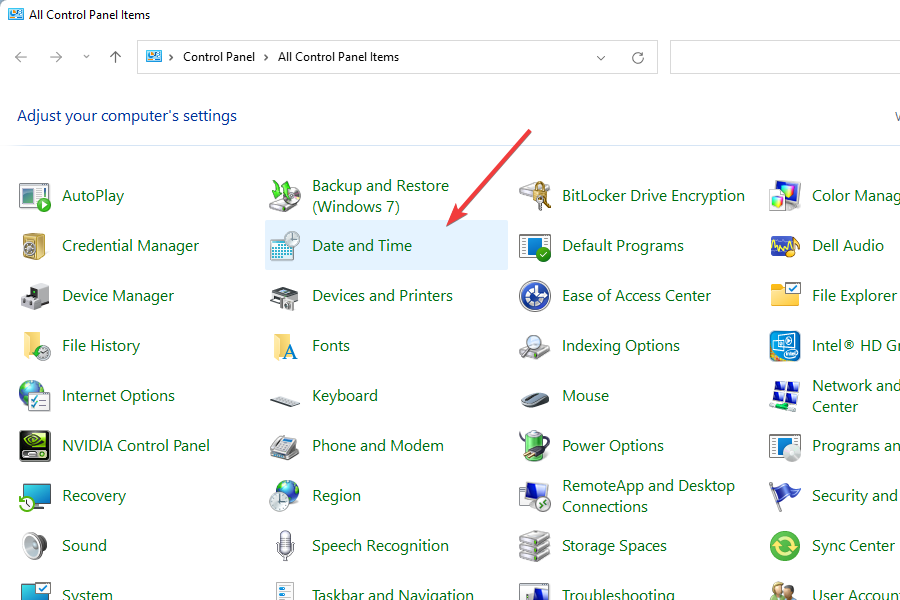
- Click on Date and Time.
- Switch to Internet Time.
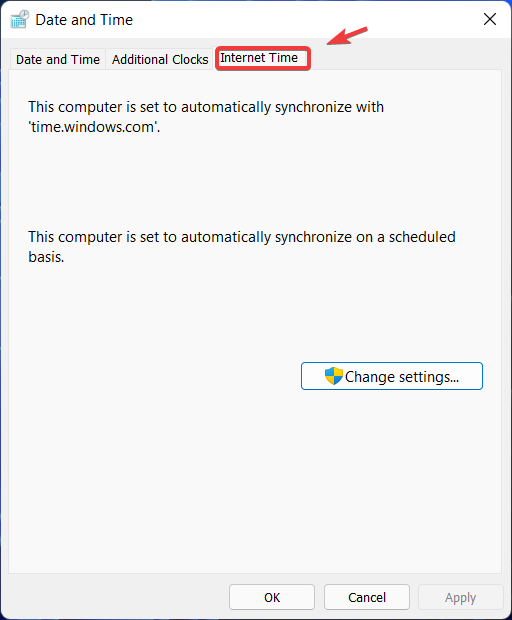
- Click on Change settings.
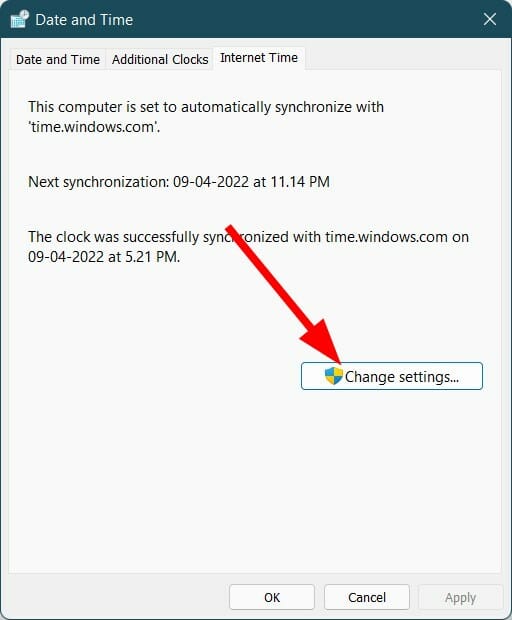
- Hit the Update now button next to Server.

- Click OK.
How can I fix the time synchronization failure on Windows 11?
1. Check time settings
- Press the Win + I buttons to open Settings.
- Click on Time & language.
- Select Date & time.
- Turn on the toggle for the Set time automatically and Set time zone automatically.
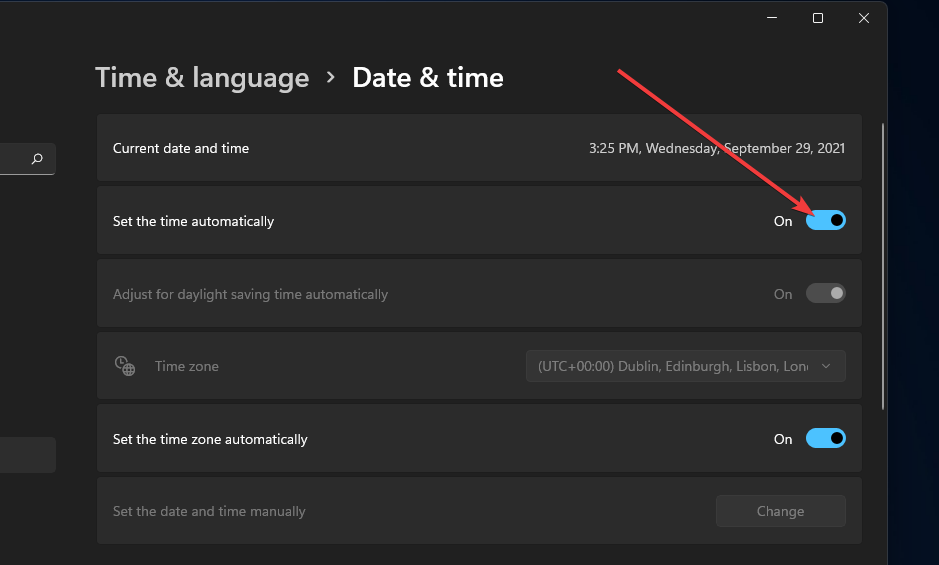
To start with, you can check if the date and time settings in the Settings menu are set to update automatically or not.
2. Check if the Windows Time service is active
- Press the Win + R keys to open the Run dialogue.
- Execute the below command.
services.msc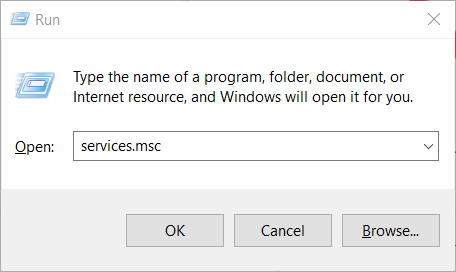
- On the right side, locate the Windows Time service and double click on it.
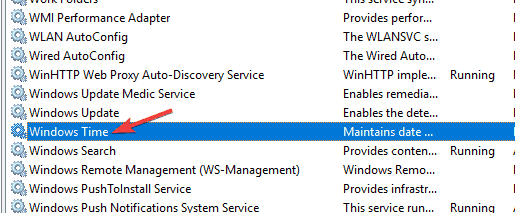
- Under Startup type, select Automatic.
- Also, click the Start button.
- Click Apply and OK to save changes.
Your Windows 11 PC relies on the Windows Time service to update the date and time on your PC.
If for any reason, this service fails to operate or function correctly, then you will experience issues such as time synchronization failure on Windows 11 error.
3. Use command prompt to force time sync
- Click on Start.
- Search for Command Prompt and run it as administrator.

- Execute the below commands one by one.
net stop w32timew32tm /unregisterw32tm /registernet start w32timew32tm /resync - Restart your PC.
When you execute the above commands, your Windows 11 PC will force the system to sync the time of the PC with the server.
There are chances that some third-party apps might have conflicted with the time sync. So, we would advise you to run the commands and see if that helps.
4. Run System File Checker
- Click on Start.
- Search for Command Prompt and run it as administrator.
- Type the below command and press Enter.
sfc /scannow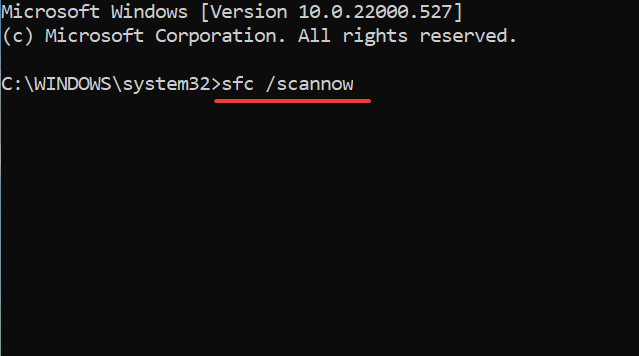
- Restart your PC.
If there is a presence of corrupt system files, then your PC won’t function appropriately and will also give rise to certain issues, such as time synchronization failed on Windows 11.
The System File Checker is an in-built tool that not only detects corrupt files but also fixes them. All this is done by simply executing a command.
Alternatively, you can also make use of reliable third-party software to help you resolve several system-related issues triggered by corrupt system files.
5. Use a different server
- Open the Start menu.
- Search for Control Panel and open it.
- Click on Date and Time.
- Switch to Internet Time.
- Click on Change settings.
- Select time.nist.gov as the Server and click the Update now button.
Several users have reported that they managed to fix the time synchronization failed on Windows 11 by changing the time server. You can also give it a try and hopefully fix the issue.
6. Tweak the SpecialPollInterval registry key
- Press Win +
Rkeys to open the Run command. - Type the below command and hit Enter.
regedit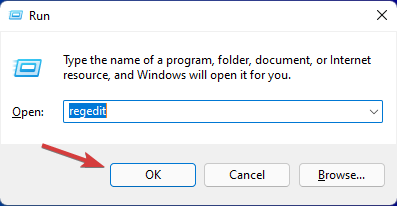
- Head over to the below address.
HKEY_LOCAL_MACHINE\SYSTEM\CurrentControlSet\Services\W32Time\TimeProviders\NtpClient - On the right side, double-click on the SpecialPollInterval key.

- Change the value to 86400 and hit OK to save the changes.

- Restart your PC for the changes to take effect.
You can use the above steps to fix the time synchronization failed on Windows 11. The above tweak in the registry settings helps change the update interval on Windows.
However, we would advise you to only tweak the registry settings if you are sure of what you are doing. You can also go ahead with the above steps, but before that, take a backup of the registry files.
7. Add new time servers
- Press Win +
Rkeys to open the Run command. - Type the below command and hit Enter.
regedit - Head over to the below address.
HKEY_LOCAL_MACHINE\SOFTWARE\Microsoft\Windows\CurrentVersion\DateTime\Servers - On the right side, right-click on the space and select New > String Value.
- In the Value name, enter the number for the server, i.e., 3.
- In the Value data field, enter time.google.com.
- Hit OK to save changes.
- Open the Start menu.
- Search for Control Panel and open it.
- Click on Date and Time.
- Switch to Internet Time.
- Click on Change settings.
- Click on the Server drop-down menu and select time.google.com.
- Hit the Update now button next to Server.
- Click OK.
Do note that the above is just an example of how you can add a new time server to your PC and update it to fix the time synchronization failed on the Windows 11 error.
You can add as many servers as you want. If you are confused about which servers you can add, you can refer to the list of servers below:
- time-a.nist.gov
- time-b.nist.gov
- 128.105.37.11
- europe.pool.ntp.org
- clock.isc.org
- north-america.pool.ntp.org
- time.windows.com
- time.nist.gov
8. Change registry values
- Press the Win + R keys to open the Run command.
- Type the below command and hit Enter.
regedit - Head over to the below address.
HKEY_LOCAL_MACHINESYSTEMCurrentControlSetServicesW32TimeConfig - On the right side, locate MaxNegPhaseCorrection and double-click on it.

- Set the Value data to fffff.
- Click OK to save changes.
- Double click on MaxPosPhaseCorrection and set Value data to ffffff.

- Click OK to save changes and exit.
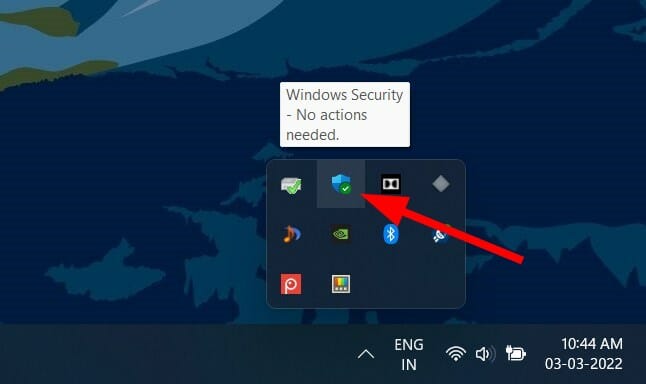
9. Disable Firewall
- Click on the upward arrow button on the bottom-right taskbar.
- Select Windows Security.
- Select Firewall & network protection from the left pane.

- Disable the Firewall for the Domain network, Private network, and Public network, one by one.
If you use a third-party antivirus software then you also need to disable the firewall. Antivirus software with a firewall enabled is one of the most common reasons why a connection to the time sync server gets interrupted.
Aggressive anti-malware could also cause multiple issues, including the one at hand. You can try disabling the antivirus or antimalware software and check if this fixes the time synchronization failed on the Windows 11 issue.
The above-mentioned solutions should be sufficient enough to help you resolve the issue. However, if nothing helps you solve the problem, you can start afresh by either resetting your Windows 11 PC or reinstalling Windows 11 on your PC.
Let us know in the comments section below which one of the above methods helped you fix the problem. Feel free to share with us any other solutions that did the job for you.
Read our disclosure page to find out how can you help Windows Report sustain the editorial team. Read more


Improve this guide


User forum
0 messages