How to turn DDC/CI: on or off [Gaming guide]

Here’s how to turn DDC/CI on or off on a gaming monitor. Enabling this feature allows better communication between your monitor and PC. You can adjust brightness easier and enhance visuals.
Let’s get right to it:
How do I turn DDC/CI on or off
How to enable Display Data Channel/ Command Interface

Note: Below guide is for BENQ monitors. However, this should also work if you are using HP, Lenovo, Dell, or any other monitor.
- Press any of the physical control buttons on your monitor. You can find the control buttons, usually at the bottom of the display panel on the right side. In some monitors, the buttons are located at the back of the panel.
- When the context menu appears, press the appropriate button to open the Menu.
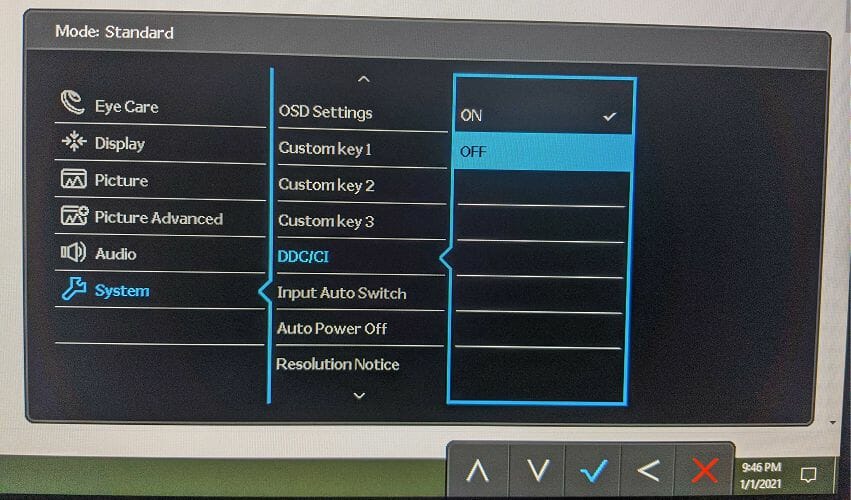
- Use the physical button to scroll down and select System.
- Use the forward navigation button and highlight the DDC/CI option.
- Next, use the forward navigation button and highlight ON.
- Press the OK/Check button to turn on DDC/CI and save the changes.
That’s it. You have successfully enabled the DDC/CI option on your computer.
However, If you have a multiple monitor setup where the monitors are from a different manufacturer, you can use a third-party tool like ClickMonitorDDC to manage DDC/CI settings.
How to disable Display Data Channel/ Command Interface
- Press any physical control button on your monitor.
- Press the appropriate button to open the Menu.
- Use the navigation button to scroll down and select System.
- Press the forward navigation button and then scroll down to the DDC/CI option.
- Press the forward navigation button and then select OFF to disable it.
- Next, press the OK/Check button to save the changes.
Now you have all the information you need to turn DDC/CI on and off. This handy feature lets your monitor and computer work together for easy adjustments like brightness.
Most monitors come with it enabled, but if it’s ever turned off, you can quickly switch it back on in your settings.
Read our disclosure page to find out how can you help Windows Report sustain the editorial team. Read more


Improve this guide


User forum
0 messages