How to uninstall greyed out Windows 10 apps
A good idea is to enter Safe Mode and try to remove the application after that
Key notes
- Unfortunately, you can't uninstall greyed out apps in Windows 10 by using normal procedures.
- Microsoft has created a special troubleshooter for that so you should download and use it first.
- An expert solution is to remove the app by using PowerShell and the commands below.

We have all sorts of applications on our PC, but sometimes certain apps can become grayed out and unable to remove. This can be a problem, so today we’re going to show you how to uninstall grayed out apps on your Windows 10 PC.
Grayed out applications are somewhat common, and some applications are built-in into Windows, so that’s the reason they’re grayed out.
Sometimes applications you install can get corrupted, and that will prevent you from removing them. Speaking of grayed out apps, here are some problems that users reported.
- Unable to uninstall program Windows 10 – This problem can occur for various reasons, and if you encounter it, be sure to download Microsoft’s troubleshooter and run it. After using the troubleshooter, the issue will be resolved.
- Uninstall Amazon Assistant Windows 10 greyed out – Many users reported issues with Amazon Assistant on their PC, and we already covered how to uninstall Amazon Assistant in one of our previous articles, so be sure to check it out for detailed instructions.
- VMWare player uninstall greyed out – This issue can occur with almost any application, and if you encounter it, try deleting the software from Safe Mode.
- Uninstall greyed out apps VMware, VirtualBox, Visual Studio 2015, McAfee – This problem can affect almost any application, but you should be able to fix it using the uninstaller software.
- Greyed out apps won’t delete – Sometimes you might encounter certain grayed out apps that you can’t delete. However, you might be able to fix that issue by using PowerShell.
How can I uninstall grayed out apps on PC?
1. Use a specialized tool
One way to uninstall grayed-out apps is to use dedicated software. A PC cleaning utility such as IObit Uninstaller offers many benefits when it comes to safely remove applications.
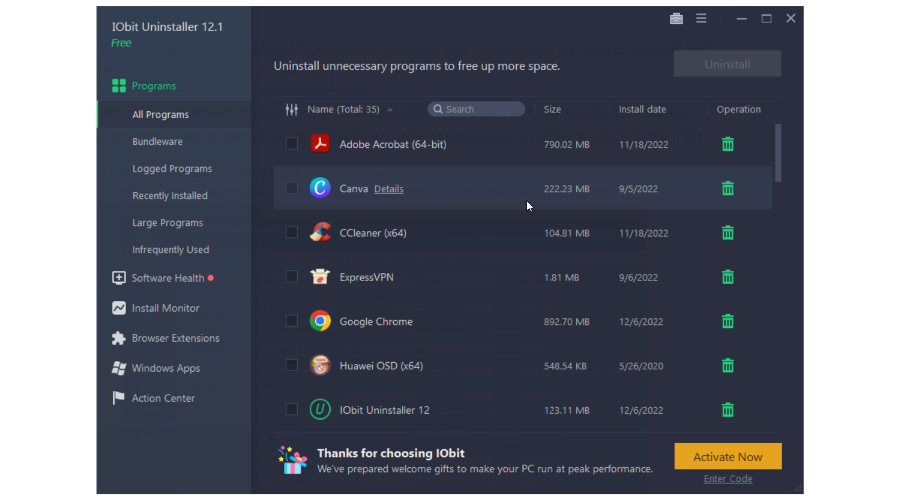
With an uninstalling utility, you will make sure that the app you are trying to uninstall along with all its corresponding files is completely erased from your PC.
IObit Uninstaller is our top choice because it is easy to use, allowing users to uninstall and clean leftover files from one central window, so you will not have to jump between apps and setting panels.
The uninstallation feature is very simple. It displays a listing similar to what you find in Windows settings. You can easily select the unwanted app and then click on the trash icon on the right for a clean uninstall.
2. Enter Safe Mode and try to remove the application
- Open the Settings app and head to the Update & Security section (to open the Settings app quickly, you can use Windows Key + I shortcut).

- From the left pane pick Recovery. In the right pane, click the Restart now button.

- Navigate to the Troubleshoot, then click on the Advanced options select the Startup Settings, and click the Restart button.
- Select the Safe Mode with Networking by pressing the appropriate keyboard key after the reboot.
Once the Safe Mode starts, try to remove the application. If that doesn’t work, you might want to try removing the application’s installation directory manually.
This method isn’t usually advised since it can leave registry entries behind, but if other solutions aren’t working, you might want to try it out.
If you can’t uninstall grayed out apps on your PC, perhaps there’s a certain glitch that is preventing you from doing that.
However, you might be able to fix this problem simply by entering Safe Mode and trying to remove the application from there.
In case you’re not familiar, Safe Mode is a special segment of Windows that runs with default settings, so it’s perfect for troubleshooting. To enter Safe Mode, follow the steps above.
3. Use Microsoft’s troubleshooter
- Download Microsoft’s troubleshooter.
- Once the troubleshooter is downloaded, run it and follow the instructions on the screen.
After the troubleshooting process is finished, the issue should be resolved and you’ll be able to easily uninstall any application from your PC with ease.
Many users reported that this method worked for them, so be sure to try it out.
According to users, issues with certain applications can sometimes occur, and they can become grayed out and unable to remove.
Microsoft is aware of this issue, and it has released its own troubleshooter to help you with this problem.
4. Use PowerShell
- In the Search bar enter powershell. Locate Windows PowerShell on the list, right-click it and choose Run as administrator.

- Run the following command:
Get-AppxPackage | Select Name, PackageFullName
- Find the application that you want to remove and copy its Package name. Let’s say we want to remove ZuneVideo, for example. The Package name for this application would be:
ZuneVideo_10.18102.12011.0_x64__8wekyb3d8bbwe
- Enter Remove-AppxPackage <package name> command and press Enter to run it. In our example, the correct command would be:
Remove-AppxPackage Microsoft.ZuneVideo_10.18102.12011.0_x64__8wekyb3d8bbwe
- Be sure to replace the package name with the package name that matches the application you’re trying to remove.
After doing that, the problem will be resolved and you’ll successfully remove the selected application.
If you’re having problems removing certain applications from your PC, perhaps you can try removing them using PowerShell.
Bear in mind that this solution only works for Universal applications that are downloaded from the Microsoft Store or available in Windows by default.
Before we start, we have to warn you that PowerShell is an incredibly powerful tool, so you can cause damage with it if you’re not careful, so use this solution and PowerShell at your own risk.
Grayed-out applications can sometimes be a problem, and in this article, we showed you several solutions that can help you deal with them, so be sure to try them all out.
Read our disclosure page to find out how can you help Windows Report sustain the editorial team. Read more


Improve this guide


User forum
3 messages