What Is an M.2 SSD and How to Install It on Your PC

An M.2 SSD is a compact, ultra fast storage device that connects directly to your motherboard without using cables. It delivers lightning speed performance, reducing boot times and improving system responsiveness. If you are planning to upgrade your computer, knowing how M.2 SSDs work and how to install one is essential.
Table of contents
What Is an M.2 SSD and How It Works?
What Is an M.2 SSD?
An M.2 SSD is a Solid State Drive that uses the M.2 form factor, which is a small, rectangular stick that plugs directly into a motherboard slot. M.2 drives can use either the SATA or NVMe (PCIe) interface. NVMe models are the fastest and most commonly used in modern systems. If your PC does not detect the drive after installation, you can follow this Windows 11 NVMe recognition guide for help.
Types of M.2 SSDs
- SATA M.2 SSD uses the SATA interface and offers speeds up to 550 MB/s.
- NVMe M.2 SSD uses the PCIe interface for much faster transfer rates, up to 7000 MB/s.
- PCIe Generations:
- Gen 3 is standard and affordable, around 3500 MB/s.
- Gen 4 is a mid range option with speeds up to 7000 MB/s.
- Gen 5 is a cutting edge option that can exceed 12,000 MB/s.
If your SSD does not show up during startup, you can check this guide on fixing NVMe not showing up in BIOS.
How to Install an M.2 SSD on Your PC
Preparing Your PC
Before you begin, make sure the system is powered off and you have a screwdriver ready.
- Shut down your PC and disconnect it from the power source.

- Hold the power button for a few seconds to drain any remaining power.
- Remove the side panel of your computer case with a screwdriver.
- Locate the M.2 slot on your motherboard, usually labeled M.2_1 or M.2_2.

- If your motherboard has a heatsink covering the slot, remove it carefully.
Installing and Setting Up the Drive
Once the slot is prepared, you can insert the M.2 SSD and configure it in Windows.
- Hold the M.2 SSD at about a 30 degree angle and align its notch with the slot key.
- Gently insert the drive into the slot until it is fully seated.
- Push the SSD down so it lies flat and secure it with the small screw provided.
- Reattach the heatsink if needed and close your PC case.
- Reconnect the power cable and turn on your computer.
- Open BIOS to confirm that the M.2 SSD is detected by the system.
- In Windows, open Disk Management, initialize the drive, and create a new partition.

- Format the new partition as NTFS to make the drive ready for use.
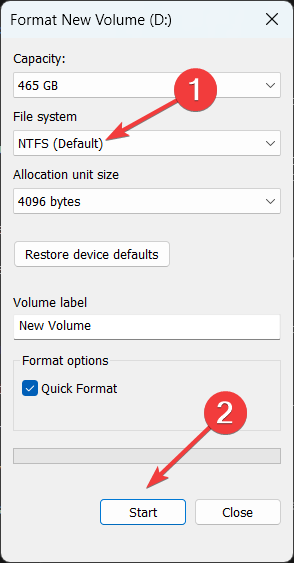
You can also follow this detailed guide on how to format an NVMe SSD in Windows 11.
Why You Should Use an M.2 SSD
- High speed so files, games, and apps load in seconds.
- Compact size since it mounts directly on the motherboard and saves space.
- No cables which improves airflow and reduces clutter inside the case.
- Durable design with no moving parts, silent operation, and lower power usage.
FAQs
No. M.2 is the form factor, while NVMe is the communication protocol that delivers faster speeds.
Only if your motherboard has a compatible M.2 slot that supports the same interface, such as SATA or PCIe.
Yes. You must initialize and format the drive in Windows before you can store data on it.
Yes. Many users install an M.2 SSD for the system drive and use SATA SSDs or HDDs for extra storage.
A heatsink is optional but recommended for Gen 4 and Gen 5 drives in order to maintain stable performance.
Conclusion
Installing an M.2 SSD is one of the most effective upgrades you can perform on a modern PC. It improves boot times, accelerates app loading, and keeps your build clean and cable free. With proper installation, BIOS detection, and correct formatting in Windows, your new M.2 SSD will deliver fast and reliable storage for years.
Read our disclosure page to find out how can you help Windows Report sustain the editorial team. Read more


Improve this guide


User forum
0 messages