Here Are 3 Easy Methods to Auto Connect VPN [Windows 10/11]
Use our recommendation for extra auto-connect options
Key notes
- If you're a privacy-concerned user, you may want to connect to a VPN on startup.
- It's also ideal to secure your home network through a VPN tunnel.
- Windows 10's built-in provider doesn't have auto-connect, but there are ways around it.
- We'll show you below how to make it happen using BAT files and also great third-party options.


World-class 24/7 support with 82% for a 2 years plan and 2 months free
70% of our readers choose Private Internet Access
70% of our readers choose ExpressVPN
Amazing connection speed with 61% off and 4 months free for the 2-years plan.
Best security protocols with 83% off and 2 months free for a 2-year plan.
If you’re wondering how to make Windows 10 automatically connect to a VPN, we’ve got you covered.
You have to create a simple BAT file with your VPN connection details and add it to the Windows autostart sequence.
This way, the VPN connection you created using the Windows 10 built-in VPN provider will autostart every time you switch on your computer, just like Skype, Steam, or an antivirus.
However, if you have a VPN desktop client installed, things become significantly easier since you have to find and activate the autostart and auto-connect options in the UI.
Follow our easy instructions below to find out how to make Windows 10 automatically connect to a VPN using a manual VPN connection and a VPN desktop client.
We’re also showing you how to stop your VPN from auto-connecting if you need to temporarily or permanently off this feature.
How do I keep the VPN on all the time in Windows 10?
There are a few ways to do this, depending on your VPN type. If you use the built-in option, you will have to add the VPN BAT file to the Windows 10 autostart file.
If you use a third-party VPN client, chances are that their dedicated app already has an option to connect to a VPN at startup.
If not, you can also do the same BAT file trick to your third-party VPN app.
How do I make Windows 10 automatically connect to VPN?
1. Create a VPN connection
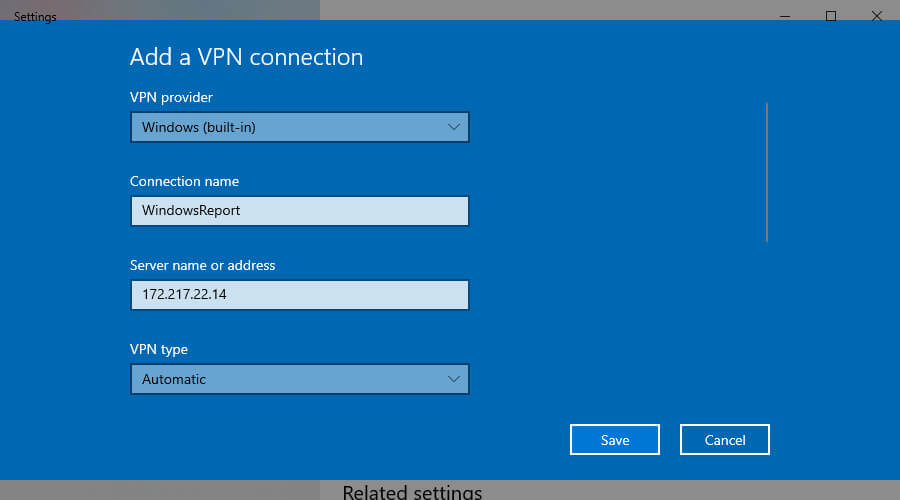
- Right-click the Start button and go to Network Connections.
- Select VPN and press Add a VPN connection.
- Add the required VPN connection details.
- Copy the Connection name, User name, and Password.
- Click Save.
You can also use a third-party VPN client. Paid VPNs offer a more extensive server network, many of which come with built-in auto-connect features, so you won’t have to go through much trouble.
We recommend using Private Internet Access. It’s the best VPN for Windows 10, thanks to high-speed VPN servers, military-grade encryption, and its user-friendly interface.
Here’s how to configure it on your PC:
- Sign up for a Private Internet Access subscription.
- Download and install PIA on your PC.

- In the systray, click the PIA icon.
- Open Settings and go to the General tab.
- Enable Launch on System Startup and Connect on Launch.

- Restart your PC.
After making these changes, PIA will auto-launch every time you turn your PC and connect to the last used VPN server.
Furthermore, it’s easier to change VPN servers in PIA for Windows 10 to automatically connect to the new VPN server instead of editing the VPN connection info in the OS and manually updating the BAT file every time you do this.
Windows 10 has limited native support for VPN protocols, some considered obsolete (PPTP, L2TP).
On the other hand, PIA supports OpenVPN and WireGuard, which are safer and more versatile protocols.
Moreover, PIA comes with a bunch of security features that Windows 10 lacks, including a kill switch that cuts off Internet access in case the VPN connection drops, to protect you from IP leaks.
Private Internet Access
Make Windows 10/11 automatically connect to PIA’s VPN servers fast and easily.2. Create a shortcut
- Right-click on an empty space on your desktop and select New, then Shortcut.

- Now, paste the following path and click on Next (make sure to replace ConnectionName with the actual data, as shown in our screenshot):
C:\windows\system32\rasdial.exe ConnectionName
- Enter a name for your connection and click on Finish.

- Double-clicking the new shortcut will automatically start your VPN connection.
Before this, you must configure the connection with your credentials just like in Solution 1.
3. Create a BAT file
Configure a BAT file for your VPN
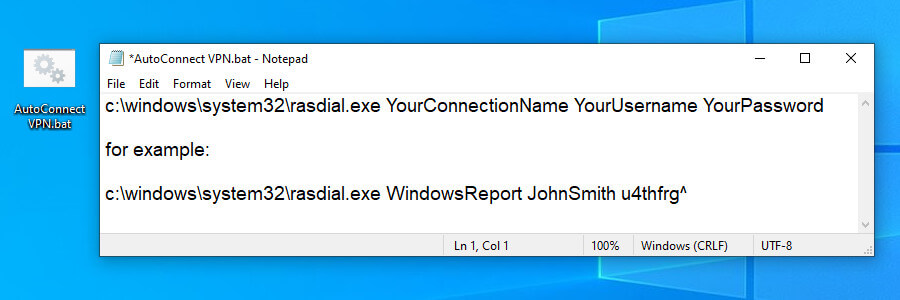
- Open the Windows 10 Notepad (press Ctrl + R, type notepad, press Enter).
- Paste the following code:
C:\windows\system32\rasdial.exe YourConnectionName YourUsername YourPassword - Replace the connection details with what you copied in the previous stage.
- Save the Notepad file and exit.
- Change the file extension of the Notepad file from TXT to BAT.
If you can’t see the format of your files, find out how to show file extensions in Windows 10.
How to add the BAT file to Windows 10 autostart?

- Press Ctrl + R, type shell:startup, and press Enter.
- Copy the BAT file to this location.
- Restart your PC.
From this point on, Windows 10 will automatically connect to the VPN at every system startup. Command Prompt briefly opens a console window and shows how it verifies the username and password, registers your PC over the network, and connects to the VPN.
If you need to switch VPN servers, you only have to edit the VPN connection details in Windows 10. The changes will get automatically picked up by the BAT file.
However, if you also modify the VPN connection name, username, or password, then you will need to manually update the BAT file, too. Otherwise, Windows 10 won’t be able to automatically connect to the VPN.
How do I stop my VPN from automatically connecting?

- Right-click the Windows taskbar and go to Task Manager.
- Go to the Startup tab.
- Right-click the VPN connection’s BAT file and click Disable.
If you change your mind and want to re-enable Windows 10 to automatically connect to the VPN, follow the same steps as above and click Enable on the disabled entry.
To make a permanent change, head over to the startup folder using Ctrl+R and shell:startup to delete the BAT file.
If you used a VPN desktop client like PIA, simply find and disable the autostart and auto-connect options in the user interface.
You can also use Task Manager to prevent PIA from autostarting at every Windows startup (same steps as disabling the BAT file).
In conclusion, it’s a good idea to make Windows 10 automatically connect to a VPN as soon as you turn on your PC.
This way, you can immediately connect to another computer over the Internet, like accessing your work PC from home.
However, using a premium VPN solution like PIA is significantly easier and unlocks more possibilities. For example, you can use PIA to access blocked websites, defeat government censorship, host game servers for you and your friends, and unlock Netflix catalogs.
Plus, PIA is among the best VPNs for BBC iPlayer.
Read our disclosure page to find out how can you help Windows Report sustain the editorial team. Read more


Improve this guide


User forum
4 messages