How to Enable or Disable Tamper Protection on Windows 10
Learn to manage this feature on your device
Key notes
- Tamper Protection is a security feature that keeps your Windows 10 device protected.
- You can manually enable or disable it using different methods.
- Among others, you can disable Tamper Protection by navigating to its specific registry key and modifying it.

Security is the main concern for Windows users, especially regarding the protection and privacy of information.
That is precisely why constant updates and improvements are being rolled out in this area, including a Tamper Protection feature.
While Windows Security is powerful enough to handle most cyber-security threats, it becomes useless once it is deactivated by third-party software or malware.
This is why the Tamper Protection feature was created, as its primary purpose is to prevent changing relevant Windows Defender Antivirus settings.
To that extent, we’ve compiled a list of methods you can use to disable or enable Tamper Protection in Windows 10, although we highly recommend you keep the feature activated at all times.
How do I turn Tamper Protection on or off in Windows 10?
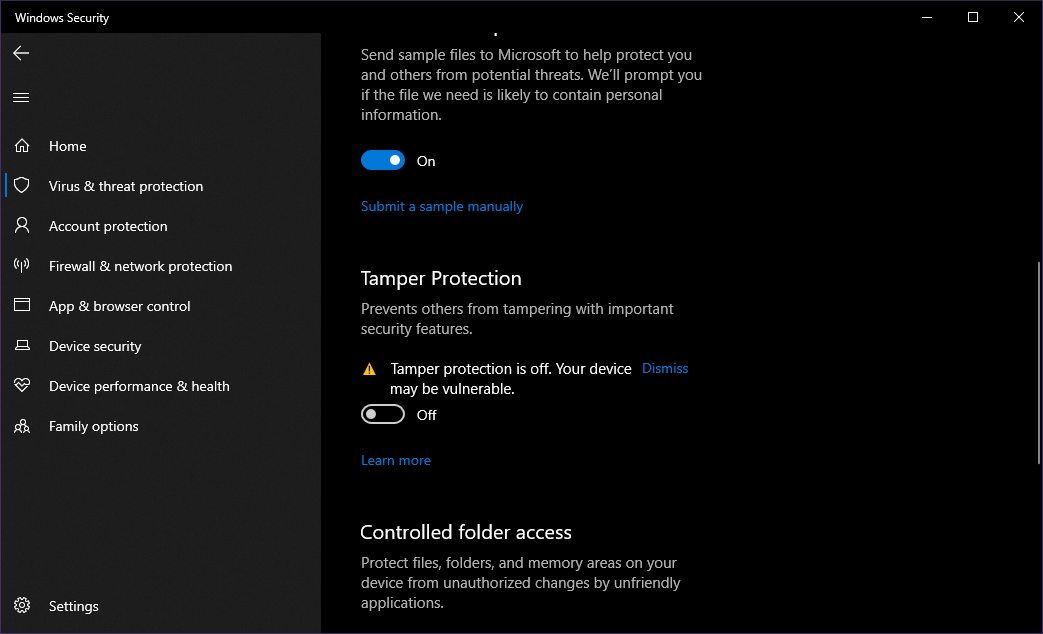
1. Use the Windows Security UI
- Click on the Start button on your taskbar.
- Click on Settings.
- Go to Updates & Security.
- Select Windows Security.
- Switch to Virus and Threat protection.
- Select Manage Settings.
- Scroll a bit to find Tamper Protection.
- Toggle between On or Off, depending on what you need.
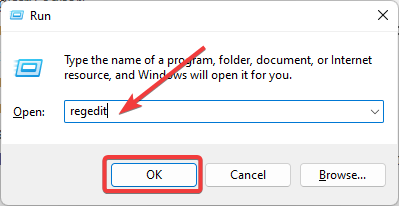
2. Edit the Registry key for Tamper Protection
1. Click Win + R on your keyboard to open the Run dialog.
2. Type in regedit.exe. This will open the Registry Editor.
3. Navigate to this location:
HKEY_LOCAL_MACHINESOFTWAREMicrosoftWindows DefenderFeatures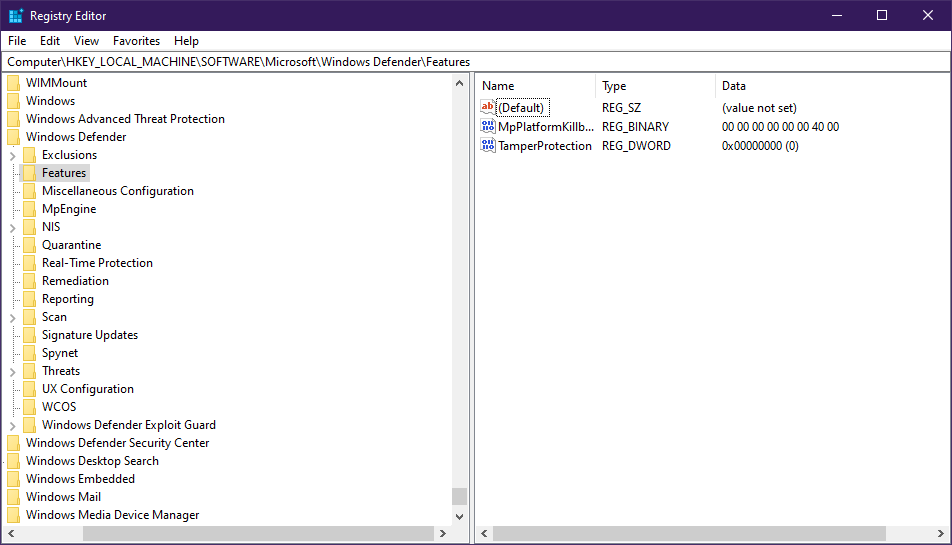
4. Double click on the DWORD called TamperProtection to edit its value.
5. Set it to 0 to disable Tamper Protection. Alternatively, you can set it to 5 to enable Tamper Protection.
A very easy method to enable or disable Tamper Protection on your PC is to tweak the Registry. All you need to do is navigate to the Tamper Protection registry key and change its DWORD value according to your preferences.
If you have trouble accessing the Registry, check out our dedicated article to find out what to do.
3. Use Intune
- Go to the Microsoft 365 Device Management portal.
- Sign in with your work or school account.
- Select Device configuration.
- Go to Profiles.
- Create a profile that includes the following settings:
- Platform:
- Windows 10 and later
- ProfileType:
- Endpoint protection
- Platform:
- Go to Settings.
- Select Windows Defender Security Center.
- Click on Tamper Protection.
- Configure it on or off.
- Assign the profile to one or more groups.
By following any of the following 3 methods, you can toggle Tamper Protection on or off as you see fit. However, keep note that due to the nature of Tamper Protection and what it does, it is recommended that you keep it enabled at all times.
Besides, if you can’t enable Tamper Protection, remove all additional linked accounts from the PC.
Did you find this guide useful? Let us know in the comments section below.
Read our disclosure page to find out how can you help Windows Report sustain the editorial team. Read more


Improve this guide
User forum
0 messages