Fix: Windows 10/11 update error 0x800705b3
It’s hard to expect your system to function in a seamless manner if your drivers are inappropriate. Back in the day, you would install the drivers provided by the hardware producer, but in Windows 10, the system update covers this department.
And that’s too often a fruitful soil for a lot of issues. One of the frequent errors that occur due to unfitting drivers is known by the code 0x800705b3. This error occurs when Windows Update is unable to install the fitting software for its hardware counterparts.
So, if you’ve got in contact with this error and your updates are stalled, you should check the list below where we enlisted the best-suited workarounds.
How to resolve Windows 10 update error 0x800705b3
- Update your drivers manually
- Run Update troubleshooter
- Prevent the driver auto-updating
- Run the SFC scan
- Run DISM
- Reset Windows Update components
- Make sure the Windows Update service is running
- Make sure the BITS service is running
- Change DNS settings
- Perform a clean reinstallation
How to fix Update error 0x800705b3 in Windows 10
Solution 1 – Update your drivers manually
As we stated so many times before, in order to make everything function as intended, you’ll need to get the drivers yourself. Drivers that are updated over the air are not always best suited for the job. Additionally, some of the devices may be outdated so you’ll need to find a proper legacy driver to get them going.
If you’re unsure how to get valid drivers, follow the instructions:
- Right-click the Start menu and open the Device Manager.
- Navigate to the troubled driver and uninstall it.
- Right-click the driver and open Properties.
- Under Details tab, locate and copy HardwareID.
- Paste the values in the search bar of your web browser to locate the proper drivers.
- Make sure to locate the proper drivers provided by the OEM’s.
- Install the drivers and restart the PC.
It’s the highest priority to download the drivers from trusted sources in order to escape malware or critical damage to your system.
Update drivers automatically
In order to prevent PC damage by installing the wrong driver versions, we strongly suggest doing it automatically by using a dedicated tool.
This tool is approved and tested by our team and will help you update all outdated drivers safely. After several tests, our team concluded that this is the best-automatized solution. Below you can find a quick guide on how to do it.
In addition, you can set up driver backups and go back where you started with your drivers, in case anything wrong occurs in the process.
Hence, managing your drivers with this practical tool will provide an automatic scan for missing or outdated drivers, optimizing the hardware with their latest drivers’ versions.
⇒ Get PC HelpSoft Driver Updater
Solution 2 – Run Update troubleshooter
One of the additions that rolled with the Creators Update is a unified troubleshooter that should be of more use than the previous built-in solutions. So, you can navigate to the new unified menu and troubleshoot the issues at hand. In this exact event, you can troubleshoot Updates, plus the Hardware and Devices, just in case.
Follow the instructions to do so:
- Press Windows key + I to access the Settings app.
- Open Update & security.
- Under the left pane, click Troubleshoot.
- Run Update troubleshooter.

- Optionally, run Hardware and Devices troubleshooter.
- Restart your PC and check for changes.
However, if the problem is still persistent, make sure to check the steps below in order to resolve it.
Solution 3 – Prevent the driver from auto-updating
Even though it’s quite hard to disable some of the update features and prevent a certain device from updating, there is a way. More than one, to be exact. And you can find those with thorough explanations in this article.
Additionally, there are reports that some older devices can interfere with the update procedure so make sure to unplug the device and uninstall the driver. Later on, you can find some alternative legacy drivers that should get you going. That’s one of the few fallacies of Microsoft’s latest addition: some older devices are simply not supported. And a lot of folks, due to professional needs of outdated printer or scanner, decided to roll back to Windows 7 just because of that.
Solution 4 – Run the SFC scan
Another troubleshooting tool worth trying is the SFC scan. This is a command-line tool that basically scans your computer for potential issues and resolves them on the way. Here’s exactly what you need to do:
- Right-click on the Start Menu button, and open Command Prompt (Admin).
- Enter the following line and press Enter: sfc/scannow

- Wait until the process is done (it may take a while).
- If the solution is found, it will automatically be applied.
- Now, close the Command Prompt and restart your computer.
Solution 5 – Run DISM
The next tool we’re going to try is DISM. Here’s how to run DISM in Windows 10:
Here’s how to run DISM in Windows 10:
- Open the Command Prompt as shown above.
- Enter the following command and press Enter:
- DISM.exe /Online /Cleanup-image /Restorehealth

- DISM.exe /Online /Cleanup-image /Restorehealth
- Wait for the process to finish.
- Restart your computer.
- In case the DISM can’t obtain files online, try using your installation USB or DVD. Insert media and type following command:
- DISM.exe /Online /Cleanup-Image /RestoreHealth /Source:C:RepairSourceWindows /LimitAccess
- Make sure to replace ”C:RepairSourceWindows” path of your DVD or USB.
- Follow further on-screen instructions.
Solution 6 – Reset Windows Update components
If none of the troubleshooting tools managed to resolve the problem, let’s try with resetting crucial update components. Here’s what you need to do:
- Start Command Prompt as administrator.
- When Command Prompt starts, run the following commands:
- net stop wuauserv

- net stop cryptSvc
- net stop msiserver
- ren C:WindowsSoftwareDistribution SoftwareDistribution.old
- ren C:WindowsSystem32catroot2 Catroot2.old
- net start wuauserv
- net start cryptSvc
- net start msiserver
Solution 7 – Make sure the Windows Update service is running
The most crucial service for receiving updates in Windows 10 is the Windows Update service. If this service is not running properly, well, you won’t be able to get any updates. So, make sure it runs by doing the following:
- Go to Search, type services.msc, and open Services.
- Find the Windows Update service. Right-click and open Properties.
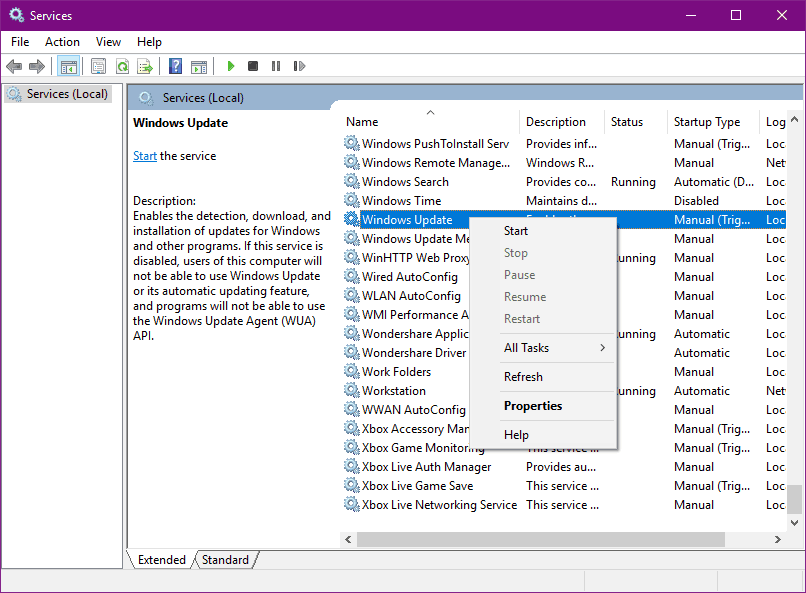
- On the General tab, find Startup type and choose Automatic.
- If the service is not running, right-click and choose Start.
- Confirm selection and close window.
Solution 8 – Make sure the BITS service is running
Background Intelligent Transfer Service (BITS) is an essential service for Updates. On some occasions, due to various reasons it can crash and stop working. What you need to do is restart the service and see if there is an improvement in the Update protocol. Here’s how:
- Press Windows key + R. In search line type services.mscand press Enter.
- Look for Background Intelligent Transfer Service (BITS) and double-click it to open its properties.
- If the service isn’t running, click the Start button.
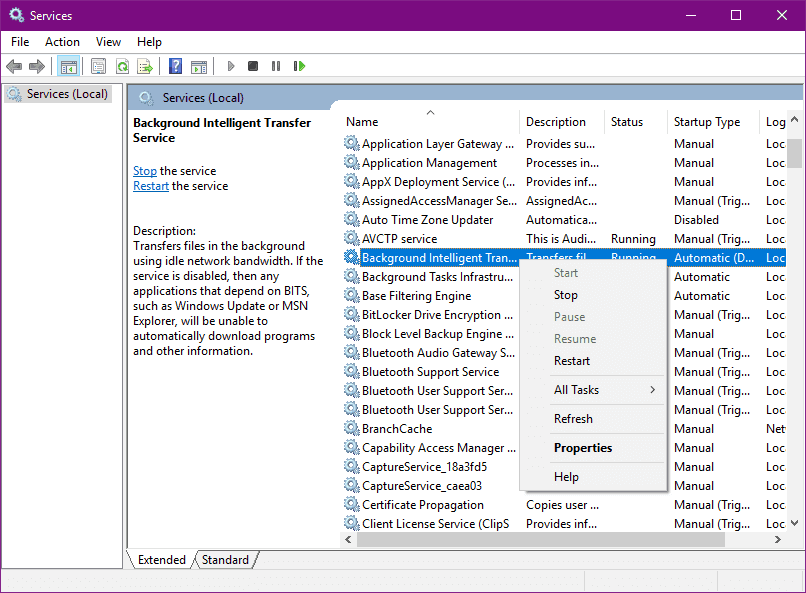
- Choose Recovery tab and make sure that First failure and Second failure are set to Restart service.
- Confirm selection and check for updates.
Solution 9 – Change DNS settings
If none of the previous workarounds resolve the problem, we’ll try and change the DNS settings. Here’s how to do that:
- Go to Windows Search, type control panel, and open Control Panel.
- Go to Network and Sharing Center, and click on Change adapter settings from the left pane.
- Choose the network you’re currently using, right-click it, and choose Properties.
- Scroll down to Internet protocol version 4 (TCP/IPv4), and choose Properties.
- Now, choose Use the following DNS Server addresses
- Enter the following values: DNS Server – 8.8.8.8 and Alternate DNS Server – 8.8.4.4
- Save changes, and restart your computer
Solution 10 – Perform a clean reinstallation
In the end, if everything falls short and you’re still looking at the error creeping on you from the screen, the clean reinstallation is a logical action. Luckily, is never been so easy to perform a clean reinstall like on Windows 10.
A detailed explanation can be found in this article. In addition, make sure to backup your data on the non-system partition and take good care of your license key.
With that, we think that you’ll have enough material to resolve this update issue. In case you need additional help or have an alternative solution, make sure to tell us in the comments section.
Read our disclosure page to find out how can you help Windows Report sustain the editorial team. Read more


Improve this guide


User forum
0 messages