Windows 11 Display Settings Not Working: How to Fix it
This problem is usually caused by file corruption on your PC
Key notes
- If display settings are not opening on Windows 11, you can try reregistering Windows apps.
- Creating a new user profile can often help with this error, so be sure to try it.

Some users reported that Windows 11 display settings are not working for them, and this can be a problem, especially if you need to adjust certain settings.
While this isn’t a serious problem, it can get quite tedious, but a couple of solutions can help you fix it.
Why won’t my display settings work?
Problems with the Settings app most likely cause this issue. Corrupted system files or corrupted user profiles can also contribute to this issue.
What can I do if the display settings are not working on Windows 11?
First of all:
- Make sure you have the latest updates installed. Certain applications, such as MacType, can interfere with the Settings app, so close them.
- You can also disconnect the second monitor, open Settings, and then connect the monitor again as a workaround.
- Alternatively, you can use your GPU control panel to configure your display.
1. Restart File Explorer
- Press Ctrl + Shift + Esc to open Task Manager.
- Next, locate Windows Explorer, right-click it, and choose Restart.
- The issue will be gone.
This is just a workaround, so you must repeat it if the issue reappears.
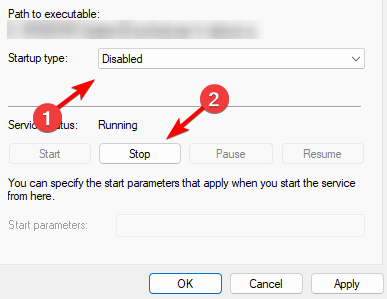
2. Disable the Print Spooler service
- Press Windows key + R and type services.msc.
- Locate the Print Spooler service and double-click it.
- Click the Stop button to stop the service and set Startup type to Disabled.
- Lastly, click on Apply and OK and check if that solves the problem.
3. Disable internal graphics
- Restart your PC.
- While it boots, keep pressing F2 or Del to enter BIOS.
- Next, navigate to Settings and set Internal graphics to Disabled.
- Save changes.
4. Reregister Windows apps
- Press Windows key + R to bring up Windows 11’s Run dialogue accessory, and input PowerShell.
- To open an elevated PowerShell app, press Ctrl + Shift + Enter.
- Then input the following commands and hit Enter:
Get-AppXPackage -AllUsers -Name windows.immersivecontrolpanel | Foreach {Add-AppxPackage -DisableDevelopmentMode -Register “$($_.InstallLocation)\AppXManifest.xml” -Verbose}
Get-AppXPackage|Foreach{Add-AppxPackage -DisableDevelopmentMode -Register "$($_.InstallLocation)\AppXManifest.xml"} - Close PowerShell when the command finishes reregistering apps.
- Press the Alt key + F4, and select Restart on the drop-down menu.
By performing this solution, you will reinstall the whole Windows Apps package and the problem should be over.
5. Start a new user account
- Press the Windows key + R combination to bring up Run’s dialogue box and enter this command in it:
control userpasswords2 - Click OK to open the User Accounts window.
- Select the Add option.
- Input an email address in the text box.
- Click the Sign in without a Microsoft account option and press Next.
- Select the Local account option.
- Fill out the required user account fields.
- Then press the Finish button.
- Select the added account in the User Accounts window and click the Properties button.
- Click the Group Membership tab.
- Select the Administrator radio button.
- Click Apply and OK to save the account settings.
- Press Alt + F4 to select Sign out. Then log into the new account to see if the issue remains there.
If that resolution works, migrate your user profile to the new account. Our guide on how to copy a profile includes full instructions for migrating a profile to a different account.
6. Perform an in-place upgrade
- Open this Windows 11 download page.
- Click the Download button for the Windows 11 ISO.
- Press your keyboard’s Windows + E keys to open File Explorer.
- Navigate to the directory that contains the downloaded ISO file.
- Double-click the Windows 11 ISO file to open it, then click the setup.exe file to bring up a Windows 11 Setup window.
- Select the Next option to go through the setup wizard and install the latest Windows 11 build.
7. Perform a Windows reset
- Press the Windows key + I to open the Settings app.
- Next, navigate to System and select Recovery.
- Click on the Reset PC button.
- Select Remove everything.
- Select Local reinstall. If that doesn’t work, you might have to use Cloud download.
- Click on Next and then Reset.
- Wait for the process to finish.
 NOTE
NOTE
Why I can’t adjust the display resolution in Windows 11?
This is most likely an issue caused by display drivers or file corruption. Luckily, we have a dedicated guide that explains what to do if Windows 11 can’t change the display resolution.
Those resolutions can help if Windows 11 display settings are not working, so be sure to try them.
As this problem is mainly caused by wrong app associations, you should also consult our guide on how to remove them in Windows 11.
You’re also welcome to chat about the ms-settings:display error in the comments area below. There you can add questions and even share other resolutions for the ms-settings:display error.
Read our disclosure page to find out how can you help Windows Report sustain the editorial team. Read more


User forum
0 messages