10 Best Mouse Settings for Improved Gaming on Windows 11
Before you start gaming, make sure you optimized your mouse
Key notes
- For those that really enjoy gaming, this guide has some quite useful tips.
- Make sure you optimized everything for a more immersive experience.
- For the best Windows 11 mouse optimization, please refer to the steps below.

There has been a lot of talk about Microsoft’s operating system, Windows 11, and gaming ever since the OS wasn’t even released.
Windows 11 has been constantly improved since it came out, and we can now call it a much more stable and reliable experience, even if we are talking about gaming.
Even Mac users can install Windows 11 on their devices and play a game of their choice after the Windows 11 gaming improvements coming with Parallels Desktop 18.
Also, if you are interested in playing Android Games on Windows 11, we can show you everything you need to know about it.
Whether you spent a bag on gaming peripherals for your PC, such as mechanical keyboards or sensitive gaming mice, tweaking the device’s settings can improve your overall experience.
And, since we’re talking about gaming, you will surely be interested in a good gaming browser, so check out the best choices.
Do Windows mouse settings affect games?
We’re going to say that yes, they do. Sensitivity or other mouse settings can thoughtfully contribute to your overall gaming experience.
Mouse acceleration, for example, was implemented to help people feel more in control over their cursor; however, it can seriously throw you off while gaming.
For FPS players, experts recommend playing these games using a sensitivity between 400 and 800 DPI.
Yes, optimizing your mouse for gaming can significantly enhance the experience, so keep that in mind next time you want to tweak your game.
Of course, if you purchased a professional gaming mouse, you can personalize it directly from the product interface.
Where are the mouse settings in Windows 11?
If you want to access your mouse’s Windows 11 system settings, all you have to do is press Win + I, select the Bluetooth & devices tab, and then select Mouse.

Also, under this section, you will find the Additional or Advanced Mouse Settings for Windows 11.
What are the best mouse settings for gaming?
1. Personalised DPI settings
If you are into gaming or spend time around gamers, one of the first things you observe is that everyone plays with different DPI settings,
Depending on how sensitive you want your mouse to be, adjusting the DPI setting to a value you are comfortable with is essential.
If you have a gaming mouse, you can change the DPI settings from the extra button on it.
How do I change mouse DPI in Settings on Windows 11?
- Press Win + I to access Settings.
- Select the Bluetooth & devices tab, then click on Mouse.

- Adjust Mouse pointer speed to your preference.

2. Disable mouse acceleration
- Press Win + I to access Settings.
- Select the Bluetooth & devices tab, then click on Mouse.
- Select Advanced mouse settings.

- Select the Pointer Options tab and disable the Enhance pointer precision option. Also, for maximum accuracy, it’s recommended that you set the Windows 11 mouse sensitivity at 6/11.

3. Always keep drivers up to date
- Search for Device Manager and open the app.

- Expand Mice and other pointing devices.

- Right-click on the mouse you are using and select Update driver.
This can also be done directly from the gaming mouse’s dedicated software, so we are showing you an alternative.
Outdated drivers are the most common reason for slow performance regarding your PC. Updating drivers by yourself can be difficult. Therefore, an automatic driver monitoring tool is a great option.
4. Boost your Polling Rate
Many gamers know that the Polling Rate is the speed at which your mouse communicates input to your gaming PC.
To help you understand, remember that the base polling rate with USB is usually 125Hz or once every 8 milliseconds.
That being said, most gaming mice typically include a 1000Hz polling rate, once per millisecond or 1000 times per second.
If you want to change the Polling Rate, you can do so directly from the mouse’s buttons, using keyboard shortcuts, or through the mouse’s dedicated software.
5. Disable Angle Snapping
Again, a fact not known by many non-hardcore gamers is that Angle Snapping is a feature that helps your mouse cursor in a straight line.
As you can imagine, that is not necessarily a good thing when we’re talking about gaming, so it can inconvenience you.
This, just as adjusting the Polling Rate, can be done using your mouse’s dedicated software, so keep that in mind.

6. Enable Game Mode
- Search for Game Mode Settings and open the app.

- Turn on Game mode.

7. Use specialized mouse software
As we said above, if you are into gaming, you are better off spending money on a gaming mouse to optimize your experience completely.
And, to get the most out of a gaming mouse, you need to download and install the corresponding software.
This way, you will have access to all the different features that the mouse comes equipped with, and you can tweak a lot more performance and visual options.
For example, if you are using a Razer gaming mouse, you will need to download the Razer Synapse to unlock the mouse’s full potential.
8. Always play games in fullscreen mode
You might now know this, but even the unimportant things can improve mouse responsiveness.
That said, after entering your favorite game, make sure you visit the Visual/Graphics settings page and make some tweaks.

For the best performance, make sure that you avoid using Windowed, or Borderless Window mode while gaming.
9. Enable Auto-HDR
It goes without saying that the HDR display is better than SDR, which means that a smoother gaming experience must be complete from all sides.
Visual quality means your mouse will move smoothly, without lag or stuttering so that you can enjoy your adventure.
If you need any help turning on Auto HDR in Windows 11, we can help you with that as well, so just relax and focus on gaming.
10. Use Raw Input
You surely know that many games nowadays have the option to turn raw mouse input on or off if you look into the settings. menu.
Typically, mouse movements are much more accurate when using raw mouse input, especially in first-person shooters.
This actually varies from game to game, but in some games with raw mouse input of the mouse, aiming will be very inconsistent, especially with higher DPI settings.
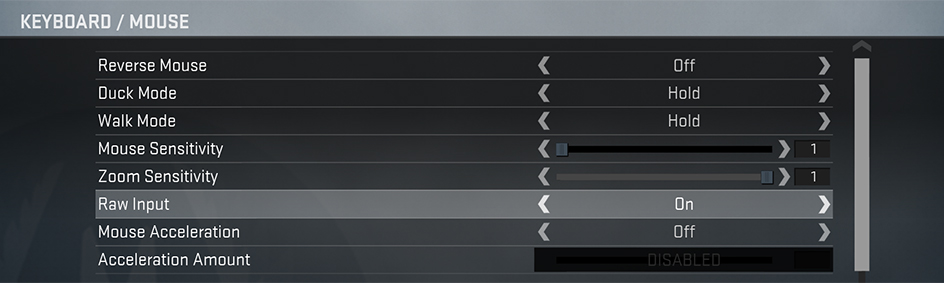
Furthermore, the raw setting takes mouse input directly from the mouse instead of from the operating system, which will change the input based on things like the cursor position on the desktop, which can limit the maximum turning speed and create inconsistent turning speed.
How do I make my mouse faster in Windows 11?
This can be done directly from the mouse’s dedicated software interface, where you can tweak a lot for your mouse.
Otherwise, like we’ve shown you above, press Win + I to bring up Settings, go to Bluetooth & devices, then click on the Mouse option and modify all you want.
Should I turn off mouse acceleration for gaming?
Yes, if you are really into gaming, we strongly recommend disabling this feature for an improved gaming experience.
This won’t make all the difference in the world, but there will be a huge difference in how you control your mouse while in-game.
How do I reduce the mouse polling rate in Windows 11?
You might look at this as farfetched, but that is how you do it. Unplug the mouse from your computer. Press the numerical buttons 4 + 5 on your keyboard, and plug in the mouse.
If your mouse is properly connected, the polling rate has switched to 125 Hz. Press the numerical button 4, and plug in the mouse if you want to switch the report rate to 500 Hz.
So, if you were wondering how do I make my mouse smoother in Windows 11, you now know what to do for the best results.
Leave a comment below if you found any useful tips in this article or maybe some advice for even better gaming optimization.
Read our disclosure page to find out how can you help Windows Report sustain the editorial team. Read more


Improve this guide


User forum
0 messages