How to Disable Show More Options on Windows 11 [2 Ways]
Key notes
- Even if the Windows 11 Show More Options menu builds a new Microsoft experience, some users want to disable it.
- If you want to turn off this feature, make sure you run our recommended command in Command Prompt.
- Keep in mind that you can easily revert File Explorer to the old look and get the design you’re more familiar with.
![Disable the Windows 11 Show More Options Menu [Quick Guide]](https://windowsreport.com/wp-content/uploads/2022/03/Show-more-options-on-Windows-11-1-886x590.jpg)
More and more people are experiencing the new and improved Microsoft operating system, but it seems like some of them still prefer the old school design.
There is no doubt that the new context menu brings up impressive consistency to Windows 11.
If we think about Windows 10, the fact that each application had its own context menu elements created a serious mess for some people.
From the Windows 11 transparent taskbar to round corners, this OS is a masterpiece. In this matter, worldwide users are interested in discovering how to quickly disable the Windows 11 Show More Options menu.
The process is pretty simple, so if you’re in the same boat, make sure you check this guide entirely because it is dedicated only to you!
How can I disable the Windows 11 Show More Options Menu?
1. Hit the Windows key to open the Start Menu.
2. Type cmd in the search box to search for Command Prompt.
3. Right click on the first result and select Run as Administrator.
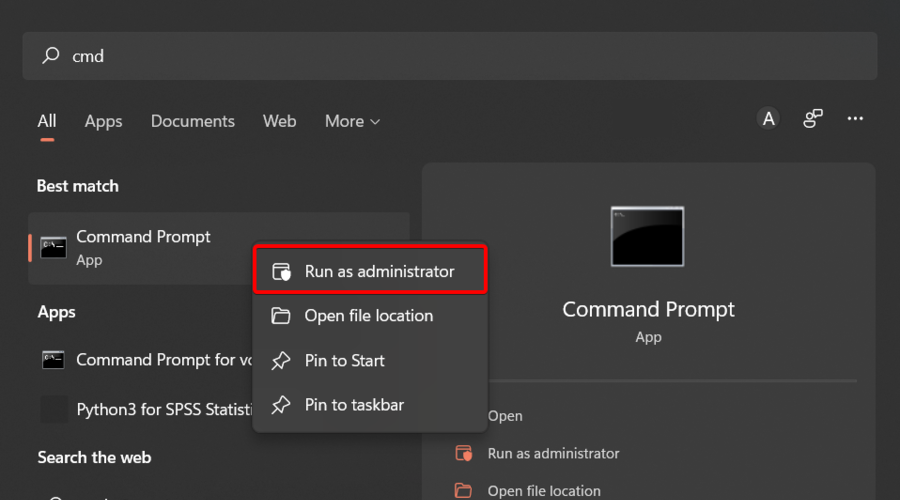
4. In the opened window, input the following command:
reg add HKCU\Software\Classes\CLSID\{86ca1aa0-34aa-4e8b-a509-50c905bae2a2}\InprocServer32 /ve /d "" /f5. Press Enter. Command Prompt will now execute your command.
6. Restart your PC.
Disable show more options using Command Prompt
Command Prompt is a very handy and helpful built-in app on your OS that helps you communicate with it. You can use cmd to disable the show more options menu on Windows 11 in just a few simple steps:
Revert File Explorer to the old look
- Use the following keyboard shortcut to open Windows 11 File Explorer: Windows + E.
- Click on the 3-dots menu at the top, then choose Options.

- Once you’re inside the Folder Options menu, navigate to the View tab.

- Now, scroll down through the options and check the box associated with Launch folder options in a separate process.

- Click Apply to save the changes, then on OK.
- Restart your PC for the changes to take effect.
So, these are the already tested methods you can try to disable the Windows 11 Show More Options menu. As you can see, both processes are pretty simple and don’t consume time.
Because it is always important to keep your system safe, we strongly recommend also checking the best security & privacy features in Windows 11.
Before you leave, don’t hesitate to check our guide on how to get back the old right-click menu in Windows 11.
Was this guide helpful for your situation? Make sure to share your experience by leaving a comment in the section below.
Read our disclosure page to find out how can you help Windows Report sustain the editorial team. Read more


Improve this guide


User forum
0 messages