How to Remove Windows 11 Unsupported Hardware Watermark
Corrupt system files is often the cause of this problem
Key notes
- Installing Windows 11 on a device that doesn’t meet the requirements can prompt the watermark.
- Reverting to the previous version can get rid of the watermark.
- In addition, you can remove the watermark from the registry.

Every version of the Windows OS has system requirements that determine the devices that can run them. So, you can encounter the Windows 11 unsupported hardware watermark if there’s a system requirement issue.
For instance, users can check Windows 11 space requirements before installing it on their PCs.
Why did I get Windows unsupported hardware watermark?
The Windows unsupported hardware watermark is a warning feature introduced to test and warn users that their hardware isn’t compatible with Windows 11. It indicates that the System requirements are not met by the device installing the new Operating System.
So, users don’t adhere to the requirements when they get the unsupported hardware watermark on their Windows PC.
Nevertheless, some users with devices that meet the requirements complain about the Windows 11 unsupported hardware watermark appearing. Hence, some factors that can cause this problem are:
- Corrupt system files – Having corrupt system files on your computer can cause numerous issues with how it works. It can affect many components of the PC, prompting errors like the Windows 11 unsupported hardware watermark.
- Windows update issues – Sometimes, users may experience problems after updating their Windows operating system if the update is not stable, or it was installed incorrectly. Also, not installing a credible version of Windows on your PC can be an issue.
Apart from the requirement issues that cause the Windows 11 unsupported hardware watermark, other factors may cause it. Fortunately, you can easily remove and fix the watermark on your computer.
How do I fix Windows unsupported hardware watermark?
Before trying any steps for fixing Windows unsupported hardware watermark, observe the following preliminary checks:
- Create a Restore Point on your computer in case of an accident.
- Make a system image backup for your PC.
- Restart Windows in Safe Mode and check if the watermark appears.
Proceed with the following steps if the issue persists:
1. Remove the unsupported hardware watermark via the Registry Editor
- Press Windows + R key to open the Run dialog box, and type Regedit to open Registry Editor.
- Navigate using this path and click Enter:
HKEY_CURRENT_USER - Double-click on the Control Panel, then click on UnsupportedHardwareNotificationCache.

- Right-click on the SV2, click on modify, change the DWORD value from 1 to 0, then click OK to save the changes.

- Close the Registry and restart your computer.
Changing the SV2 value should make the watermark disappear on your computer. However, if you don’t have the UnsupportedHardwareNotificationCache key in your Control Panel, you must create one.
Should you have issues accessing the Registry, then follow these fixes.
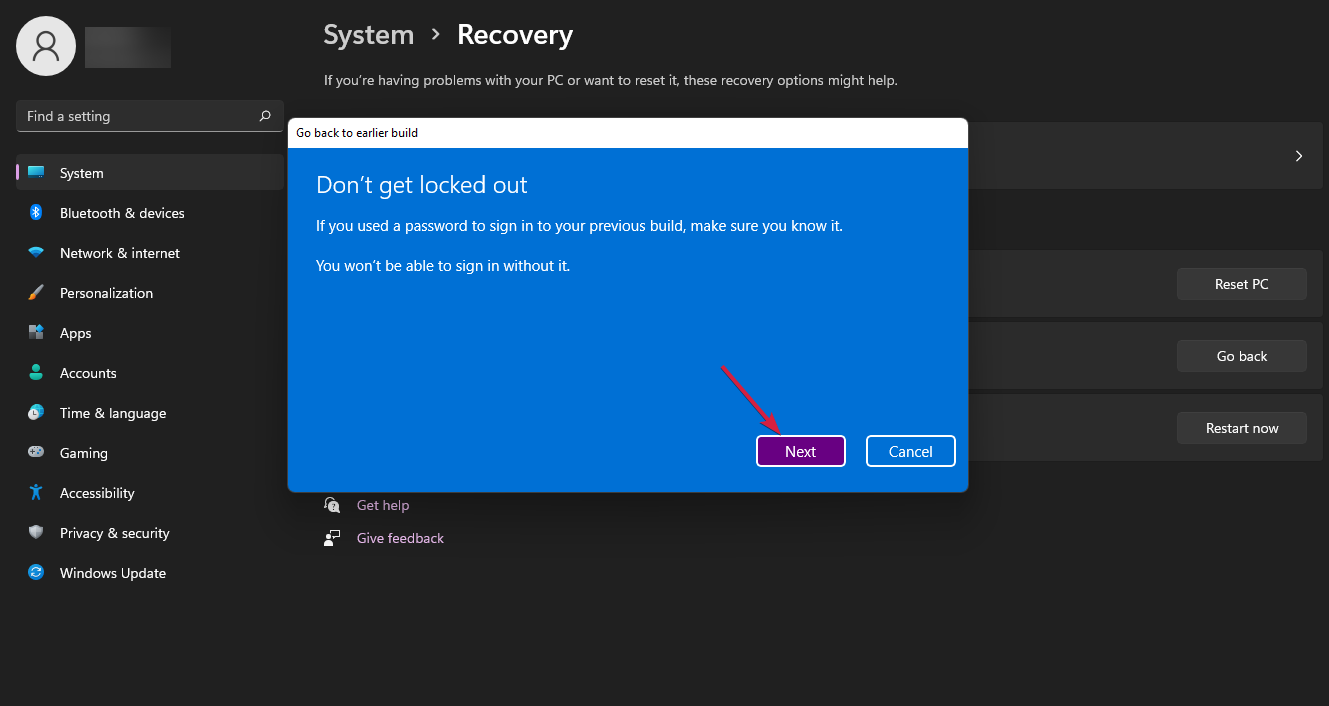
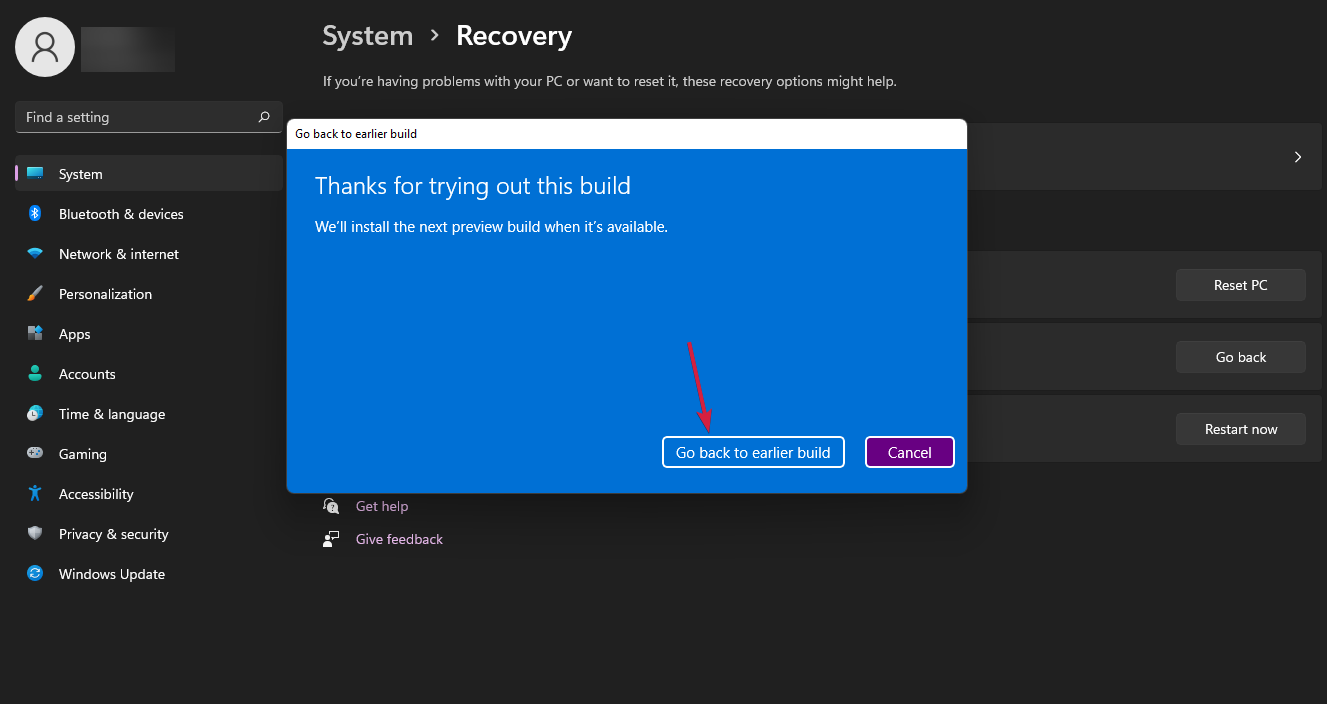
2. Rollback Windows 11 to the previous version
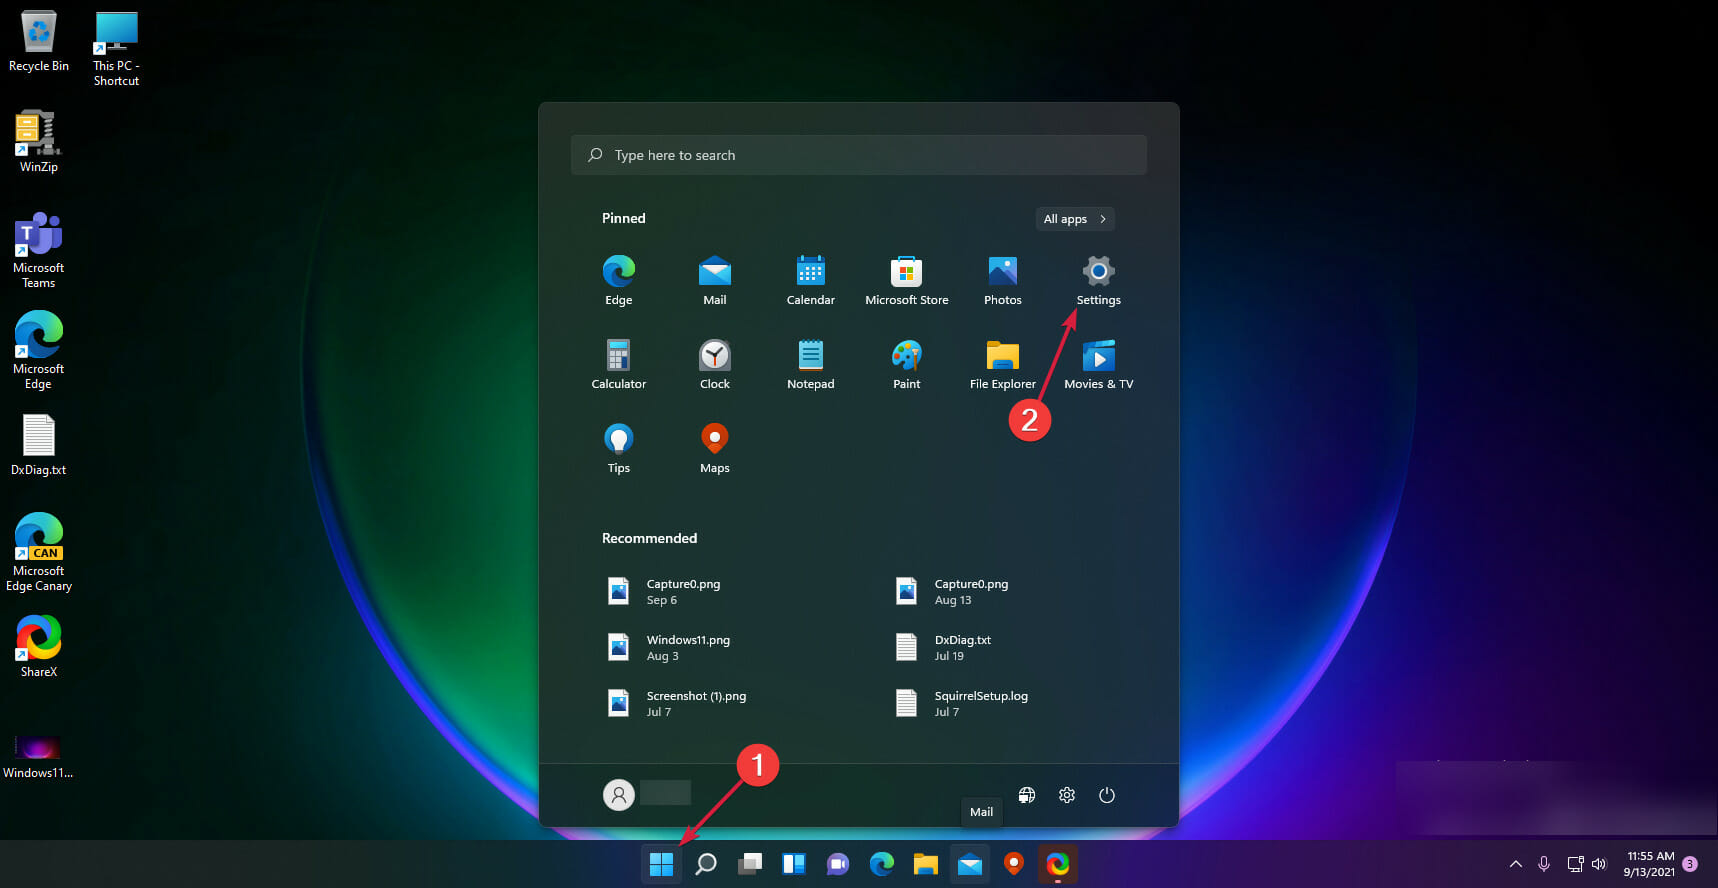
- Left-click on the Start button and open Settings.
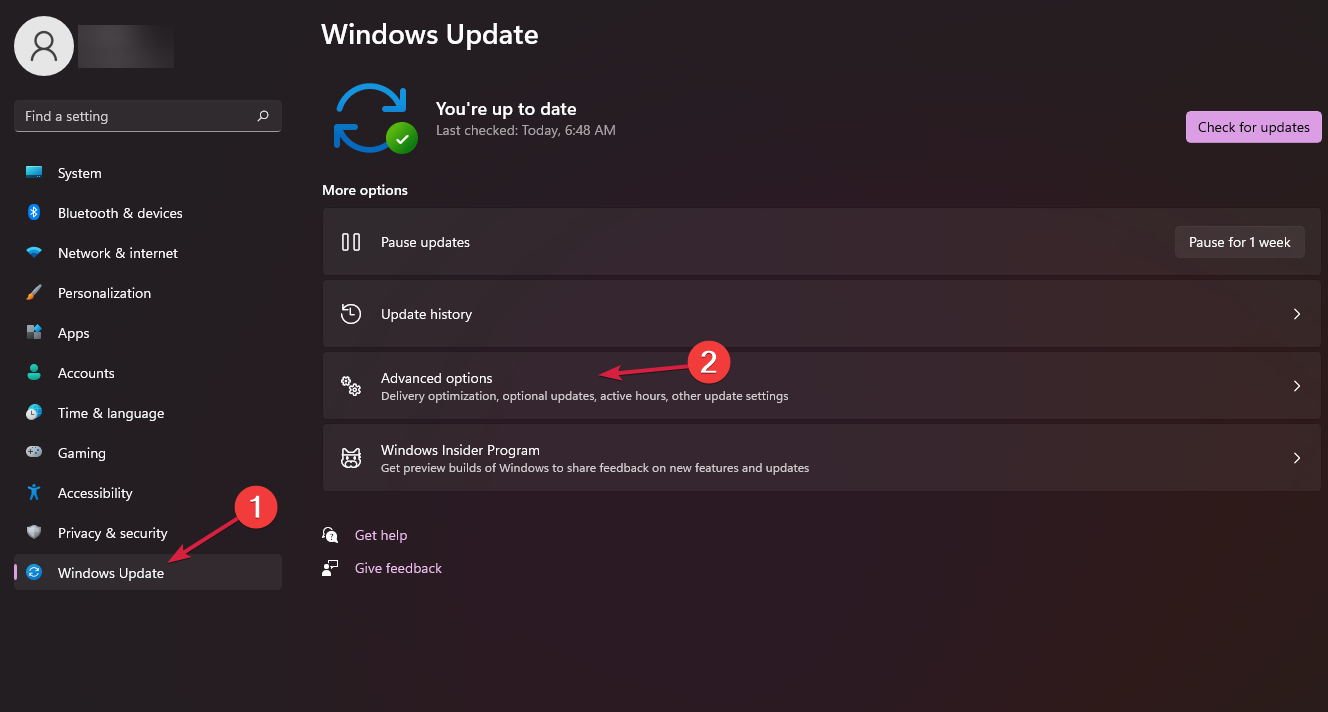
- Choose Windows Update, then click on Advanced options.

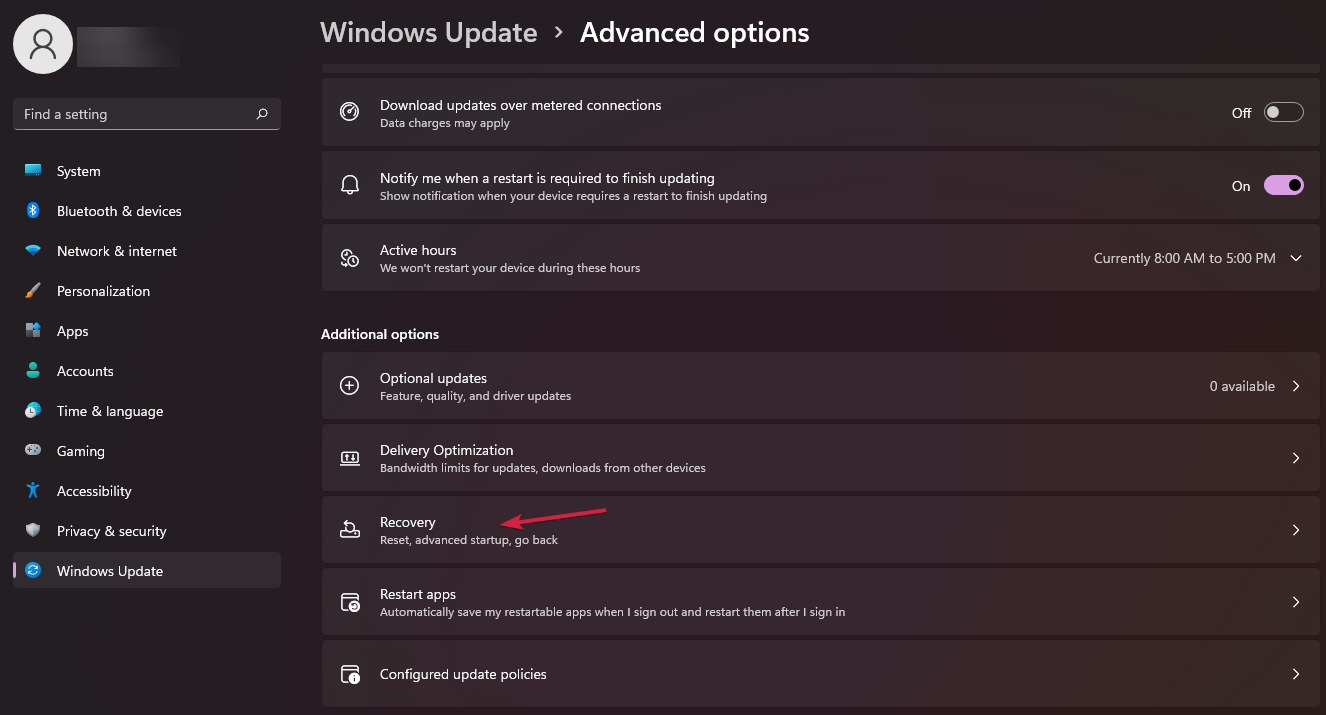
- Scroll down the list and choose Recovery.

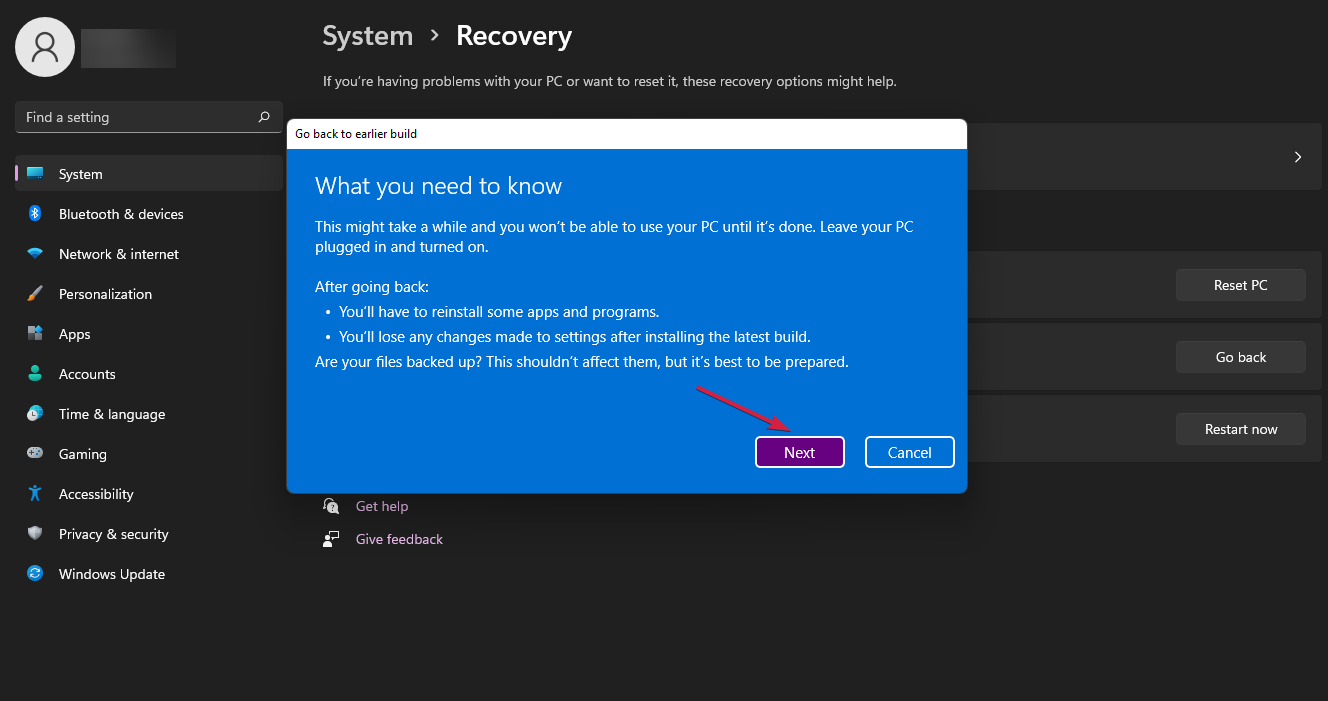
- Click on the Go Back button under the Recovery options menu.

- Microsoft will ask why you must go back to Windows 10. Choose an answer and then click Next.

- Select the No, thanks button.
- Click Next to confirm.
- Make sure you don’t forget your PIN and password because you’ll need them later. Click Next.
- Click the Go back to earlier build button.

For users who upgraded to Windows 11 from Windows 10, reverting to the previous version is another option to get rid of the watermarks.
Rolling back will allow you to use the supported Windows version for your PC. Nonetheless, you can read about fixing the rollback option missing on Windows 10/11 and revert to a supported Windows.
3. Use Windows 11 on an unsupported device
For users who’d love to stick with using Windows 11 on their unsupported devices they can try the following steps:
3.1 Disable Windows 11 Automatic Update
- Press Windows + R key to launch the Run dialog box and type services.msc, then click OK.
- Locate Windows Update, then click Stop.

- Click the drop-down button next to Startup type, select Disabled and click OK to save the option.

You can check our guide for more help disabling Windows automatic updates on your device.
3.2 Turn on Windows Firewall
- Left-click the Start button and type control panel, then open it.
- Select the Windows Defender Firewall option.

- Next, click on Turn Windows Defender Firewall on or off.

- Go to the Private network settings and Public network settings, then click the radio buttons for the Turn on Windows Defender Firewall option.

- Close the Control Panel and restart your computer.
Enabling the Windows Defender Firewall will help your device run Windows 11 without the risk of virus attacks.
Check for fixes if you can’t activate Windows Defender Firewall on your PC.
Alternatively, you can read about bypassing Windows 11 installation without TPM on your device.
If you have more questions or other queries, kindly drop them in the comments section.
Read our disclosure page to find out how can you help Windows Report sustain the editorial team. Read more


Improve this guide


User forum
0 messages