Fix: WSL Something Went Wrong: Please Restart (error)
Enabling certain features would fix the problem
8 min. read
Updated on
Read our disclosure page to find out how can you help Windows Report sustain the editorial team. Read more
Key notes
- Users may receive WslRegisterDistribution Failed errors with various error codes while installing or using WSL on Windows 11.
- The most common Windows 11 WSL errors include 0x80070032, 0x80370102, 0x8007023e, and 0x8007019e.
- There are various reasons for these problems, but the most common one is that you haven’t activated a critical functionality like a Virtual Machine Platform.

You have just encountered the error message WSL something went wrong. A WSL error in Windows 11 might occur for a variety of reasons. The exact message is WslRegisterDistribution Failed with different error codes.
The Windows Subsystem for Linux (WSL) is a function that allows developers and typical users to install and work with Linux on their Windows computers.
Even though this functionality is precious for developers, it can occasionally cause mind-boggling complications that are difficult to fix.
Fortunately, these errors aren’t impossible; in this post, we’ll discuss all possible causes and solutions.
Why is WSL not working?
There are a few reasons why WSL may not work. Among these include the following:
- Malware on the computer – Viruses may cause many PC problems and hinder WSL from working. We recommend using the best Windows 11 antivirus.
- Disabled service – If you are using WSL for the first time, there are chances that the WSL service is turned off on your device.
- Permission issues – You may have to fix file permission issues before using WSL on a Windows 11 device.
- Errors with the LxssManager – LxssManager controls distribution operations in the background. If it fails to start or is stuck in the process, you may get the 0x80070032 error.
The WSL error in Windows 11 includes a variety of codes and warnings, and the most prevalent are WslRegisterDistribution Failed with errors: 0x80070032, 0x80370102, 0x8007023e, and 0x8007019e.
Now that we’ve covered the causes and error codes, let’s go into the solutions.
How can I fix the WSL something went wrong error?
1. Fix WslRegisterDistribution Failed: 0x80070032 error
1.1 Scan your computer for malware
- Press Windows + I keys to open Settings.
- Click on Privacy & Security, then on the right pane, choose Windows Security.
- After that, click on Virus and threat protection.
- Next, select Scan options.
- Select Full Scan and then click on Scan now.
- Let the scan complete.
The first thing to do when getting a Windows 11 WSL error code 0x80070032 is to scan your system for malware.
Antivirus software from firms like ESET is also a good alternative due to their specialization in this field.
This anti-malware program ensures that your computer’s hard drive won’t be infected with any malicious software.
⇒ Get ESET
1.2 Enable WSL
- Press the Windows key, type Turn Windows features on or off, then click on the result to open it.
- Find Windows Subsystem for Linux and enable it.
- Click OK.
- Let it search and install the required system files, restart your computer and check if the problem is solved.
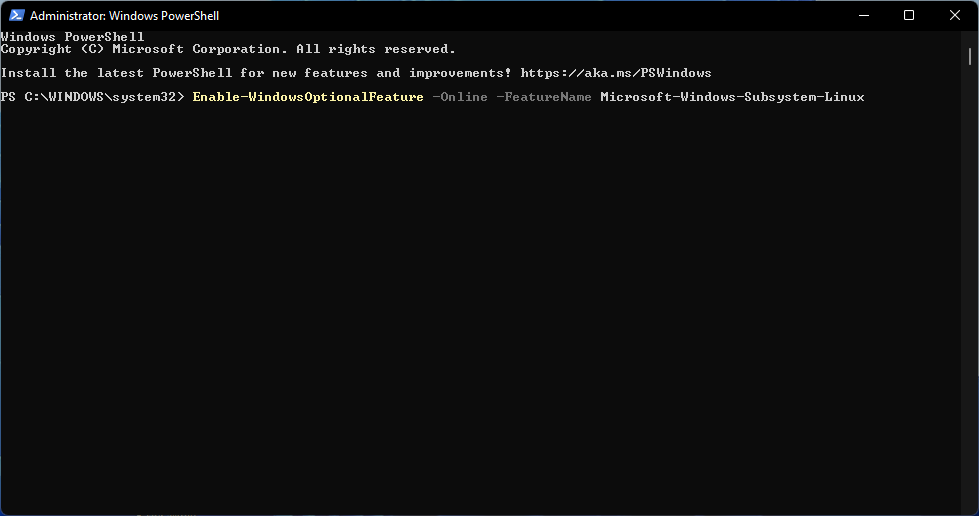
Alternatively, you can enable WSL using Windows PowerShell by following the steps below:
- Click on the Start menu, type Windows PowerShell, right-click on it and select Run as administrator.
- Copy and paste the following code:
Enable-WindowsOptionalFeature -Online -FeatureName Microsoft-Windows-Subsystem-Linux - If needed, type the following letter to reboot your system: Y.
1.3 Enable Virtual Machine
- Go to the Start menu and type Turn Windows Features on or off, then click on the result to open it.
- Find Virtual Machine Platform and enable it, then click OK.
The virtual machine installation is necessary for running WSL and is a good step if something goes wrong. If your system supports it, install it using Windows Features unless you encounter issues.
1.4 Fix file permission issue
- Press Windows + R keys to open the Run dialog box.
- Type %localappdata%\Packages\ and press Enter.
- Find the Distro folder, right-click on it, and select Properties.
- Go to the Security tab section, and click on the Advanced option.
- Check to see if your account is on the list or not. If your account is on the list, proceed to the following method; if not, delete and install WSL again.
1.5 Restart the LxssManager Service
- Press the Windows + R keys to open the Run.
- Type Services.msc and press Enter.
- Find LxssManager, right-click on it, and select Stop.
- Relaunch WSL and check if the error is disappeared or not.
1.6 Launch WSL from Microsoft Store
- Press the Windows key to open the Start menu, type Microsoft Store and press Enter.
- Select My Library from the app’s bottom left corner.
- Find the Linux distribution app, such as Ubuntu, then click Launch and check whether the problem is solved.
Sometimes Windows 11 WSL errors may happen because of a bug in your installed Linux distribution. To solve this issue, you can relaunch the WSL distribution app from the Microsoft Store.
2. Use a PC repair tool
It’s not uncommon for your computer to be the root of a problem, and it’s simple to fix using a third-party tool. These tools allow you to automatically scan for and replace any broken system files.
3. Fix WslRegisterDistribution Failed: 0x80040306 error on installation
- Press the Windows + R keys to open the Run dialog box, then type cmd.exe.
- Right-click on the title bar, and choose Properties.
- Uncheck Use legacy console and click OK.
4. Fix WslRegisterDistribution Failed: 0x80370102 error
4.1 Enable Hyper-V
- Press the Windows key to open the Start menu, type Turn Windows Features on or off, and press the Enter key.
- Find Hyper-V and enable it.
- Now, click OK.
- Restart your computer and check if the problem is solved or not.
If something goes wrong with WSL, you may only have to restart or enable Hyper-V.
4.2 Enable Hardware Virtualization
- Right-click on the Start menu and open Task Manager.
- Go to the Performance tab and check if Virtualization is enabled.
- If Virtualization is not enabled, restart your computer and hit the BIOS key as soon as the computer starts up to enter your PC BIOS option. For example, the BIOS key could be F1, F2, F10, F12, or DEL.
- Locate the CPU configuration section and enable Virtualization.
It would be best if you turned on the hardware Virtualization to use Hyper-V-powered WSL on your computer.
4.3. Turn on the Virtual Machine Platform (VMP)
- Go to the Start menu, type Turn Windows Features on or off, then hit Enter.
- Find Virtual Machine Platform and enable it, then click on OK.
- Wait for the installation to complete and restart your computer.
VMP is one of the necessary features that must be enabled to fix the Windows 11 WSL error code 0x80370102.
5. Fix WslRegisterDistribution Failed: 0x8007023e error
5.1 Disable and Enable the Linux Subsystem
- Click on the Start menu, type Turn Windows Features on or off, and then hit Enter.
- Uncheck Hyper-V, Windows Subsystem for Linux, Virtual Machine Platform, and Windows Hypervisor Platform, then select OK.
- Please restart your computer, then run Windows Features and enable them again.
If something goes wrong with WSL, the Linux Subsystem might only need re-enabled.
5.2 Reinstall Windows Subsystem for Linux (WSL)
- Press Windows + I keys to open Settings.
- On the left pane, select Apps, and then on the right pane, click on Apps & features.
- Find the Linux distribution (like Ubuntu) in the list, click on the three-dotted option and choose Uninstall.
- Allow the procedure to finish.
- After that, find Windows Subsystem for Linux in the list, click on the three-dotted menu and select Uninstall.
- Follow the steps mentioned in the previous method to disable WSL and Windows Hypervisor Platform in Windows Features.
- Restart your computer, then install WSL.
6. Fix WslRegisterDistribution Failed: 0x8007019e error
6.1 Update Linux using Terminal
- Go to the Start menu, type cmd, right-click Command Prompt, and select Run as administrator.
- Type the following commands in Command Prompt and hit Enter to update the Linux distribution application:
C:\> bash
$ sudo apt-get update
$ sudo apt-get dist-upgrade
$ <CTRL-D>
C:\> exit
6.2 Repair the Linux Terminal App
- Press Windows + I keys to open Settings.
- In the left pane, click Apps, then in the right pane, pick Apps & features.
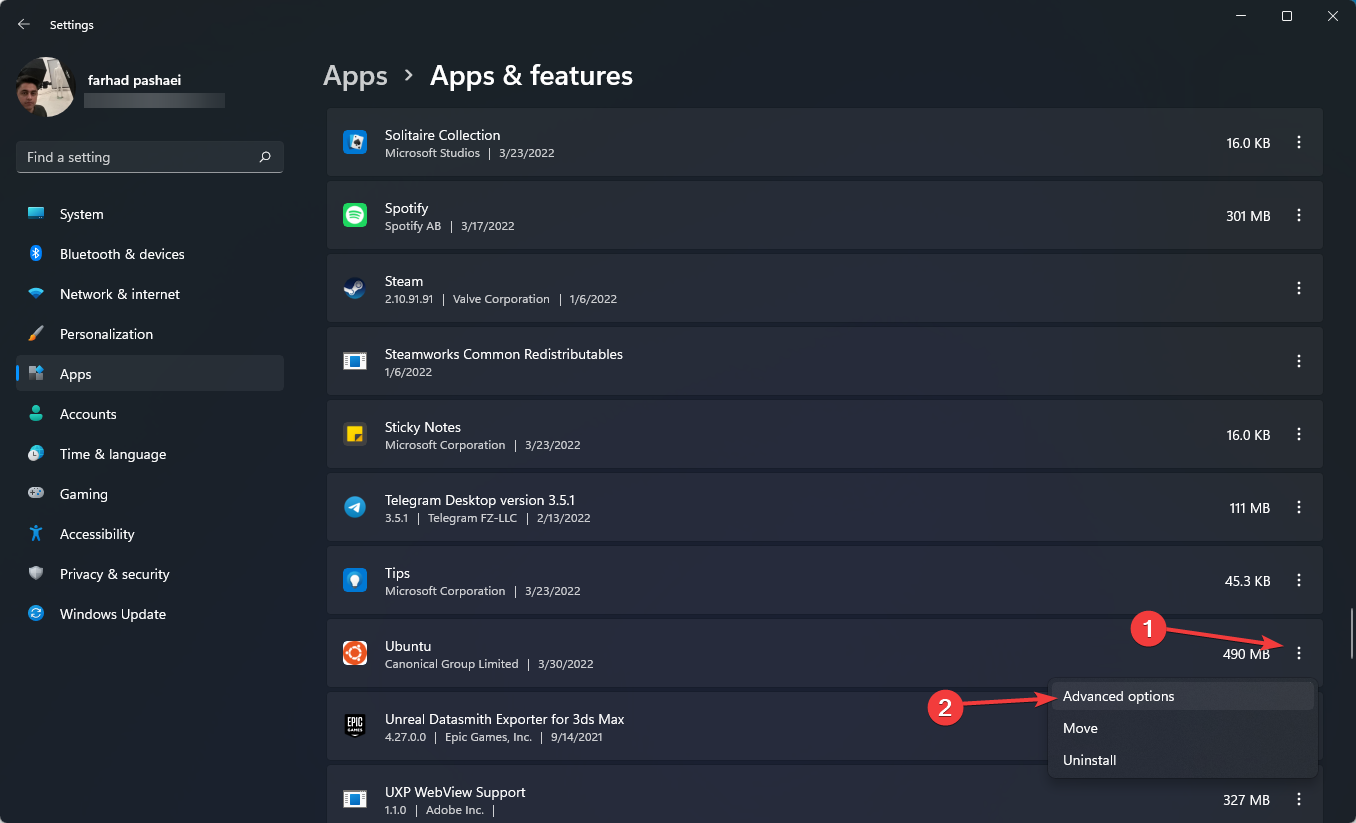
- Find a Linux Distribution Application such as Ubuntu, then click on the three-dot and select Advanced Options.
- Please scroll down the page to find the Repair option, then click on it.
Check to ensure the error has been fixed; if not, proceed to the next solution.
6.3. Reset the Linux Terminal App
- Press Windows + I keys to open Settings.
- In the left pane, click Apps, then in the right pane, pick Apps & features.
- Find a Linux Distribution Application such as Ubuntu, then click on the three-dot and select Advanced Options.
- Please scroll down the page to find the Reset option, then click on it.
WslRegisterDistribution failed with error 0x8007019e may occur because of a corrupt installation of the Linux application. You can repair or reset the Linux Distribution Application to solve the problem.
If something goes wrong with WSL, faulty or incomplete WSL installation and a problem with Windows or WSL settings might be the problem.
While there are many WSL-related issues on Windows 11, fixing them is usually as simple as reinstalling WSL or making sure you’ve activated the appropriate feature.
Make sure hardware Virtualization, and Virtual Machine Platform are enabled on your PC before diving into any sophisticated methods.
If you successfully overcame WSL errors on Windows 11, please tell us what the problem was and how you fixed it.


User forum
0 messages