Outlook Fix: Windows Security Keeps Asking for Password
Disabling the password protection will get rid of the Windows Security pop up
Key notes
- Windows 10 has better security features but lacks logic and user understanding in some areas.
- Most often, the Windows Security pop-ups often ask for credentials when connecting to Wi-Fi networks.
- Solutions to this issue include disabling password-protected sharing, changing Outlook settings, checking Credential Manager, and resetting network settings.

Security-wise, Windows 10 is probably the most secure Windows iteration to date. However, that enforced security something functions without any logic whatsoever.
And even if there’s any logic, they did a subpar job explaining why something happens when it does. Let’s take the Windows Security pop-up that blocks the connection to Wi-Fi networks and asks for your credentials.
To make things even worse, this is the password protection most users never set. Some associate it with Outlook but it doesn’t seem to be the case every time. Fortunately, there’s a solution to this issue.
Few of them, to be exact. So make sure to check them out below.
How to get rid of the Windows Security pop-up in Windows 10?
- Disable Password Protected Sharing
- Change Outlook settings
- Check Credential Manager
- Reset Network settings
1. Disable Password Protected Sharing
It might come as a surprise but there are multiple reasons for this unpleasant occurrence. One that’s common includes HomeGroup sharing. If you have multiple PCs connected via HomeGroup sharing, you’ll need to disable the password protection.
That’s a common bug that bothered users on Windows XP and it seems it found its place in Windows 10, as well. Here’s how to do it easily in Windows 10:
- In the Windows Search bar, type Advanced sharing and open ”Manage advanced sharing settings”.

- Expand All networks.
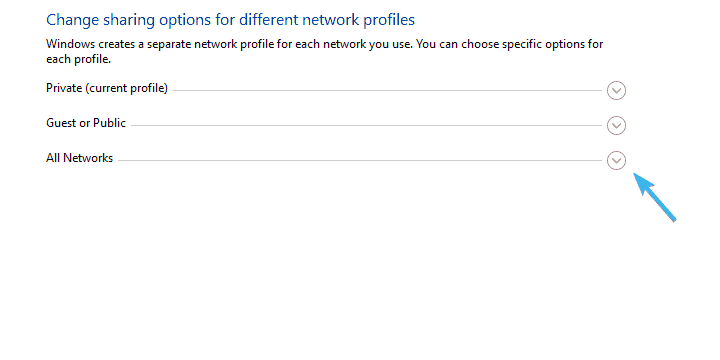
- Navigate to the bottom and select to Turn off password protected sharing.

- Save changes and exit.
2. Change Outlook settings
Outlook security settings are the most common reason for the Windows Security pop-up. Now, there are a lot of variations on the subject and various solutions roaming around. However, the most probable solution is hidden within Outlook’s Account settings.
Here’s what you need to do in order to disable repetitively occurring Windows Security prompts:
- Open Outlook.
- Open ”File” from the main menu.
- Choose Info and then Account Settings.
- Choose the E-mail tab.
- Right-click on the account that inflicts Windows Security prompt and select Change.
- Select More settings.
- Under the Security tab, uncheck the ”Always prompt for login credentials” box and confirm changes.
- Click OK and save changes.
On the other hand, if you’re still constantly annoyed by Windows Security pop-up asking to sign in with who-knows-what credentials, make sure to check the additional steps.
3. Check Credential Manager
Some users managed to resolve the issue at hand by deleting certain credential inputs from the Credential Manager. During the creation process of an Outlook account, you might have made a slight mistake.
It seems that it’s related to credentials check input, forcing the Windows Security pop-up to reoccur frequently. Follow these steps to delete Outlook-related inputs from the Credential Manager:
- In the Search bar, type Credential and open Credential Manager.

- Open Windows Credentials.
- Look at the Generic section for Outlook-related credentials.
- Expand everything associated with Outlook and click Remove.
- Restart your PC and look for changes.
If you need more info on how to add, delete, or edit files in Credential Manager, we’ve prepared a complete guide that will help you understand better what it does and how to navigate it.
4. Reset Network settings
Finally, you can try resetting network settings. For some users, the issues started after small Wi-Fi network issues, which are common for various reasons. It seems that resetting the network fixes relentless credential pop-ups.
If you’re not sure how to reset network settings in Windows 10, follow the steps below:
- Press Windows key + I to summon the Settings app.
- Open Network & Internet.

- Select Status from the left pane.

- Scroll to the bottom and click on Network Reset.

- Enter your Wi-Fi credentials and reconnect.
If Windows 10 forgets your network credentials, check out this simple guide to quickly solve the problem.
That should be it. We hope that at least one of the enlisted solutions helped you address the bothersome Windows Security prompt.
In case you have an alternative solution or questions regarding the ones we posted, make sure to tell us. You can do so in the comments section below.
RELATED STORIES YOU SHOULD CHECK OUT:
Read our disclosure page to find out how can you help Windows Report sustain the editorial team. Read more


Improve this guide


User forum
0 messages