Windows update standalone installer stuck searching [Fixed]
Key notes
- If you are trying to search for updates using the Windows update standalone installer, you may encounter a never-ending search for the update.
- The troubleshooter will scan the system and suggest appropriate fixes to resolve the issue.
- Before downloading the SSU, make sure you know your system’s OS version and the edition.
- Find more useful guides on the Windows 10 Errors troubleshooting hub.

If you are trying to search for updates using the Windows update standalone installer, you may encounter a never-ending search for the update. This can be caused by several reasons, and the issue has affected all the previous version of Windows including 7,8 and the latest Windows 10.
If you are facing a similar problem and the Windows update standalone installer is stuck at searching for update screen without any progress, here are a couple of fixes to resolve the same.
Fix Windows update standalone installer stuck at searching for updates
- Disable Automatic Updates (Windows 7/Windows 8)
- Update via WSUS Offline Updater (Windows 7 / 8)
- Run the Windows Update Troubleshooter (Windows 10)
- Download Most Recent SSU
- Download Most Recent KB
- Fix Windows File Corruption
1. Disable Automatic Updates (Windows 7/Windows 8)
If you are using Windows 7, try to disable automatic Windows updates and then try to run the standalone installer. Here is how to do it.
- Type window update in the search box.
- Select Windows Update under Programs.

- From the Control Panel, click on Change Settings.

- Click the drop-down menu under Important Updates and select “Never check for updates”.
- Click OK to apply the changes.
- Restart your computer and wait for the PC to boot normally. Run the standalone update installer and check for any improvements.
If you are still facing the same problem, do the following:
- Download KB4490628. Make sure you download the right version of the software depending on your OS edition and build. Run and install the SSU driver.
- Restart your PC.
- Go to Windows Update > Change Settings. Under Important Update, click the dropdown menu and select “Install updates automatically (recommended). Click OK to save the changes.
- Click on check for update and install any pending update.
- Also Read: Top 7 antivirus with data recovery for 2019
2. Update via WSUS Offline Updater (Windows 7 / 8)
Alternatively, you can also use WSUS Offline updater, a small open source software utility to download missing updates from the Microsoft server automatically.
- Begin with downloading WSUS Offline Updater. Make sure you download the most recent version of the tool from the page.
- Extract the wsusoffline.zip file.
- Run the UpdateGenerator.exe.

- Check “Verify downloaded updates “ and “Include C++ Runtime Libraries and .Net Frameworks” boxes.
- Click on Start to download the missing updates.
- Once the downloading of updates is over, close UpdateGenerator.exe.
- Go to the wsusoffline folder again, and open Client folder.

- Double-click on Updateinstaller.exe.
- Check “Update C++ Runtime Libraries” box and click Start.
Wsus Offline Installer will start installing all the pending updates downloaded in the last phase. The update installation may take a few minutes to a few hours.
3. Run the Windows Update Troubleshooter (Windows 10)
Microsoft allows you to download Windows Update troubleshooter. The troubleshooter scans the PCs for the update related problems and suggests solutions accordingly.
- Download Windows Update Troubleshooter.
- Run the Troubleshooter after the download is complete.

- Click on Next and follow the on-screen instructions in the wizard.
The troubleshooter will scan the system and suggest appropriate fixes to resolve the issue.
4. Download Most Recent SSU
If the troubleshooter failed to find and fix the problem, you can download and install the most recently SSU (Servicing Stack Update) from the Microsoft site.
Before downloading the SSU, make sure you know your system’s OS version and the edition. Here is how to determine whether you are using 32-bit or 64-bit Windows.
- Click on Start and open Settings.
- Go to System > About and System type.

- Now go to SSU download and under Method 2, click on Microsoft Update Catalog.
- Download either 32-bit or 64-bit SSU update.
- Run the Servicing Stack Update by double-clicking on it.
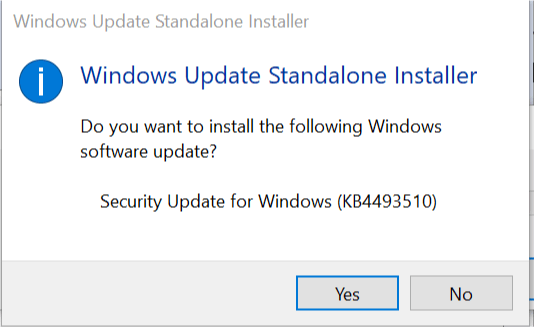
- If everything goes right, it will scan your PC for pending update and prompt you to install the pending update.
- Click Yes to proceed with the installation.
Restart your PC and again check for any pending update.
5. Download Most Recent KB
If installing the most recent SSU did not resolve the problem, try downloading the most recent KB from the official Microsoft source.
- First, check your Windows edition by going to Start > Settings > System > About and System Type.
- Next, go to the Update history page.

- Find the most recent KB for your version of Windows 10. Note down the KB number for the most recent KB.
- Now go to Microsoft Update site and search for the KB number from the above step.

- Download the most recent KB. After the download is complete, double-click on the KB to start the update.
6. Fix Windows File Corruption
If the issue still persists, you can run the System File Checker and Deployment Image Servicing and Management tool to fix the file corruption. Here is how to do it.
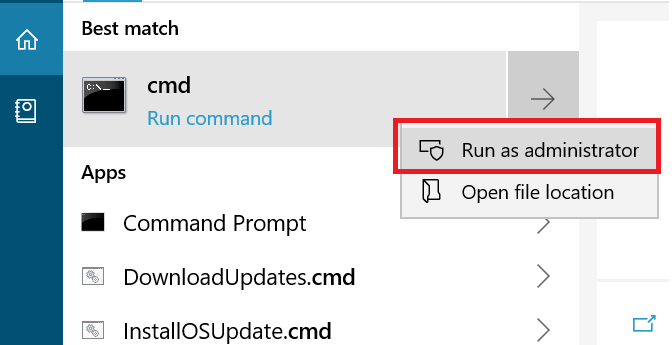
- Open Command Prompt as admin. To do this, type cmd in the search, right-click on Command Prompt and select Run as Administrator.
- In the Command Prompt type, the following command and hit enter:
DISM.exe /Online /Cleanup-image /Restorehealth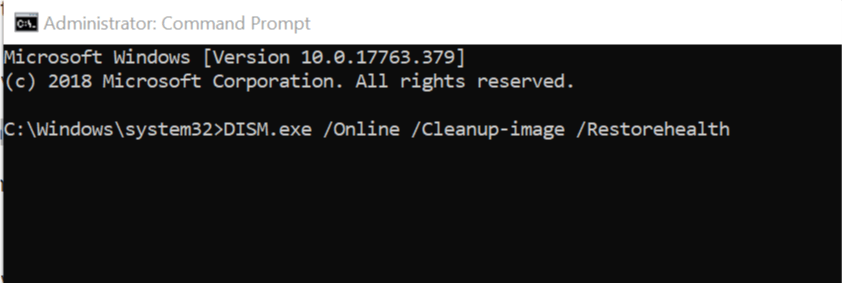
- Next, type this command and hit enter.
Sfc /scannow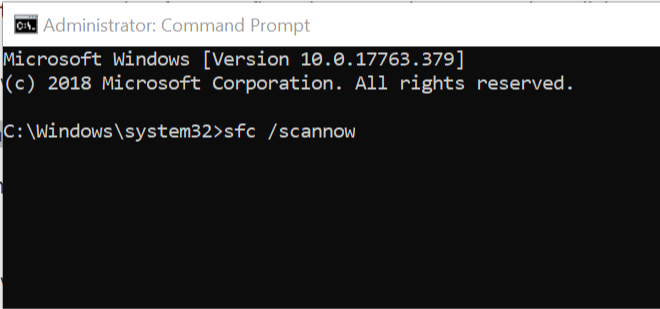
Note: The first and the second command may take several minutes to complete the operation.
Once done, close the command prompt and restart your system.
After the restart, try to run the Windows Standalone installer or check for Windows update and check for any improvements.
RELATED STORIES YOU MAY LIKE:
Read our disclosure page to find out how can you help Windows Report sustain the editorial team. Read more


Improve this guide


User forum
0 messages