Fix: Microsoft XPS Document writer missing/not working
By default, Microsoft is using two virtual print drivers: Microsoft Print to PDF and Microsoft XPS Document Writer. Now, based on these two drivers and on their functionality you will be able to customize the printing process right from your own Windows 10 system.
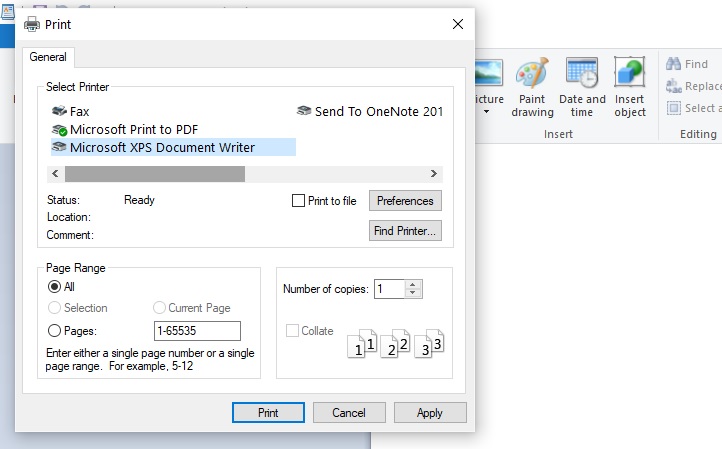
So, if, for example, the Microsoft XPS Document Writer is missing or it’s not working, you might not be able to print your docs and files and that might be a real problem.
Anyway, if you know that this virtual driver used to work without issues and that something recently went wrong, don’t panic. The troubleshooting steps from below should help you fix the Microsoft XPS Document Writer is missing or is not working problem.
6 ways to fix Microsoft XPS Document Writer missing / not working
- Solution 1 – Apply any pending Windows 10 updates.
- Solution 2 – Fix Windows 10 update problems.
- Solution 3 – Uninstall a recently applied system update.
- Solution 4 – Update printer drivers.
- Solution 5 – Manually reinstall Microsoft XPS Document Writer virtual driver.
- Solution 6 – Check for system malfunctions.
1. Apply the latest Windows 10 updates
You might have problems while trying to access and use Microsoft XPS Document Writer if your system is not running on the latest available update patch. So, first of all, make sure that there aren’t any pending updates waiting for your approval. You can check for updates and apply new system patches by following:
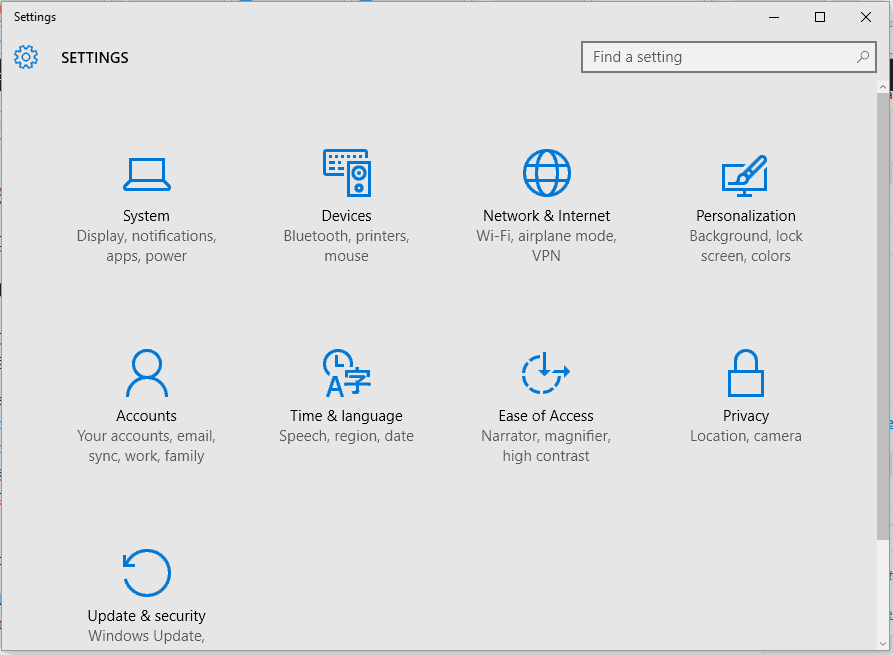
- Press the Win+I keyboard hotkeys.
- From the System Settings window click on the Update & Security entry – it’s the last one, located on the bottom of the main window.
- Next, from the left panel switch to the Windows update tab.

- If a Windows 10 update is available for your computer, it will be listed there in form of a system notification.
- So, if available, follow on-screen prompts and apply all the update files.
- Restart your system in the end and check the Microsoft XPS Document Writer functionality.
2. Fix Windows 10 update problems
If the problems appeared right after you installed a new Windows 10 update, you need to verify if problems occurred during the flashing process. So, in that matter, you have to run a dedicated troubleshooter. Don’t worry, you won’t have to use a third-party app or any other similar risky app, but an official program developed and offered by Microsoft.
Thus, go ahead and download the Microsoft update troubleshooter engine from this page – just run the executable file and follow on-screen prompts if that’s required (if problems are found everything should be automatically fixed).
3. Uninstall a recently applied update
If the official troubleshooter engine cannot repair your Windows 10 system, so if you still cannot use the Microsoft XPS Document Writer software, a better idea will be to uninstall the update package that caused the problem in the first case. Here is how you can complete this particular process:
- Press the Win+I keyboard hotkeys.
- From System Settings access Update & Security.
- Highlight the Windows update tap.
- Next, click on Advanced options and choose View your update history link.

- Now, you should see a list of updates that were recently applied on your computer.
- You can choose which patch to remove from your PC.
- Make sure you reboot your device in the end.
4. Update printer drivers
During certain updates or while a new app is installed, some of your drivers might require some attention. Shortly, you need to refresh the Microsoft XPS Document Writer drivers if problems are experienced – maybe the drivers just need to be updated, situation during which you will have to follow:
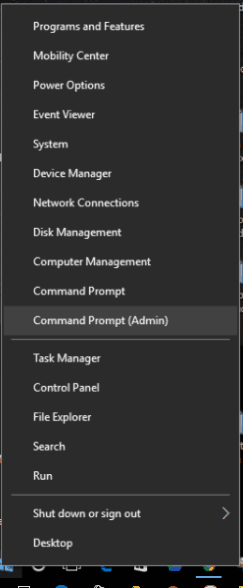
- Right-click on the Windows Start icon – located near the Cortana icon.
- From the list that will be displayed click on the Device Manager entry.

- From Device Manger extend the Print queues feature.
- Right click on the Microsoft XPS Document Writer field.
- Choose ‘update driver software’.
- Also, you can choose ‘scan for hardware changes’ for repairing possible problems.
- That’s it; the issues should be fixed now.
Alternatively, you can use a third-party tool that scans your system and installs the latest printer drivers for your PC with just a few clicks. PC HelpSoft Driver Updater works with all versions of Windows and makes updating drivers a breeze.
It is useful software for updating the necessary printer drivers on your PC. After installing the utility, you only need to scan your computer. It will detect outdated drivers and request your permission to update them.
The driver updater program is handy for automatically updating Windows drivers. Otherwise, doing it manually takes time and requires extensive knowledge of the drivers you’re looking for.
⇒ Get PC HelpSoft Driver Updater
5. Manually reinstall Microsoft XPS Document Writer virtual driver
In other situations, updating the virtual drivers might just not be enough. In those cases you will have to manually reinstall Microsoft XPS Document Writer:
- First, go to Device Manager as explained above.
- Extend Print queues and right-click on Microsoft XPS Document Writer.
- Select ‘uninstall’.
- Also, go to Control Panel (click on the Windows Search icon – the Cortana button – and enter Control Panel), switch to Category and under Hardware and Sound click on View devices and printers. Then, right-click on Microsoft XPS Document Writer and choose Remove device.
So, through the steps from above you managed to uninstall Microsoft XPS Document Writer from your computer; now, let’s see how you can reinstall it:
- Return to the Devices and Printers folder from Control Panel.
- From there click on Add a printer.
- When asked, select Add a local printer.
- Under Use an existing port choose PORTPROMPT.
- Also, fill out the next forms in this way: Manufacturer – Microsoft; Printers – Microsoft XPS Document Writer.
- Also pick ‘replace the current driver’ and under printer name enter Microsoft XPS Document Writer.
- The drivers should be now automatically installed.
- Thus, the Microsoft XPS Document Writer software should run smoothly now.
6. Check for system malfunctions
If the steps from above aren’t solving your problems you should check for system errors – if a process got corrupted or if similar malfunctions were caused due to different other reasons, you should scan your Windows 10 PC by using a built-in Microsoft feature. The scan process will look for problems and if something is detected the software will also try to automatically fix the issues; anyway, here is how this troubleshooting solution can be applied on your device:
- Right-click on the Windows Start icon.
- From the list that will be displayed click on the ‘Command Prompt (Admin)’ entry – that’s how you can open an elevated command prompt window.
- In the cmd window type sfc /scannow and press Enter.
- Wait while the system is scanned.
- Restart your computer in the end.
Conclusion:
The steps from above should solve the Microsoft XPS Document Writer is missing or isn’t working issues. Of course, if you are still experiencing the same problems, return here and try to describe the errors you receive in detail.
These details will help us better understand your Windows 10 problems and we can better assist you with similar tutorials like the already explained one. Let us know your thoughts on this matter in the comment area bellow.
Read our disclosure page to find out how can you help Windows Report sustain the editorial team. Read more


Improve this guide


User forum
1 messages