Fixed: Error Code 0x80070035 The Network Path was Not Found
Apply these effective solutions to fix the error 80070035 on your PC
Key notes
- The error code 0x80070035 usually occurs if your computer can’t find the path of a network that it’s connected to.
- Enabling SMB V1.0 may be the answer to quickly fixing Error code 0x80070035.

Internal networks should be simple to configure and use. Nonetheless, despite all advancements in the field, users are experiencing repeated connectivity issues.
There have been reports concerning the internal network related to the error code 0x80070035 and The network path was not found message.
How do I fix error code 0x80070035 in Windows 11?
1. Run the Windows Update Troubleshooter
- Open the Settings app from the Start button.

- Head over to Update & Security.

- Click on Troubleshoot.

- Select Additional troubleshooters.

- Locate Windows Update and click on Run the troubleshooter.

- Follow further instructions, and let the wizard finish the process.
- Restart your computer.
2. Disable third-party firewall
If you’re 100% sure that the internal network configuration works as intended but the error keeps reappearing, you should consider disabling the third-party firewall.
Some modern antivirus suits come with third-party firewalls. This extra layer of protection is more than welcomed, but nothing can guarantee that it won’t interfere with the internal network.
By disabling it, some users sorted out the error 0x80070035 for good. So, make sure to give it a try and look for yourself.
You can also consider changing your firewall to avoid these errors. Check out this list, including the best two-way firewalls for your PC.
3. Enable SMB V1.0
- Open the Start menu, type Windows Feature, and turn Windows features on or off.

- Locate SMB 1.0/CIFS File Sharing Support.

- Check the box and click OK.

4. Change the value for AllowInsecureGuestAuth
- Press the Windows + R keys to open the Run dialogue.
- Type regedit and click on OK.

- Navigate to:
Computer\HKEY_LOCAL_MACHINE\SYSTEM\CurrentControlSet\Services\LanmanWorkstation\Parameters
- Locate AllowInsecureGuestAuth.

- Right-click on it and select Modify.

- Change the value to 1 from 0.

- Click on OK.
5. Enable advanced sharing
- Go to your Local disk (C:), right-click on it, and select Properties.

- Click on the Sharing tab.

- Go to Advanced sharing.

- Check the box for Share this folder.

- Click on Apply, then OK to save changes.
It is common to encounter this error if the sharing property isn’t enabled. This is because for computers to be able to send and receive files and data, you need to make sure your device can share its folders.
6. Change Network Security settings
- Press Windows + R keys, type secpol.msc in the Run dialogue and click on OK.

- Select Local Policies from the left pane.

- Double-click on Security Options from the right pane.

- Locate Network security: LAN Manager authentication level and double click it.

- From the drop-down menu, choose Send LM & NTLM-use NTLMv2 session security if negotiated.

- Then click on Apply and OK to save the changes.
7. Enable Network Discovery
- Click the Start button, then type Control Panel and open it.

- Click on Network and Sharing Center.

- From the left pane, choose Change advanced sharing settings.

- Select Turn on network discovery.

- Reboot your system and check if the error is fixed.
8. Reinstall your PC’s Network adapters
- Right-click on the Start button and select Device Manager.

- Click on the View tab and select the Show hidden devices option.

- Locate and expand Network adapters.
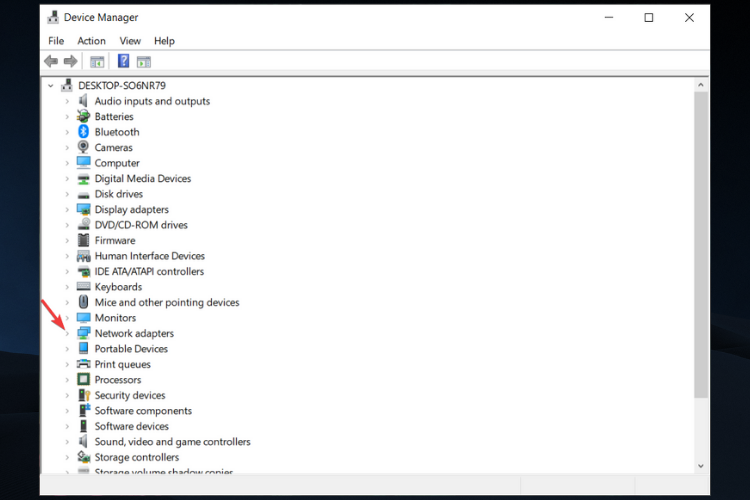
- Uninstall all the drivers by right-clicking on each one and selecting Uninstall Device.

- Reboot your PC and check if the error persists.
 NOTE
NOTE
9. Use the Local Group Policy Editor
9.1 Enable insecure guest logons
- Open the Start menu and type gpedit.msc to open the Local Group Policy Editor.

- Under Local Computer Policy, click on Computer Configuration.

- Double-click on Administrative Templates.

- Click on Network on the right side.

- Locate the Lanman Workstation and open it.

- Double click on Enable insecure guest logons.

- Select the Enabled option to allow insecure guest logons to an SMB server.

- Click on Apply, then on OK to save the settings.
Keep in mind that, when enabling this policy setting, the SMB client will allow insecure guest logons, which will let unauthenticated access to shared folders.
9.2. Disable the Microsoft Network client
- Open Local Computer Policy.
- Go to Computer Configuration, and this time choose Windows settings.

- Double-click on Security Settings.

- Open Local Policies.

- Go to Security Options and open it.

- Locate the Microsoft Network client: Digitally sign communications(always) option.

- Right-click on it, select Properties, and choose Disabled.

- Click Apply and then OK to save the settings and close the window.
10. Create a new Windows credential
- Click the Start button, then type Control Panel and open it.
- Select Credential Manager.

- Click on Windows Credentials.

- Remove all the credentials in the Windows Credential section and restart the system.
- After restarting, go back to the same page and click on Add a Windows credential.

- Now add the credentials manually.

- Click on OK to save the settings.
11. Check TCP/IP NetBIOS Helper service
- Open the Start menu, type Services, and open it.

- Navigate to TCP/IP NetBIOS Helper.

- Right-click on it and open Properties.

- Under the Startup type section, select Automatic and confirm changes.

- Restart your PC and look for changes.
For an internal network to function seamlessly, you’ll need to confirm that the TCP/IP NetBIOS Helper service is running in the background at all times.
This service should be enabled to run with the system permanently, but there are reports that it stops after critical system changes imposed by Windows Updates.
12. Enable NetBIOS
- Press Windows+ R to summon the Run dialogue.
- Type NCPA.CPL and press Enter.

- Right-click on your default network and open Properties.
- Go to Internet Protocol Version 4 (TCP/IPv4) and click on Properties below.

- Click on Advanced.

- Select the WINS tab.

- Click on Enable NetBIOS over TCP.

- Confirm changes by clicking OK.
Error code 0x80070035 often implies that the NetBIOS over TCP feature is disabled and by enabling it, you should be able to address the error permanently.
13. Reset Windows 10 Update components
- Open the Start menu, type Command Prompt and click on Run as administrator.

- Now, type in the following commands and press Enter after each one:
net stop wuauservnet stop cryptSvcnet stop bitsnet stop msiserver
- Next, we will rename the SoftwareDistribution and Catroot2 folders by typing the commands below in the Command Prompt. Make sure to press Enter after each command you type:
- Ren C:WindowssoftwareDistribution SoftwareDistribution.old
- Ren C:WindowsSystem32catroot2 Catroot2.old

- Restart the BITS, Cryptographic, MSI Installer, and Windows Update Services by executing the below commands:
net stop wuauservnet stop cryptSvcnet stop bitsnet stop msiserver
- Now, close the Command Prompt and restart your computer.
This workaround is resetting the Windows 10 update components. As the name says, this is an assemblage of parts that makes downloading and installing Windows updates possible.
So, if we reset these components, there’s a good chance we’ll resolve our update problem.
14. Run an SFC scan
- Open the Start menu, type Command Prompt and click on Run as Administrator.
- Type in the following command and press Enter:
sfc/scannow
- Wait for the process to finish, as it will take some time.
- Restart your computer.
15. Whitelist Windows Update servers
- Click the Start button, type Control Panel and open it.
- Select Network & Internet.

- Click on Internet Options.

- Head over to the Security tab.

- Select the Trusted Sites option from the Security window.

- Click on Sites.

- Uncheck the Require server verification (https:) for all sites in this zone feature.

- You will now have a box that says Add this website to the zone. Type in the following addresses: https://windowsupdate.microsoft.com and https://update.microsoft.com.

- Click the Add button after you type in the addresses above.

- Save the settings and restart your computer.
If you can’t install Windows updates, there’s also a chance your system blocks the Windows Update servers. So, make sure to whitelist them.
16. Run DISM
- Open Start menu, type Command Prompt, and click on Run as an administrator to open it.
- In the command line, copy-paste these lines one by one and press Enter after each:
DISM /online /Cleanup-Image / ScanHealth
DISM /Online /Cleanup-Image /RestoreHealth
- Wait until the procedure ends, as it might take up to 10 minutes.
- Restart your PC.
Since Deployment Image Servicing and Management (DISM) is a more powerful troubleshooter tool than SFC, there’s a high chance it will resolve the problem immediately.
What does error code 0x80070035 mean?
Usually, each error comes with a code and a message containing some details of the failure to identify what malfunctioned easily.
In this case, they pinpoint the network connectivity issues that arise when your device can’t find the trail of a connected network.
Even if this is an important detail, remember that the error can occur from different causes and locations within the operating system.
Because of this, it is tough for a person without technical knowledge or experience to fix the issue without help.
Why do I get the error code 0x80070035?
While there isn’t a precise answer to this question, for some users, simply changing the name of the computer they were trying to connect to into something shorter solved the issue.
Others say that corrupted registry entries resulted in this error and that fixing them also solved this problem.
Error code 0x80070035 may also be related to your antivirus or firewall settings, as the programs can block the resources and restrict Internet access.
While there can be a lot of causes for this message error, we have compiled a complete list of possible solutions to help you, so check them out below.
How do I restore the network path
The error code discussed above is connected to your network path. Hence, by using any of the solutions we have suggested in this article, you should be able to successfully restore your network path.
You should pick what seems the most appropriate solution for your specific case.
How can I avoid error code 0x80070035?
Being up-to-date with your OS’s updates and drivers is always a good place to start if you want to avoid any errors.
Always check for permission when trying to share files and data and disable any third-party apps that might stay in the way of that.
We recommend you use a troubleshooting tool as it’s friendlier, more efficient, and can help you deal with computer issues.
Don’t forget to verify if you have any network access problems and if the OS and the network services communications are enabled.
However, if you don’t want to go through all the trouble of setting up the PC and avoid dealing with any errors, we have another solution for you.
You should try a cloud storage service to share data known as Sync. It lets you send files of any size to anyone, and it’s up to you to choose from the available apps for Windows, Mac, iPhone, iPad, and Android.
So, there you have it. Even though encountering this error can be frustrating, these solutions will help you fix it in no time.
Make sure to bookmark this page in the unfortunate event you might need it again or to help someone in need if they ever find themselves dealing with this error.
Please find out more about Network locations, what they are, and how to use them in Windows 10. Doing so can also help you understand potential errors, see them faster in the future, and even prevent them.
If you have additional questions or suggestions, post them in the comments section below, and we’ll get back to you.
Read our disclosure page to find out how can you help Windows Report sustain the editorial team. Read more


Improve this guide


User forum
16 messages