Windows 11 Hotspot CMD: How To Set It Up Step-by-Step
![]() 8 min. read
8 min. read
![]() Published on
Published on
Share this article
Improve this guide
Read our disclosure page to find out how can you help Windows Report sustain the editorial team. Read more
Setting up a Windows 11 hotspot via CMD (the Command Prompt) is a great solution when you’re without a Wi-Fi router.
Just like your smartphone, your Windows 11 PC can easily create a Wi-Fi hotspot. It’s a simple process, especially if you’re comfortable using the Terminal or Command Prompt tools.
I’ve provided a step-by-step setup below and alternative methods, so let’s get started!
What Is Windows 11 Hotspot CMD?
Windows 11 Hotspot CMD is a simple method that allows you to create a Wi-Fi hotspot directly from your PC. You can use the command-line tool (CMD) to execute specific commands and create a hotspot with customized settings. It’s the built-in Windows Command Prompt or Windows PowerShell.
You might want to follow this method rather than the Windows Settings app for the following reasons:
- CMD offers granular control over your hotspot settings, allowing you to customize functions that might not be available through the GUI.
- You can create scripts to automate the hotspot creation process, allowing you to activate the feature even when you’re not around.
- CMD can provide more detailed information and troubleshooting options when you face problems with the Windows 11 mobile hotspot feature.
System Requirements for Hotspot
You can use this approach if the user account and PC meet the following conditions:
- Your Windows 11 PC must have a Wi-Fi adapter that supports the Hosted Network feature. This is typically a modern wireless adapter.
- You’ll also need to run CMD or Terminal as an administrator to create and manage the hotspot.
- The PC is running the latest driver for the Wi-FI adapter.
How To Configure Windows 11 Hotspot via CMD
Now, let me outline below the simple commands and steps you can follow to get started:
Check Hosted Network Support
In the first step, you’ll find out if your PC supports the Hosted Network feature by running a simple command in CMD.
- Click on the Start menu and type CMD.
- Select the Run as administrator option for Command Prompt.
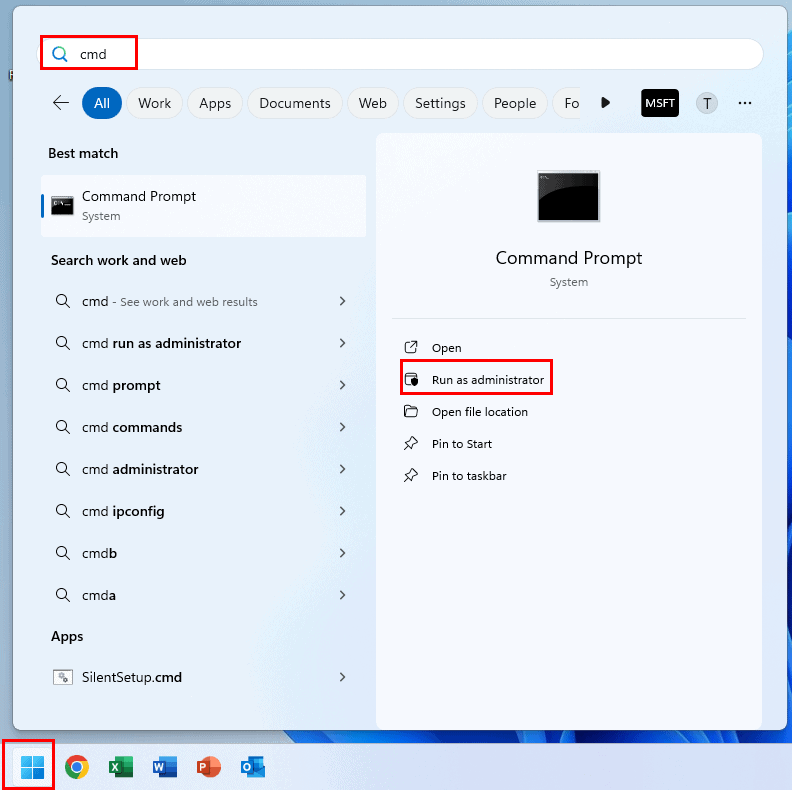
- The Windows 11 CMD will open in admin mode showing the following default address:
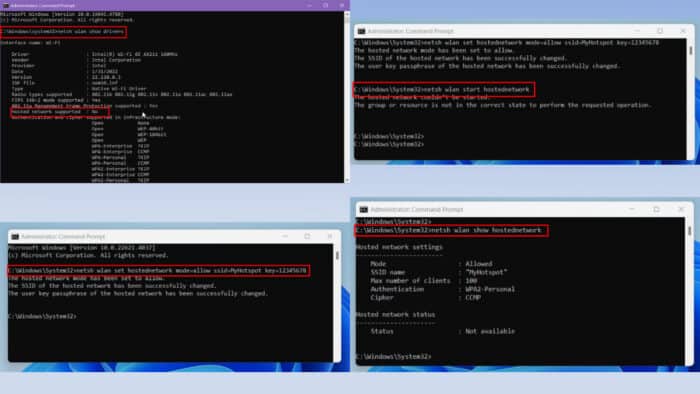
C:\Windows\System32>- Now, copy and paste this command inside the CMD and hit Enter:
netsh wlan show drivers- An elaborate report will show up in CMD.
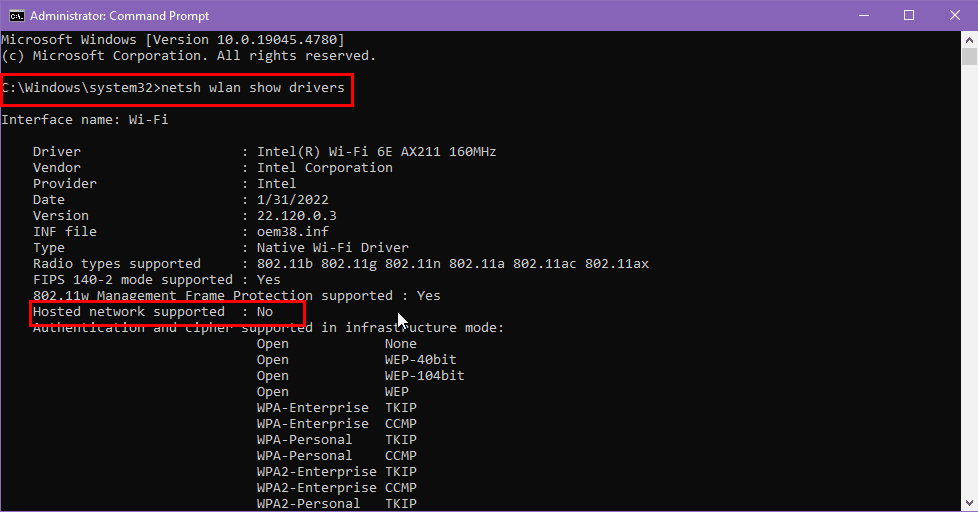
- Depending on the Wi-Fi adapter’s capabilities, you’ll get either Yes or No for the Hosted network supported parameter in the report.
- If you see Yes, move on to the next step.
- Contrarily, if you see No, get a Wi-Fi adapter that supports Hosted Network.
Enabling a Mobile Hotspot
Let’s consider that your PC’s Wi-Fi adapter has the necessary functionalities. Now, go back to the same CMD you opened earlier and enter the following command into it:
netsh wlan set hostednetwork mode=allow ssid=MyHotspot key=12345678In the above script, make changes in the following code parameters:
- ssid=MyHotspot: Replace
MyHotspotwith the network name you want to set for your device. - key=12345678: This is the hotspot network password parameter. Replace
12345678with your own passphrase.
Hit Enter to execute the code.
If the device’s Hosted Network feature is working, you’ll see the following results in the CMD console:
The hosted network mode has been set to allow.
The SSID of the hosted network has been successfully changed.
The user key passphrase of the hosted network has been successfully changed.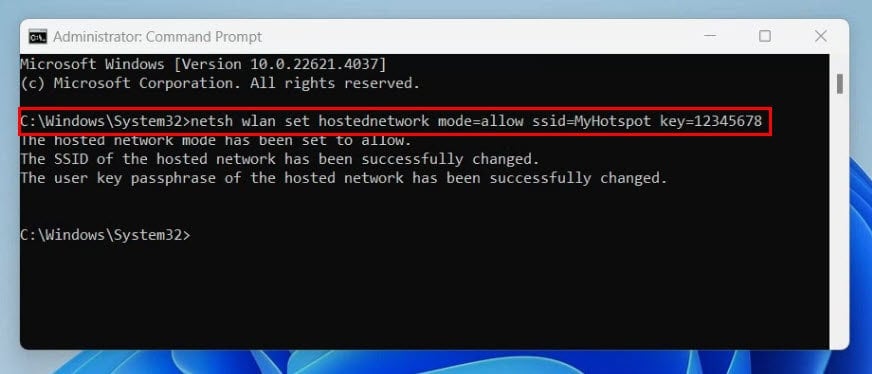
So far, you’ve configured the hotspot network name or SSID and the hotspot password.
Now, run the following command in the same CMD interface to activate the Windows 11 Mobile Hotspot feature.
netsh wlan start hostednetwork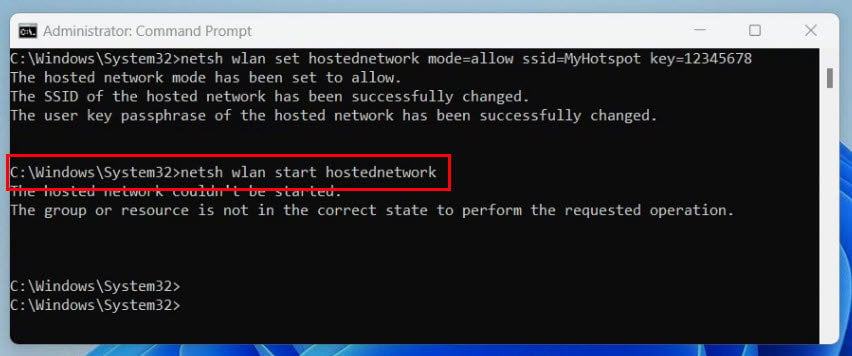
After successful execution, the CMD window will show the following values:
The hosted network started.This confirms that you’ve enabled Windows 11 hotspot CMD the right way.
Checking the Hotspot Status
You can check the status of the active Windows 11 Mobile Hotspot feature using a simple CMD command. Find below the script you must run:
netsh wlan show hostednetwork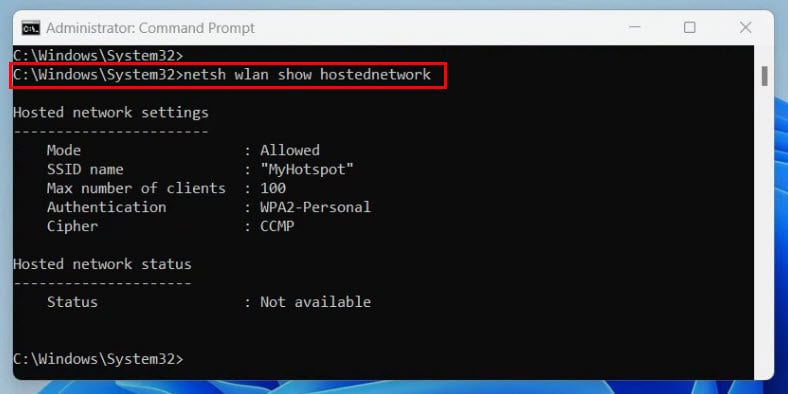
When the script runs successfully, you’ll get a report of the hotspot status in the following format:
Hosted network settings
-----------------------
    Mode                   : Allowed
    SSID name              : "MyHotspot"
    Max number of clients  : 100
    Authentication         : WPA2-Personal
    Cipher                 : CCMP

Hosted network status
---------------------
    Status                 : Started
    BSSID                  : xx:xx:xx:xx:xx:xx
    Radio type             : 802.11n
    Channel                : 11
    Number of clients      : 2
Here’s a quick rundown on this information to help you analyze the wireless network status:
- Mode: It says whether the device has allowed the Hosted Network.
- SSID name: This parameter shows the name of the Wi-Fi network. In this case, it’s MyHotspot.
- Status: When you see the
Startedmessage in theStatusparameter, the feature is active and your device is sharing its internet via Wi-Fi or Bluetooth. - BSSID: This is the MAC address of the virtual adapter of Windows 11 Mobile Hotspot.
- Number of clients: It indicates the number of active devices sharing the network. In the current exercise, it’s two devices.
Change the Hotspot Configuration
Here are various commands you can use to customize the hotspot settings:
Configure the Maximum Number of Clients
Type in the following command inside an administrator CMD terminal and hit Enter:
netsh wlan set hostednetwork mode=allow ssid=YourNetworkName key=YourPassword maxclients=NumberIn the above command, replace YourNetworkName with the SSID you need, YourPassword with a passphrase, and Number with a numeric value, like 10 for up to 10 devices.
If successful, you should see this output in the terminal:
The maximum number of clients has been successfully changed.Change the Authentication Method
The Windows 11 Mobile Hotspot feature uses an encrypted authentication system for enhanced security. If you wish to change the protocol, use the following script in CMD:
netsh wlan set hostednetwork mode=allow ssid=YourNetworkName key=YourPassword auth=WPA2-PersonalThe terminal will reply with the following message:
The authentication type has been successfully set to WPA2-Personal.Modify the Wireless Mode
Should you need to change the Wi-Fi or Bluetooth network sharing mode, use the following script to start Windows 11 Mobile Hotspot feature:
netsh wlan set hostednetwork mode=allow ssid=YourNetworkName key=YourPassword mode=nReplace WirelessMode with g for 802.11g mode or n for 802.11n mode.
You’ll get the following reply in the CMD if the activation is successful:
The radio type has been set to 802.11n.Reset Hosted Network Settings
If the wireless network is running slow or not accepting connection requests from a new device, you can refresh it. Here’s the command you can try:
netsh wlan refresh hostednetworkIf the process is successful, you’ll see the following message in the terminal:
Hosted network has been refreshed.Stopping the Mobile Hotspot
When you need to disable the Windows 11 Mobile Hotspot service, run the following script in CMD:
netsh wlan stop hostednetworkThe following output confirms that the service is now inactive:
The hosted network stopped.Setting up a Windows 11 Hotspot Using CMD Batchfile
Do you want to enable the hotspot feature on system startup? Follow these steps:
- Open a new Notepad file.
- Copy and paste the following scripts inside the Notepad file:
powershell -ExecutionPolicy Bypass "$connectionProfile = [Windows.Networking.Connectivity.NetworkInformation,Windows.Networking.Connectivity,ContentType=WindowsRuntime]::GetInternetConnectionProfile(); $tetheringManager = [Windows.Networking.NetworkOperators.NetworkOperatorTetheringManager,Windows.Networking.NetworkOperators,ContentType=WindowsRuntime]::CreateFromConnectionProfile($connectionProfile); $tetheringManager.StartTetheringAsync();"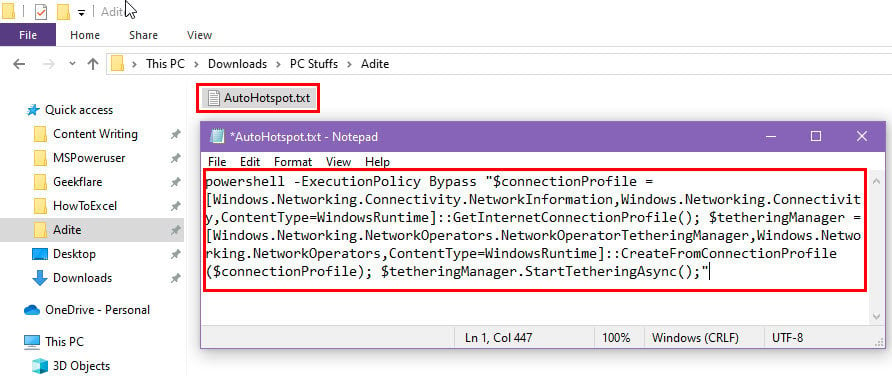
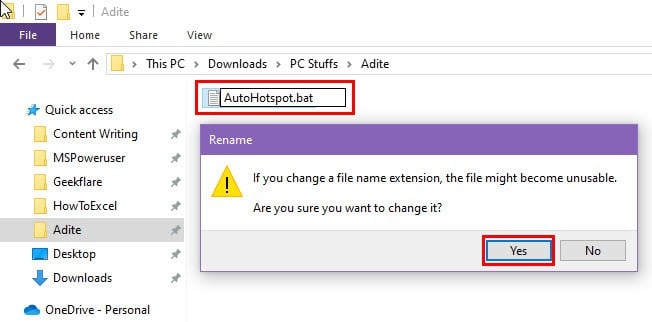
- Click the Save button of the File menu.
- Now close the file.
- Select the file, press F2, and change the extension to .BAT.
- Click anywhere else on the screen to save the Notepad file as a batch script file.
- Press the Windows and R keys together to launch the Run command.
- Inside the Open field, enter the following command and hit Enter:
shell:startup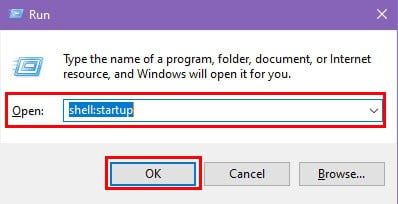
- The Startup folder will open.
- Copy and paste the batch file inside this directory.
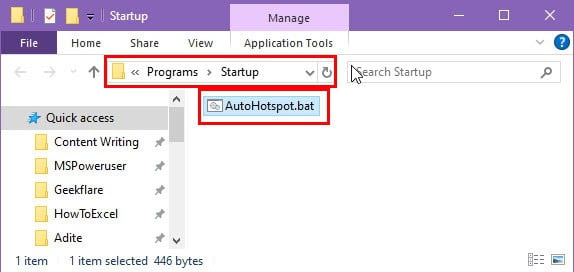
- Now, reboot the PC and notice that the Windows 11 Mobile Hotspot feature activates on system restart or power on.
Alternatives to Windows 11 Hotspot CMD
If you face any issues in launching a Command Prompt terminal as an administrator, follow these steps to enable the hotspot:
- Go to the Settings app by pressing the Windows + I keys together.
- Click on the Network & internet menu in the navigation panel on the left side.
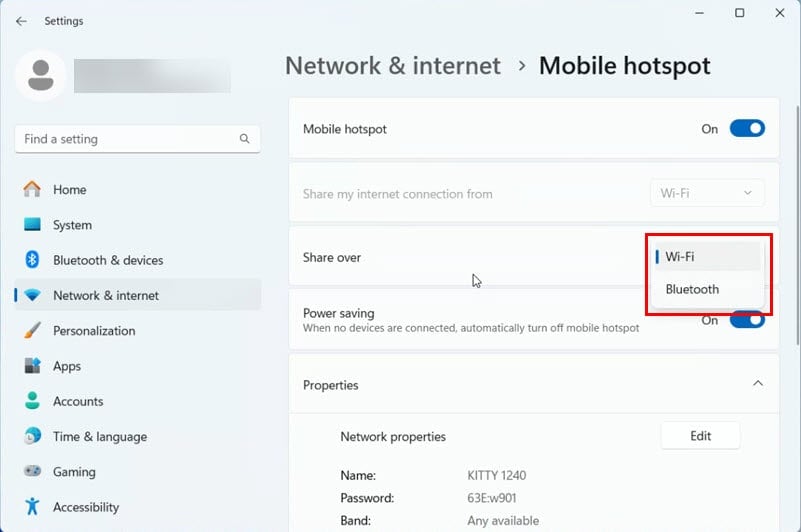
- On the right side menu, click on the Mobile hotspot option.
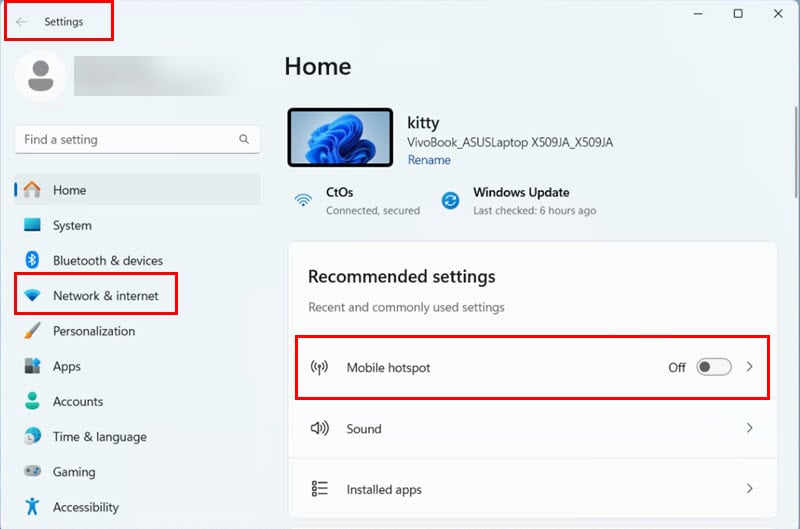
- Click on the toggle button to activate the service.
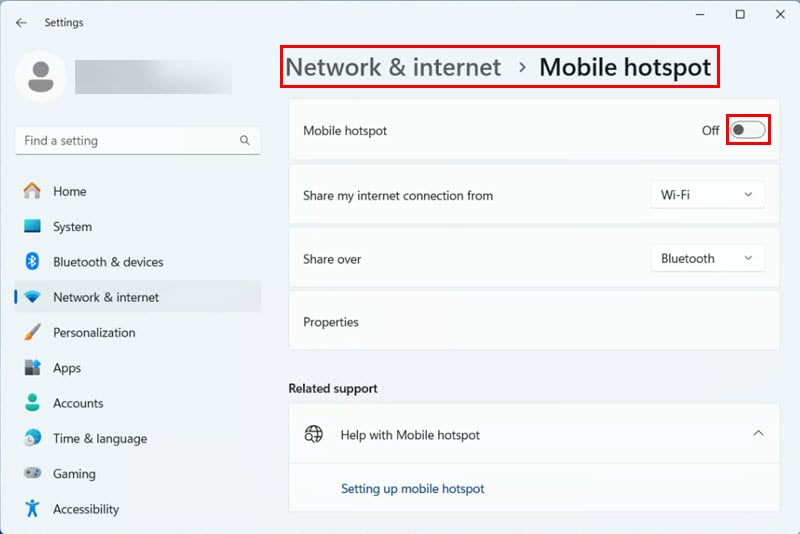
- To switch to Bluetooth from Wi-Fi or vice versa, click on Share over and select the transmitter you need.
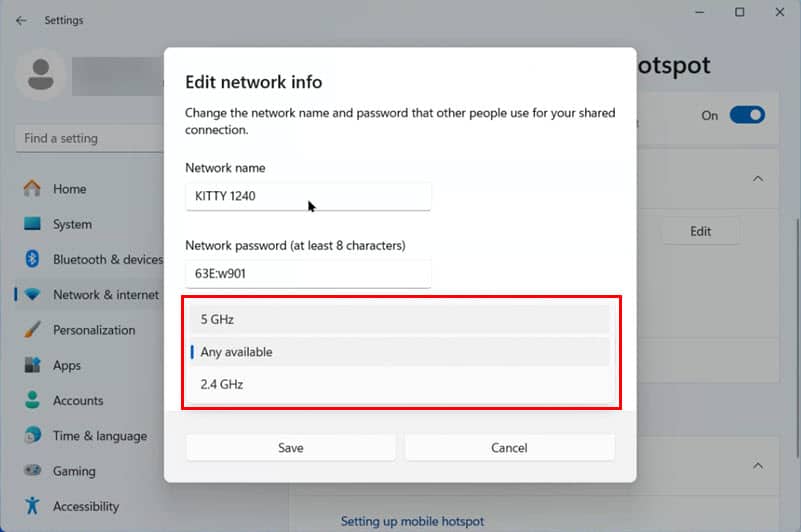
- If you’re using the Wi-Fi radio for a mobile hotspot, click Edit below the Properties section.
- Change the Network band to 2.4 GHz or 5.0 GHz, as needed.
- Click Save to implement the Network band modification.
Summary
Now you can activate a shareable wireless network using the Windows 11 Hotspot CMD feature.
Here, you’ve also learned how to configure this function from a granular level using various commands.
If the article helped you or you know any better methods, feel free to comment below.


User forum
0 messages