Yellow Screen of Death in Windows 10: Here’s how to solve it
8 min. read
Updated on
Read our disclosure page to find out how can you help Windows Report sustain the editorial team. Read more
Key notes
- You may be familiar with the Blue Screen or Black Screen of Death errors, but when you hear other colors, it changes everything.
- Be careful when changing BIOS settings as the BIOS interface is designed for advanced computer users because you may change a setting that may prevent your computer from booting properly.
- Choose the operating system you want to repair (in this case Windows 10) > Click Next on the Choose an option screen.

You may be familiar with the Blue Screen or Black Screen of Death errors, but when you hear other colors, it changes everything.
Apparently, there are other colors, though not so common, but computer users have experienced the purple, brown, yellow, red, and even green screen of death.
The main reason for such errors is malfunctioning or corrupted hardware drivers on your computer system.
And this color coding simply helps when you get the issue and the tech support at Microsoft can help you resolve it as they understand how deep an issue each one carries.
This article is about the Yellow Screen of Death, which occurs when an ASP.NET web application encounters a problem and eventually crashes.
ASP.NET is an open-source web application framework used in Windows OS for web development to build dynamic web pages.
So what happens when you get the yellow screen of death in Windows 10? We’ve got some troubleshooting tips for this PC error!
How do I fix the Yellow Screen of Death issue in Windows 10?
- Uninstall and reinstall the graphics card driver
- Update your drivers
- Boot in Safe Mode
- Perform a clean boot
- Perform an Automatic Repair
1. Uninstall and reinstall the graphics card driver
- Right-click Start.
- Select Control Panel.
- Go to Programs.
- Click Uninstall a program.
- Right-click the graphics card driver you’re using and select Uninstall.
- Confirm that you wish to continue with the uninstall.
- A prompt will appear asking if you want to delete all saved profiles. Clicking Yes will delete all its software and saved profiles. Clicking No will remove its software but the profile files are saved on your hard disk.
- Once driver files have uninstalled, restart your computer to complete the uninstallation.
- Turn on your computer and reinstall your graphics card driver.
Outdated drivers can cause a variety of issues and are the very first thing to check when experiencing the Yellow Screen of Death issue.
However, do note that driver files should be uninstalled before you update to newer drivers, or when removing an older graphics card and replacing it with a new one.
Just use the steps detailed above in order to uninstall the graphics card from your system.
Moreover, other outdated drivers can cause this problem as well and there’s no secret that updating drivers manually can be a long and tedious process.
Therefore, you might want to use a tool that will easily update all your drivers for you. Just download Outbyte Driver Updater to do it automatically.
As confirmed by users worldwide, Outbyte Driver Updater will help you avoid any kind of damage to your PC by downloading and installing the wrong driver versions.
2. Update your drivers
Update drivers from Device Manager
- Right-click Start.
- Select Device Manager.

- Click Display adapters to expand it.

- Right-click on the graphics card driver.
- Select Update driver software.

If you don’t have any driver updates available, right-click on the graphics card driver and click Uninstall, then restart your computer.
Update drivers from Windows Update
Update drivers from the manufacturer’s website
- Right-click Start.

- Select Device Manager.

- Expand the Sound, Video and game controllers option.

- Right-click on the name of the graphics card.
- Click Update driver software.

- Restart your computer.
Go to your graphics card manufacturer’s website, check for the latest Windows 10 drivers available and then install it based on the instructions on the website.
Besides, you can as well update your drivers using a specialized driver update program aforementioned in the first solution.
3. Boot in Safe Mode
- Click on the Start button.
- Select Settings.
- Click Update & Security.
- Select Recovery from the left pane.

- Go to Advanced startup.

- Click Restart now.
- Select Troubleshoot from the choose an option screen.

- Click Advanced options.

- Go to Startup Settings and click Restart.

- Once your computer restarts, a list of options will come up.
- Choose 4 or F4 to start your computer in Safe Mode.
Safe mode starts up your computer with limited files and drivers but Windows will still run. To know whether you’re on Safe mode, you’ll see the words at the corners of your screen.
If the issue of the Shift key, not working persists, check whether it occurs while your computer is in Safe mode. Follow the above steps to start your computer in Safe Mode.
A quicker way to get into Safe Mode is to restart your computer then do the following:
- From the Choose an option screen, select Troubleshoot > Advanced options > Startup Settings > Restart.
- Once your computer restarts, a list of options will come up.
- Choose 4 or F4 to start your computer in Safe Mode.
If the issue isn’t there while in Safe mode, then your default settings and basic drivers are not contributing to the issue.
4. Perform a clean boot
- Go to the search box.
- Type msconfig.

- Select System Configuration.
- Find the Services tab.

- Select Hide all Microsoft services box.

- Click Disable all.

- Go to the Startup tab.
- Click Open Task Manager.

- Close Task Manager, then click OK.
- Reboot your computer.
Performing a clean boot for your computer reduces conflicts related to software that can bring up the root causes of the Shift key not working.
These conflicts can be caused by applications and services that start up and run in the background whenever you start Windows normally.
In order to successfully perform a clean boot on Windows 10, you have to be logged on as the administrator, then follow the above procedure.
You will have a clean boot environment after all these steps are carefully followed, after which you can try and check if the Shift key not working problem is gone.
Can’t open Task Manager? Don’t worry, we’ve got the right solution for you.
5. Perform an Automatic Repair
- Insert the Windows installation disk or USB drive, then restart your computer. You will see a message requesting you to Press any key to boot from DVD.
- Do so and press any key to boot from DVD.
- Once you see the Install Windows page displayed, click Repair your computer to start Windows Recovery Environment (WinRE).
- In WinRE, go to Choose an option screen.
- Click Troubleshoot.

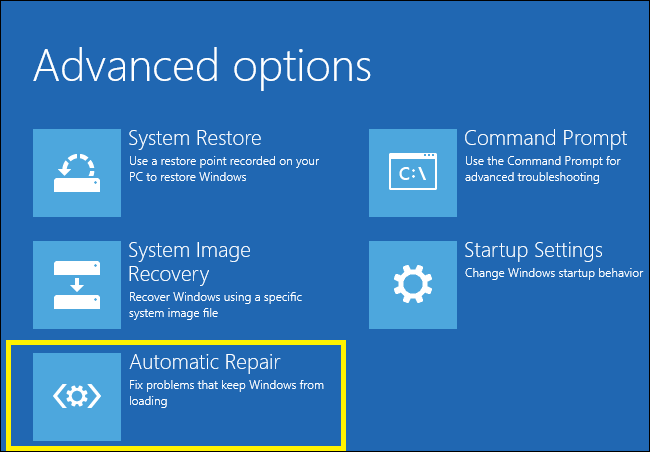
- Click Advanced Options.

- Click Automatic Repair.

In order to do this, you need to download Windows 10 ISO then create a Media Creation Tool, which you can do from another computer.
Once you have the installation media, follow the steps above. If you don’t see the Press any key to boot from DVD message, change the boot order in your BIOS settings to start from disk or USB.
Be careful when changing BIOS settings as the BIOS interface is designed for advanced computer users because you may change a setting that may prevent your computer from booting properly.
You should only update BIOS when necessary like when solving a compatibility problem. It can be complicated and render your computer inoperable in case of any errors.
Follow the steps below exactly as they are to change the boot order then perform a repair:
- In the restart process, check for any instructions on how to interrupt normal startup.
- Enter the BIOS Setup Utility. Most computers use F2, F10, ESC, or DELETE key to begin this setup.
- Find a tab in BIOS set up utility labeled Boot Order, Boot Options, or Boot.
- Use the arrow keys to go to Boot Order > press Enter.
- Locate the removable device (CD, DVD, or USB flash drive) in the Boot list.
- Use arrow keys to move the drive upwards to appear as the first in Boot list > Press Enter.
- Your boot order sequence has now been changed to boot from DVD, CD, or USB flash drive.
- Press F10 to save changes and exit the BIOS Setup Utility.
- Click Yes in the confirmation window and your computer will restart normally.
- Let the scan proceed for a few minutes to remove any malware infecting your computer.
- Select your preferred language, currency, time, keyboard, or another input method.
- Click Next > click Repair your computer.
- Choose the operating system you want to repair (in this case Windows 10) > Click Next on the Choose an option screen.
- Select Troubleshoot.

- Select Advanced Options.

- Click System Restore or Startup Repair.

Once the repair is complete, check whether Windows 10 will not boot issue goes away, otherwise try the next solution.
Did any of these solutions help you fix the Yellow Screen of Death in Windows 10? Let us know in the comments section below.


User forum
0 messages