Accidentally Disabled All MSCONFIG Services: How to Restore
Log back into your PC with restore methods

If you have accidentally disabled all services in MSCONFIG, many users on Microsoft’s forums have experienced the same issue. This can prevent you from logging into your PC and may even cause BSoDs or system crashes.
These services are essential for keeping Windows stable and functional. In this guide, we’ll explain how to re-enable all MSCONFIG services and get your system working normally again.
What can I do if I accidentally disabled all services MSCONFIG?
Table of contents
- What can I do if I accidentally disabled all services MSCONFIG?
- 1. Perform Startup Repair
- 2. Enable MSCONFIG services using a different account
- 3. Replace the on-screen keyboard with CMD
- 4. Perform a System Restore
- 5. Boot into Safe Mode with Networking
- 6. Use the Registry Editor to Re-enable Services
- 7. Restore Services from a Backup of services.msc Settings
- 8. Use DISM and SFC to Repair System Files
- 9. Revert MSCONFIG Changes via Command Prompt
- 10. Reset your PC
1. Perform Startup Repair
- Turn off your PC.
- Turn on your PC and press the F10 key when the first screen appears. The key could be different for different brands of PCs.
- Select Troubleshoot.

- Choose Advanced Options.

- Select Startup Repair.

- Wait for the process to complete, and do not interrupt the process.
Startup Repair or Automatic Repair is an inbuilt tool that fixes startup-related problems of your PC automatically.
It fixes missing or damaged system files preventing your PC from booting up. Once the process completes, your PC should boot up normally.
2. Enable MSCONFIG services using a different account
- Sign in to your other account that doesn’t require any password.
- Press Win + R keys to open the Run dialogue.
- Type msconfig and press Enter.

- Switch to the Services tab.

- Click on Enable all.

- Click Apply and OK.
This would work for users who have created one extra account on their PCs. You should ensure that at least one account doesn’t require password access, as this could help if you have disabled all services in the MSCONFIG situation.
3. Replace the on-screen keyboard with CMD
- Turn off your PC.
- Turn on your PC and press the F10 key when the first screen appears. The key could be different for different brands of PCs.
- Select Troubleshoot.
- Choose Advanced Options.
- Select Command Prompt.

- Run the below command to know the partition letter where you have installed Windows OS.
BCDEDIT - Execute the below commands to change the directory.
C:/cd Windowscd System32 - Replace the on-screen keyboard app by running the below command.
ren osk.exe osk.exe.bak - Copy the command prompt to osk.exe by running the below command.
copy cmd.exe osk.exe - Restart your PC.
- In the Windows login screen, click on the on-screen keyboard icon.
- This will trigger the Command Prompt.
- Type the below command to open MSCONFIG.
msconfig
- Select Normal startup.

- Click OK.
- Reboot your PC.
This option helped a lot of users who accidentally disabled MSCONFIG.
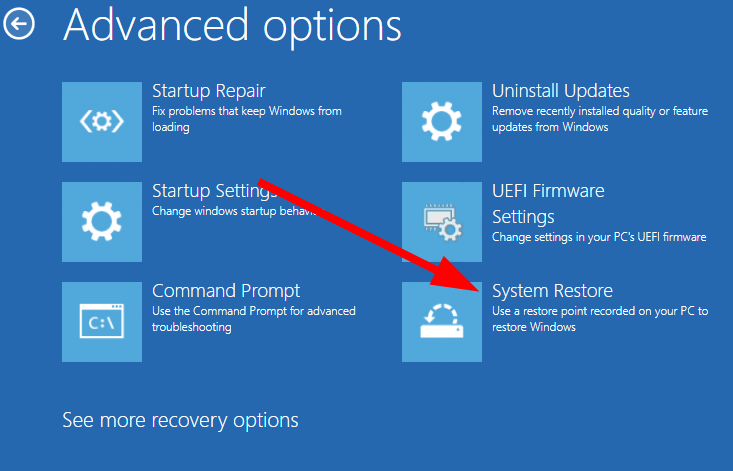
4. Perform a System Restore
- Turn off your PC.
- Turn on your PC and press the F10 key when the first screen appears.
- Choose Troubleshoot.
- Select Advanced Options.
- Select the System Restore option.
- Select the restore point.
- Click Next.
- Wait for the process to complete and check whether this resolves the issue.
Do note that for System Restore or this method to work, you should already create a system restore point on your PC.
If you do not know how to do that, you should check out our guide that explains 3 methods to create a restore point on your PC.
5. Boot into Safe Mode with Networking
- Restart your PC and press F8 (or Shift + F8) before Windows loads.
- Select Safe Mode with Networking.

- Once inside, open MSCONFIG and re-enable the necessary services.

Why it works: Safe Mode loads only essential drivers, letting you undo the change without triggering crashes.
6. Use the Registry Editor to Re-enable Services
- Boot into Safe Mode or from a Windows installation USB.
- Press Shift + F10 to open Command Prompt.
- Type regedit and press Enter.

- Navigate to HKEY_LOCAL_MACHINE\SYSTEM\CurrentControlSet\Services.
- Find and modify the Start values of critical services (set them back to 2 for automatic).
Why it works: MSCONFIG changes are stored in the registry, so editing them directly can restore service startup.
7. Restore Services from a Backup of services.msc Settings
- If you previously exported your service configuration:
- Open Services (services.msc).
- Go to Action > Import Configuration (if available) or reapply settings manually.
- If not, you can copy service start types from a working Windows machine and apply them.
8. Use DISM and SFC to Repair System Files
- Boot from Windows installation media.
- Open Command Prompt and run:
- sfc /scannow /offbootdir=C:\ /offwindir=C:\Windows
- DISM /Image:C:\ /Cleanup-Image /RestoreHealth
Why it works: Repairs corrupted or altered service configurations so Windows can boot normally.
9. Revert MSCONFIG Changes via Command Prompt
- Boot from installation media.
- Open Command Prompt.
- Type bcdedit /deletevalue {current} safeboot.
- Then run msconfig and re-enable services.
10. Reset your PC
- Turn off your PC.
- Turn on your PC and press the F10 key when the first screen appears.
- Choose Troubleshoot.
- Select the Reset this PC option.

- Choose Keep my files.

- Follow the on-screen prompts to complete the reset process.
- Wait for the process to complete.
As a last resort, if nothing works, you should opt to reset your PC. You can follow the above process and safely reset your PC and get back your PC in normal working condition.
That is it from us in this guide. You can check out our guide that lists different ways to access MSCONFIG on your PC.
This isn’t the only issue you can encounter, and many users reported that the Apply button is grayed out in msconfig, but we have a guide to fix that.
We have also correctly explained how to use the System Configuration tool on Windows 10. Feel free to let us know in the comments below which one of the above solutions resolved your problem.
Read our disclosure page to find out how can you help Windows Report sustain the editorial team. Read more


Improve this guide


User forum
2 messages